# 1auth
> Passkey-based authentication and transaction signing for smart accounts.
## Architecture
Understanding how 1auth components work together to provide secure, gasless authentication and transactions.
### Overview
1auth is built on top of the [Rhinestone SDK](https://docs.rhinestone.dev/home/introduction/welcome-to-rhinestone), adding a passkey-based authentication layer to Rhinestone's chain abstraction and smart account infrastructure. The result: fully chain-abstracted accounts secured by passkeys.
1. **Security through passkeys** - WebAuthn provides hardware-backed, biometric authentication
2. **Full chain abstraction** - One account, one balance, works across all supported chains
3. **Simplicity through abstraction** - Complex blockchain operations are hidden from users
4. **Flexibility through standards** - Built on [ERC-7579](https://erc7579.com) modular accounts with EIP-1193 compatibility for wide tooling support
### System Components
### 1auth Service
The 1auth service runs at `passkey.1auth.app` and consists of two main parts:
#### Passkey Provider (iframe)
The passkey provider runs in a secure iframe embedded in your application and handles all WebAuthn operations:
* Passkey registration and authentication
* EIP-712 typed data signing
* Intent preparation and user approval
* Session persistence across origins
The iframe architecture ensures that passkey credentials are never exposed to the parent application, providing an additional layer of security.
:::note[White-Labeling]
The `passkey.1auth.app` domain can be whitelabeled to your own domain, so the wallet experience is fully branded and siloed to your application. Contact us for whitelabel setup.
:::
##### Cross-App Session Persistence
Because the passkey provider runs on a dedicated domain (`passkey.1auth.app`), users stay logged in across all apps that integrate 1auth. Session state is stored in the provider's localStorage and cookies, separate from each app's origin.
This means:
* **One login, many apps** - Users authenticate once and are recognized across all 1auth-powered apps
* **No unnecessary repeated passkey prompts** - Returning users get a seamless experience
* **App isolation** - Individual apps never access session data directly; they communicate through the secure iframe
#### 1auth Backend
The backend integrates the [Rhinestone Orchestrator SDK](https://docs.rhinestone.dev) to handle onchain execution:
* Receives signed intents from the passkey provider
* Uses Rhinestone SDK to convert intents into executable transactions
* Submits transactions across multiple chains
* Handles gas sponsorship and transaction monitoring
### Chain Abstraction
1auth accounts are fully chain abstracted, powered by the Rhinestone SDK. Users interact with a single account that works seamlessly across all supported chains:
| Feature | Description |
| ------------------------- | ------------------------------------------------------------------- |
| **Cross-chain execution** | Execute transactions on any supported chain from a single signature |
| **Unified balances** | Users see aggregated balances across chains |
| **Automatic bridging** | Assets are bridged as needed to fulfill transactions |
| **Gas sponsorship** | Users never need native tokens for gas |
| **MEV protection** | Transactions are protected from front-running and sandwich attacks |
### Crosschain Keystore
The 1auth keystore maps a user's passkey-secured identity to their smart account ownership across supported chains. Instead of asking users to register and recover accounts chain-by-chain, 1auth keeps ownership changes coordinated so the same passkey and recovery configuration can apply wherever the account is used.
This is what lets a recovered account regain access across chains with one authorization. The passkey remains the user's signing root, while the onchain account configuration gives every supported chain the same view of who can sign and who can authorize recovery.
### Smart Account
Each user gets a fully [self-custodial](/self-custody) smart contract account that supports modular functionality via [ERC-7579](https://erc7579.com). The account is controlled by a passkey validator module that verifies WebAuthn signatures onchain—only the user can authorize transactions.
Key features:
* Counterfactual deployment (account exists before first transaction)
* Modular architecture for extensibility
* Same address on EVM chains
### Request Flow
1. **User Action** - User clicks PayButton or initiates transaction in your app
2. **SDK Request** - 1auth SDK sends the transaction request to the passkey provider iframe
3. **Passkey Signing** - User reviews and authenticates with Face ID/Touch ID
4. **Backend Processing** - Signed intent is sent to 1auth backend
5. **Rhinestone Execution** - Backend uses Rhinestone SDK to execute onchain
6. **Confirmation** - SDK receives confirmation, updates UI
### Learn More
* [Rhinestone Documentation](https://docs.rhinestone.dev/home/introduction/welcome-to-rhinestone) - Deep dive into the underlying infrastructure
* [Passkeys](/passkey) - How passkeys provide secure, non-custodial authentication
## FAQ
### General
#### What is 1auth?
1auth is a passkey-based authentication and transaction signing SDK for smart accounts. It lets users authenticate and sign transactions using biometrics (Face ID, Touch ID, Windows Hello) instead of seed phrases or browser extensions.
#### Do users need a wallet extension?
No. 1auth uses passkeys which are built into modern browsers and operating systems. No extensions or apps required.
#### Which chains are supported?
1auth supports any EVM-compatible chain. Transactions are executed via cross-chain intents, so users can pay from any chain.
### Accounts
#### What type of account do users get?
Each user gets a smart contract account (ERC-7579 modular account) controlled by their passkey. The account is fully self-custodial—only the user can authorize transactions.
#### Is my account address the same on every chain?
Yes. Your 1auth account has the same address on all EVM chains. You can receive funds on any chain to the same address.
#### What is chain abstraction?
Chain abstraction means users don't need to think about which chain they're on. Powered by [Rhinestone](https://rhinestone.wtf), 1auth handles bridging assets and executing transactions across chains automatically. Users see a unified balance and can pay from any chain.
#### Do I need to bridge tokens manually?
No. When you make a transaction, 1auth automatically bridges assets as needed. You never need to manually bridge or worry about having the right tokens on the right chain.
#### Can I use the same account across different apps?
Yes. Your 1auth account works across all apps that integrate 1auth. Because authentication happens on a shared provider domain (`passkey.1auth.app`), you stay logged in across apps—no need to re-authenticate for each one.
### Compatibility
#### Which browsers are supported?
Passkeys work in all modern browsers:
| Browser | Support |
| ------- | -------------------- |
| Chrome | Full support (v109+) |
| Safari | Full support (v16+) |
| Firefox | Full support (v122+) |
| Edge | Full support (v109+) |
#### Which devices support passkeys?
| Platform | Passkey Storage |
| ----------- | -------------------------------------------- |
| macOS / iOS | iCloud Keychain (syncs across Apple devices) |
| Windows | Windows Hello |
#### Do password managers work with passkeys?
Yes. These password managers support passkey storage and sync:
| Password Manager | Passkey Support |
| ---------------- | ---------------------- |
| 1Password | Full support |
| Bitwarden | Full support |
| iCloud Keychain | Native (Apple devices) |
Using a password manager lets you sync passkeys across all your devices and browsers.
### Integration
#### Do I need viem or wagmi?
No. The React components work standalone without any web3 libraries. If you already use viem/wagmi, we provide adapters for those too.
#### Can I test against 1auth from localhost?
No. Passkeys (WebAuthn) require a [secure context](https://developer.mozilla.org/en-US/docs/Web/Security/Secure_Contexts), and browsers block passkey operations on plain `http://` origins other than `localhost` itself. Because 1auth authenticates on a separate provider domain (`passkey.1auth.app`), the cross-origin iframe and credential scoping make `http://localhost` unreliable or non-functional for the full authentication flow.
To develop locally, use one of these approaches:
* **Self-signed certificate + `/etc/hosts`** — Generate a self-signed TLS cert, add an entry like `127.0.0.1 local.myapp.dev` to `/etc/hosts`, and serve your app over HTTPS on that hostname.
* **[Tailscale](https://tailscale.com/kb/1153/enabling-https/)** — Tailscale can provision valid HTTPS certificates for your machine via `tailscale cert`, giving you a `*.ts.net` domain that works out of the box.
* **[Caddy](https://caddyserver.com/)** — Use Caddy as a local reverse proxy; it automatically provisions locally-trusted TLS certificates.
#### Is there a testnet?
Yes. Pass `testnets: true` when creating your client to operate on testnet chains only:
```tsx
const client = new OneAuthClient({ testnets: true });
```
### Security
#### How are passkeys secured?
Passkeys use public key cryptography. The private key never leaves the user's device and is protected by the device's secure enclave (TPM, Secure Enclave, etc.).
#### What happens if a user loses their device?
Passkeys sync across devices via iCloud Keychain, Google Password Manager, or Windows Hello. Users can also register multiple passkeys as backup.
## Introduction
Passkey-based authentication and transaction signing for smart accounts. Build secure, gasless, cross-chain applications without the complexity.
### What is 1auth?
1auth provides a complete authentication and transaction signing solution built on top of WebAuthn passkeys and smart contract accounts. It enables your users to interact with blockchain applications using just their device's biometrics - no seed phrases, no browser extensions, no gas fees.
### Motivation
Traditional wallet experiences create friction at every step. Users must manage seed phrases, install browser extensions, manage gas tokens, and understand complex blockchain concepts before they can interact with applications. The goal of 1auth is to abstract all this with a simple, but powerful, embedded wallet solution that leverages passkeys.
Passkeys are an open source tool that any developer can leverage. So why use 1auth? Building a produciton-ready passkey wallet from scratch is hard:
* **Key recovery** - If a user loses their device, how do they regain access? Passkeys sync across devices via platform providers (such as iCloud and Google), but coordinating this with onchain accounts in a self-custodial manner requires careful architecture.
* **Crosschain key management (i.e., keystore)** - Passkey credentials must be mapped to smart account ownership across multiple chains, with proper validation methods deployed and maintained onchain.
* **Crosschain complexity** - A single user action might require bridging assets, managing random gas tekens to execute on a different chain, and monitoring multiple transactions.
* **Gas abstraction** - Users shouldn't need native tokens on every chain. Sponsoring gas requires paymaster integration and infrastructure across all supported chains.
1auth handles all of this so you can focus on your application.
### The advantages of 1auth
* **Full self-custody** - Users hold their own keys in device secure hardware. 1auth never has access to private key material.
* **Transact on any chain** - One account works across all supported chains with automatic bridging and unified balances.
* **No seed phrases, no extensions** - Users authenticate with Face ID or Touch ID, in any modern browser.
* **Gasless by default** - Transactions are sponsored. Users never need native tokens.
### 1auth Use Cases
#### Fintechs
Build applications with crypto functionality while maintaining a non-custodial architecture. Because 1auth never holds keys, your application can align with unhosted wallet classifications under MiCA, SEC, and FinCEN frameworks. See [Self-Custody & Compliance](/self-custody).
#### Crypto Consumer Apps
Create a clean new user onboarding experience using familiar web2 flows (Oauth, SSO, etc) that is fully self-custodial, highly performant (with transaction signing local to the user), and with great economics (passkeys leverage existing device hardware at zero infrastructure cost).
#### DeFi Onboarding
Bring new users into DeFi without the traditional wallet setup barrier. 1auth's EIP-1193 provider works with viem, wagmi, and ethers, so you can integrate with existing DeFi tooling while offering a Web2-like sign-up experience.
#### Multi-Chain Applications
Build applications that work across chains without users managing multiple wallets or bridging assets manually. 1auth accounts have unified balances and execute transactions on any supported chain from a single signature.
#### Agents
Generate wallets for AI agents or enable co-piloted self-custodial wallets between your users and agents using session keys for scoped agent spending authorisations.
### Self-Custody
1auth is built on a fully self-custodial architecture. Private keys are generated and stored exclusively in the user's device secure hardware (Secure Enclave, TPM). 1auth cannot access, reconstruct, or use private keys—and cannot sign transactions or censor users on their behalf.
This means users have true ownership of their assets with no third-party risk, while developers benefit from reduced compliance burden.
[Learn more about Self-Custody & Compliance →](/self-custody)
## Why Passkeys
Passkeys are the foundation of 1auth's security model. They provide a user-friendly alternative to passwords and seed phrases, while ensuring your users maintain full custody of their private keys.
### What are Passkeys?
Passkeys are a modern authentication standard based on [WebAuthn (FIDO2)](https://www.w3.org/TR/webauthn-2/). Instead of remembering passwords or securing seed phrases, users authenticate with their device's built-in biometrics:
* **Face ID** or **Touch ID** on Apple devices
* **Windows Hello** on Windows devices
* **Fingerprint sensors** on Android devices
Each passkey is bound to a specific domain and protected by the device's secure hardware. They cannot be reused on a different site, which makes credential theft through fake websites ineffective.
### How Passkeys Work
Passkeys use public key cryptography:
1. **Registration**: When a user creates an account, their device generates a key pair. The private key is stored in secure hardware (Secure Enclave, TPM), while the public key is sent to the server.
2. **Authentication**: When signing in or signing a transaction, the server sends a challenge. The device signs this challenge with the private key after biometric verification.
3. **Verification**: The server verifies the signature using the stored public key.
The critical point: **the private key never leaves the device**. The server only ever sees the public key and signed challenges.
```
┌─────────────────────────────────────────────────────────┐
│ User's Device │
│ │
│ ┌──────────────────┐ ┌─────────────────────────┐ │
│ │ Biometric │ │ Secure Hardware │ │
│ │ Verification │─────▶│ (Secure Enclave) │ │
│ │ │ │ │ │
│ │ Face ID │ │ Private Key Stored │ │
│ │ Touch ID │ │ Signing Operations │ │
│ └──────────────────┘ └───────────┬─────────────┘ │
│ │ │
└────────────────────────────────────────┼────────────────┘
│ Signed Intent
▼
┌─────────────────────┐
│ 1auth Server │
│ │
│ Public Key Only │
│ No Key Material │
└─────────────────────┘
```
### Benefits
#### For Users
* **Full self-custody** - Private keys live in your device's secure hardware. No third party—including 1auth—can access or move your assets. Secure enough for anyone to use.
* **No passwords or seed phrases** - Just use Face ID or Touch ID. Nothing to remember, write down, or lose.
* **Cross-platform sync** - Passkeys sync across your devices via iCloud Keychain, Google Password Manager, or Windows Hello, so you're never locked to a single device.
* **Simple and familiar** - The same biometric experience as unlocking your phone or making an Apple Pay purchase.
#### For Developers
* **Self-custody = regulatory hedge** - Because users hold their own keys, your application can align with non-custodial wallet classifications. No custody license required.
* **Clean user onboarding** - No wallet downloads, no seed phrase UX, no browser extension requirements. Users sign up with a single biometric prompt.
* **Fast conversion** - Users are more likely to complete sign-up without password friction or extension install steps.
* **Cost-effective** - No MPC infrastructure, no key management servers, no HSMs. Passkeys leverage existing device hardware at zero infrastructure cost.
* **Standard browser APIs** - WebAuthn is supported in all modern browsers with no dependencies.
### Passkey Support
Passkey support is effectively universal on modern hardware.
| Platform | Passkey Support | Source |
| --------------- | --------------- | ---------------------------------------------------- |
| **iOS / macOS** | 95%+ | [passkeys.dev](https://passkeys.dev/device-support/) |
| **Android** | 95%+ | [passkeys.dev](https://passkeys.dev/device-support/) |
| **Windows** | \~75% | [passkeys.dev](https://passkeys.dev/device-support/) |
:::note[Windows Support]
TPM 2.0—which enables Windows Hello and passkey support—has been built into essentially all CPUs since 2015 (Intel PTT, AMD fTPM). Microsoft **mandated** it for all new Windows device certifications **starting 2016**.
:::
#### Password Manager Support
Major password managers also support passkey storage and sync, extending coverage beyond platform-native implementations:
| Password Manager | Passkey Support |
| ---------------- | ------------------------------- |
| **1Password** | Full support (all platforms) |
| **Dashlane** | Full support (all platforms) |
| **Bitwarden** | Full support (all platforms) |
| **Enpass** | Full support (desktop + mobile) |
| **NordPass** | Full support (all platforms) |
This means users can store and sync passkeys through their preferred password manager, independent of their device platform.
### How 1auth Uses Passkeys
1auth leverages passkeys throughout the authentication and transaction flow:
1. **Account Creation** - User registers a passkey, creating a smart account controlled by that passkey
2. **Authentication** - Users authenticate with biometrics via WebAuthn
3. **Transaction Signing** - EIP-712 typed data is signed using the passkey's private key
4. **Cross-Origin Security** - The passkey provider runs in a secure iframe, isolating credentials from your application
This architecture ensures that even if your application is compromised, the user's private keys remain protected in their device's secure hardware.
## Quick Start
::::steps
#### Install the SDK
:::code-group
```bash [npm]
npm install @rhinestone/1auth
```
```bash [yarn]
yarn add @rhinestone/1auth
```
```bash [pnpm]
pnpm add @rhinestone/1auth
```
:::
#### Get a JWT signing key
Every user intent is authenticated with your app's JWT — there is no
anonymous fallback. Create an app in the
[Rhinestone dashboard](https://dashboard.rhinestone.dev) to generate a
signing key, then expose two same-origin endpoints that mint the JWTs the
SDK attaches to each intent. See [Fee Sponsorship](/guides/fee-sponsorship)
for the full server setup.
#### Initialize Client
```tsx
import { OneAuthClient } from '@rhinestone/1auth';
const client = new OneAuthClient({
providerUrl: 'https://passkey.1auth.app',
// Required for intents — points at the endpoints you created above.
sponsorship: {
accessTokenUrl: '/api/sponsorship/access-token',
extensionTokenUrl: '/api/sponsorship/extension-token',
},
});
```
:::tip
A client without `sponsorship` configured rejects every `sendIntent` call
with `MISSING_APP_CREDENTIALS`. See [Fee Sponsorship](/guides/fee-sponsorship)
to wire up the token endpoints.
:::
::::
### Next Steps
### References
* [API Reference](/sdk) - Full SDK documentation
* [RPC Reference](/rpc) - EIP-1193 provider methods
* [npm](https://www.npmjs.com/package/@rhinestone/1auth) - Install the SDK package
* [Example App](https://github.com/rhinestonewtf/1auth-example-app) - Reference integration
## Self-Custody & Compliance
Passkeys enable true self-custody of crypto assets, which has significant implications for regulatory compliance.
### Self-Custody Tests
1auth's architecture passes the key tests that distinguish a self-custodial wallet from a custodial service:
| Test | 1auth |
| ----------------------------------------- | ------------------------------------------------------------------------------------------------------------------------------------------------------------------------------ |
| **Provider cannot access private keys** | Keys are generated and stored exclusively in user device hardware (Secure Enclave, TPM). 1auth never sees key material. |
| **Provider cannot sign transactions** | All signing happens on-device via WebAuthn. 1auth has no technical ability to produce valid signatures. |
| **Provider cannot censor or block users** | 1auth cannot prevent a user from signing or submitting transactions. Users can also interact with their smart account directly onchain. |
| **Provider cannot freeze or seize funds** | Assets are held in user-owned smart contract accounts. 1auth has no admin keys or backdoors. |
| **User can recover access independently** | Passkeys sync across devices via platform providers (iCloud Keychain, Google Password Manager). Users can also add backup passkeys or recovery modules to their smart account. |
| Test | 1auth |
| ------------------------------------------------------------------------------------- | ------------------------------------------------------------------------------------------------------------------------------------------------------------------------------------------------ |
| **The "Reconstruction" Test:** Provider cannot access or reconstruct the private keys | Keys are generated and stored exclusively in user device hardware (Secure Enclave, TPM). 1auth never sees the key material. |
| **The "Seizure" Test:** Provider cannot sign transactions or withdraw funds | All signing happens on-device via WebAuthn. 1auth has no technical ability to produce valid signatures. |
| **The "Censorship" Test:** Provider cannot block users | 1auth cannot prevent a user from signing or submitting transactions. Users can also interact with their smart account directly onchain. |
| **The "Independency" Test:** User can recover access independently | Passkeys sync across devices via platform providers (iCloud Keychain, Google Password Manager). 1auth also provides a recovery module with a recovery path that is independent of 1auth systems. |
#### Portability
A common concern with any wallet provider: what happens if the service shuts down?
* **Passkeys are synced by platform providers** - iCloud Keychain, Google Password Manager, and password managers like 1Password store and sync passkeys independently of 1auth.
* **Smart accounts are onchain** - User accounts exist as smart contracts on public blockchains. They continue to function regardless of whether 1auth's service is running.
* **Direct onchain interaction** - Users can interact with their smart account directly through any EVM-compatible tool (e.g., Etherscan, Cast) using their passkey-derived signature.
* **Module-based recovery** - Users can install recovery modules (social recovery, backup keys) on their smart account for additional portability.
### Regulatory Framework Alignment
This self-custodial design aligns with major regulatory frameworks:
**European Union (MiCA)**
* Custody requires safekeeping crypto-assets or means of access (like private keys)
* 1auth doesn't hold assets or keys—users retain exclusive control
* Meets requirements for non-custodial service classification
**United States (SEC/FinCEN)**
* Guidance distinguishes "hosted" (custodial) from "unhosted" (non-custodial) wallets
* Unhosted wallets: users independently control keys and transact directly
* 1auth's architecture aligns with unhosted wallet classification
### What This Means for You
| Stakeholder | Benefit |
| --------------- | ---------------------------------------------------------------------------- |
| **Developers** | Reduced compliance burden when adding crypto functionality to your app |
| **Users** | Full ownership of assets with no third-party risk |
| **Enterprises** | Architecture compatible with self-custodial positioning in regulated markets |
### Passkeys vs Traditional Approaches
import { GrantPermissionDemo } from '../../layout'
### Overview
`OneAuthClient` is the core class of the 1auth SDK. It handles all interactions with the passkey authentication system including:
* User registration and authentication
* Transaction signing with multiple UX modes
* Cross-chain intent submission
* Token swaps
### Constructor
```tsx
import { OneAuthClient } from '@rhinestone/1auth';
const client = new OneAuthClient({
providerUrl: 'https://passkey.1auth.app',
sponsorship: {
accessTokenUrl: '/api/sponsorship/access-token',
extensionTokenUrl: '/api/sponsorship/extension-token',
},
theme: {
mode: 'dark',
accent: '#6366f1',
},
});
```
#### Config Options
| Option | Type | Required | Description |
| --------------- | ------------------- | ---------------------- | -------------------------------------------------------------------------------------------------------------------------------------------------------------------------------------------------------------------------------------------------------------------------------------------------------------------------------- |
| `providerUrl` | `string` | No | URL of the 1auth provider (defaults to `https://passkey.1auth.app`) |
| `sponsorship` | `SponsorshipConfig` | For intents and assets | Endpoints (or callbacks) that mint your app's JWT. Required for `sendIntent`, `sendBatchIntent`, `grantPermissions`, and `getAssets` — without it the SDK throws `MISSING_APP_CREDENTIALS`. Get a signing key from the [Rhinestone dashboard](https://dashboard.rhinestone.dev); see [Fee Sponsorship](/guides/fee-sponsorship). |
| `dialogUrl` | `string` | No | URL for the dialog UI (defaults to `providerUrl`) |
| `redirectUrl` | `string` | No | Redirect target for redirect flow |
| `theme` | `ThemeConfig` | No | UI customization options |
| `blind_signing` | `boolean` | No | Hide the 1auth signing review iframe for supported signing calls. The browser WebAuthn prompt still appears. |
| `testnets` | `boolean` | No | When `true`, chain queries prefer testnets. `wallet_getAssets` always returns grouped mainnet and testnet balances. |
| `prewarm` | `boolean` | No | When `true`, schedules a one-time [`prewarm()`](#prewarm) on an idle callback after construction. Off by default — prefer calling `prewarm()` on button hover/focus. |
### Authentication Methods
#### authWithModal
Opens a combined sign-in/sign-up modal:
```tsx
const result = await client.authWithModal();
if (result.success) {
console.log('User:', result.user?.username);
console.log('Address:', result.user?.address); // typed `0x${string}`
}
```
#### authenticate
Authenticate with optional challenge signing:
```tsx
const result = await client.authenticate({
challenge: '0x...', // Optional: sign a challenge
});
```
### Asset Methods
#### getAssets
Fetches a unified portfolio across mainnets and testnets by account address.
This uses your configured `sponsorship.accessToken` to send an app JWT to the
1auth provider before any balance data is returned.
```tsx
const assets = await client.getAssets({
accountAddress: '0x1111111111111111111111111111111111111111',
});
console.log('All balances:', assets.balances);
console.log('Mainnet balances:', assets.mainnets.balances);
console.log('Testnet balances:', assets.testnets.balances);
```
### Signing Methods
Multiple UX modes for transaction signing:
#### signWithModal
Full-screen modal with transaction details:
```tsx
const result = await client.signWithModal({
accountAddress: '0x...',
challenge: '0x...',
description: 'Review and sign',
transaction: {
actions: [{ type: 'custom', label: 'Approve action' }],
},
});
```
#### signWithPopup
Opens signing in a popup window:
```tsx
const result = await client.signWithPopup({
accountAddress: '0x...',
challenge: '0x...',
description: 'Review and sign',
});
```
#### signWithEmbed
Embeds signing UI in your page:
```tsx
const result = await client.signWithEmbed({
accountAddress: '0x...',
challenge: '0x...',
description: 'Review and sign',
}, {
container: document.getElementById('signing-container')!,
});
```
#### blind\_signing
Set `blind_signing: true` on the client to hide the 1auth review iframe
for supported signing flows and start the passkey ceremony immediately.
The browser's WebAuthn prompt is still shown.
```tsx
const client = new OneAuthClient({
providerUrl: 'https://passkey.1auth.app',
blind_signing: true,
});
const result = await client.sendIntent({
accountAddress: '0x...',
targetChain: 8453,
calls: [{ to: '0x...', data: '0x...' }],
});
```
Per-call options can override the client default:
```tsx
await client.signTypedData({
accountAddress: '0x...',
domain,
types,
primaryType,
message,
blind_signing: false,
});
```
Blind signing applies to `sendIntent`, `sendBatchIntent`,
`signMessage`, `signTypedData`, and `signWithModal`. It does not apply
to signup, login, recovery, or permission-grant dialogs. See
[Clear Signing](/guides/clear-signing) for the visible review UI opt-out
path and failure behavior.
### Intent Execution
#### sendIntent
Submit cross-chain intents to the Rhinestone orchestrator.
```tsx
const result = await client.sendIntent({
accountAddress: '0x...',
targetChain: 8453,
calls: [
{
to: '0x...',
data: '0x...',
value: parseEther('0.1'),
label: 'Mint NFT', // Optional — shown in the sign dialog
sublabel: '0.10 USDC',
icon: 'https://your-app.example/nft.svg', // Optional fallback icon
},
],
closeOn: 'completed',
});
if (result.success) {
console.log('TX Hash:', result.transactionHash);
}
```
Each call in `calls` is an `IntentCall` and accepts four optional UI fields:
| Field | Description |
| ---------- | --------------------------------------------------------------------------------------------------------------------------------------------------------------------------------------------------------------------------------------------------------------------------------------------------------------------------------------------------------------------------- |
| `label` | Primary line in the sign dialog action card (e.g. `"Mint NFT"`) |
| `sublabel` | Secondary line under the label (e.g. `"0.10 USDC"`) |
| `icon` | Fallback icon URL (SVG / square PNG / `data:` URL, ≤ 8 KB) shown when 1auth's built-in token registry can't resolve a logo. **Built-in icons always win** — USDC / ETH / MATIC etc. ignore `icon`. |
| `abi` | Optional ABI used by the sign dialog to render an **unverified** human-readable decode of `data` (function name + args). Same trust model as `label` / `sublabel` / `icon` — the dialog renders the decoded preview behind an "Unverified" badge and always shows the raw `to` + selector alongside as ground truth. See [Per-call ABIs](/sdk/wallet-client#per-call-abis). |
##### With Token Requests (Output-First)
Use `tokenRequests` to specify what tokens a target-chain call needs before it
executes. The orchestrator determines the optimal path to deliver them from the
user's assets across any chain.
```tsx
import { encodeFunctionData, parseUnits } from 'viem';
const USDC_BASE = '0x833589fCD6eDb6E08f4c7C32D4f71b54bdA02913';
const amount = parseUnits('100', 6);
const transferData = encodeFunctionData({
abi: erc20Abi,
functionName: 'transfer',
args: ['0xRecipient...', amount],
});
const result = await client.sendIntent({
accountAddress: '0x...',
targetChain: 8453,
calls: [
{
to: USDC_BASE,
data: transferData,
label: 'Send USDC',
sublabel: '100 USDC',
},
],
tokenRequests: [
{
token: USDC_BASE,
amount,
},
],
closeOn: 'completed',
});
```
This is ideal for app actions such as transfers, deposits, and purchases that
need an output token before execution. For a plain swap where the user only
receives the output token, call `sendIntent` with `calls: []` rather than
adding placeholder calldata.
Pass `waitForHash: true` if you need a transaction hash. Otherwise, rely on `intentId` + `getIntentStatus`.
#### grantPermissions
Grant a scoped SmartSession permission to an app-owned session key. 1auth
opens the permission review, collects the user's passkey approval, and
submits the install/enable transaction. Your app sends only the public
`sessionKeyAddress`; keep the private key in your own signer.
```tsx
import { definePermissions, OneAuthClient } from '@rhinestone/1auth';
import { generatePrivateKey, privateKeyToAccount } from 'viem/accounts';
import { parseUnits } from 'viem';
const oneAuth = new OneAuthClient({
providerUrl: 'https://passkey.1auth.app',
sponsorship: {
accessTokenUrl: '/api/sponsorship/access-token',
extensionTokenUrl: '/api/sponsorship/extension-token',
},
});
const privateKey = generatePrivateKey();
const sessionKeyAddress = privateKeyToAccount(privateKey).address;
const now = Math.floor(Date.now() / 1000);
const validUntil = now + 24 * 60 * 60;
const permissions = definePermissions({
address: mUSD,
name: 'mUSD',
abi: erc20Abi,
functions: {
mint: {
params: {
to: { condition: 'equal', value: accountAddress },
amount: { condition: 'equal', value: parseUnits('0.1', 6) },
},
},
},
});
const result = await oneAuth.grantPermissions({
accountAddress,
targetChains: [84532],
sessionKeyAddress,
validAfter: now,
validUntil,
maxUses: 25,
...permissions,
});
```
After this grant succeeds, the app can prepare and submit a matching
`mUSD.mint(accountAddress, parseUnits('0.1', 6))` intent with its
session key. That later mint does not open another 1auth user-signature
dialog; the SmartSession validator enforces the `to` and `amount`
constraints on-chain.
For bridge or cross-chain swap sessions, include a bridge claim
permission with `crossChainPermits`. Selector permissions still describe
the destination-chain calls; `crossChainPermits` describes the
source-chain Permit2 claim that funds the route.
```tsx
import {
createCrossChainPermission,
definePermissions,
resolveTokenAddress,
} from '@rhinestone/1auth';
import { parseUnits } from 'viem';
import { arbitrumSepolia, baseSepolia } from 'viem/chains';
const ARB_SEPOLIA = 421614;
const BASE_SEPOLIA = 84532;
const amount = parseUnits('0.1', 6);
const now = Math.floor(Date.now() / 1000);
const validUntil = now + 86400;
const usdcOnArb = resolveTokenAddress('USDC', ARB_SEPOLIA);
const swap = definePermissions({
address: rwaSwap,
name: 'RWASwap',
abi: rwaSwapAbi,
functions: {
swap: {
params: {
usdcIn: { condition: 'equal', value: amount },
recipient: { condition: 'equal', value: accountAddress },
},
},
},
});
const bridge = createCrossChainPermission({
from: { chain: baseSepolia, token: mUSDOnBase, maxAmount: amount },
to: { chain: arbitrumSepolia, token: usdcOnArb, recipient: accountAddress },
validAfter: BigInt(now),
validUntil: BigInt(validUntil),
settlementLayers: ['ACROSS'],
});
await oneAuth.grantPermissions({
accountAddress,
// Destination chain for swap; source chain for Permit2 claim.
targetChains: [ARB_SEPOLIA],
sourceChains: [BASE_SEPOLIA],
sessionKeyAddress,
validAfter: now,
validUntil,
maxUses: 25,
permissions: swap.permissions,
crossChainPermits: [bridge],
contracts: swap.contracts,
});
```
The source chain must be in `sourceChains`. During settlement, Permit2
verifies the claim by calling `isValidSignature` on the source-chain
account, so the SmartSession validator must be installed and enabled
there too.
#### Plain swaps
Plain swaps use `sendIntent` with an empty `calls` array and one or more
`tokenRequests`:
```tsx
import { resolveTokenAddress } from '@rhinestone/1auth';
import { parseUnits } from 'viem';
const result = await client.sendIntent({
accountAddress: '0x...',
targetChain: 8453,
calls: [],
tokenRequests: [{
token: resolveTokenAddress('USDC', 8453),
amount: parseUnits('100', 6),
}],
sourceAssets: ['ETH'],
});
```
For routes that fund target-chain execution, use `sendIntent` or
[`walletClient.sendCalls`](/sdk/wallet-client) with real calls plus explicit
`tokenRequests`. Do not pass dummy `data: '0x'` calls or self-transfers just to
make an intent shape fit.
### Utility Methods
#### getIntentStatus
Poll for transaction completion:
```tsx
const status = await client.getIntentStatus(intentId);
console.log(status.status); // 'pending' | 'completed' | 'failed'
```
#### getPasskeys
Fetch user's registered passkeys:
```tsx
const { passkeys } = await client.getPasskeys('user@example.com');
passkeys.forEach(p => console.log(p.name, p.createdAt));
```
#### setTheme
Update theme at runtime:
```tsx
client.setTheme({
accent: '#10b981',
mode: 'dark',
});
```
#### prewarm
Load the dialog ahead of the first user interaction so it opens instantly. The SDK already pre-connects (DNS/TLS) at construction; `prewarm()` goes further and loads the dialog bundle + font into a hidden iframe, so when the user opens a real dialog it paints from cache instead of doing a cold load.
Call it on a **likely-intent signal** — hover or focus of your sign-in / pay button — so pages where the user never authenticates don't pay for a cross-origin iframe:
```tsx
```
`prewarm()` is idempotent and best-effort: it never throws and never blocks a real open (a failed warm just falls back to a normal load). It resolves `true` once the dialog bundle has loaded. It loads a dedicated, side-effect-free warm route (it runs no auth flow and creates no backend state), which still warms the shared bundle every dialog flow reuses. Call `client.destroyPrewarm()` to release the hidden iframe when auth is no longer likely on the current view.
:::tip
Prefer hover/focus warming over the `prewarm: true` config flag — the flag warms on every page load (even ones with no auth), while hover/focus warms only when the user reaches for the button.
:::
### Error Handling
All methods return result objects with success/error info:
```tsx
const result = await client.sendIntent({ ... });
if (!result.success) {
console.error('Code:', result.error?.code);
console.error('Message:', result.error?.message);
}
```
### Supported Networks
1auth supports all chains in the Rhinestone orchestrator network. Query supported chains at runtime:
```tsx
import { getSupportedChains, getAllSupportedChainsAndTokens } from '@rhinestone/1auth';
// Get all supported chain IDs
const chains = getSupportedChains();
// Get chains with their supported tokens
const chainsAndTokens = getAllSupportedChainsAndTokens();
```
Mainnet chains include Ethereum, Base, Arbitrum, Optimism, Polygon, and others. The `targetChain` parameter in `sendIntent()` accepts any supported chain ID.
### Transaction Lifecycle
When you call `sendIntent()`, the transaction progresses through these stages:
| Status | Description |
| -------------- | ------------------------------------------------- |
| `pending` | Intent created, waiting for quote |
| `quoted` | Quote received from orchestrator |
| `signed` | User has signed with their passkey |
| `submitted` | Submitted to the Rhinestone orchestrator |
| `claimed` | A solver has claimed the intent |
| `preconfirmed` | Pre-confirmation received (typically \< 1 second) |
| `filled` | Transaction filled on the target chain |
| `completed` | Fully confirmed on-chain |
| `failed` | Intent failed |
| `expired` | Intent expired before execution |
The `closeOn` option controls when `sendIntent()` resolves:
* `"preconfirmed"` (default) — Resolves quickly, recommended for most use cases
* `"claimed"` — Resolves at first solver claim (fastest, less certain)
* `"filled"` — Resolves when the transaction hits the target chain
* `"completed"` — Waits for full on-chain confirmation (slowest)
For a transaction hash, pass `waitForHash: true` or poll with `getIntentStatus()` after the intent resolves.
### Notes
* Create one client instance and reuse it
* Use the `closeOn` parameter to control when promises resolve
* The client handles all WebAuthn and passkey operations internally
* `signMessage` and `signTypedData` require a passkey session (call `authWithModal()` first)
* If you see `401` from `/api/sign/options`, your session cookie is missing or blocked
import { WalletConnectDemo } from "../../layout"
### Try it
### Overview
`createOneAuthConnection` is the ergonomic front door for connecting a user and getting
back a ready-to-use EIP-1193 provider plus the connected `{ address, signerType }`.
**By default the app gets 1auth smart accounts + intents** (passkey signer). Offering a
**traditional wallet** (WalletConnect / injected — RainbowKit-style) as the account signer
is **opt-in** via `eoaConnect: true` — only then does the dialog show the "Continue with
wallet" option, and picking it connects the EOA as the signer (no 1auth account is
created). Passkey selection is unchanged either way.
When the user picks a traditional wallet (an EOA), the returned provider forwards
`eth_sendTransaction` / `personal_sign` / `signTypedData` / `wallet_sendCalls` **straight
to that wallet's native RPC — no Rhinestone intents**. When they pick a passkey,
transactions route through 1auth intents exactly as they do everywhere else. Your app
writes **one** downstream code path either way.
It composes [`OneAuthClient.connect()`](/sdk/client) and
[`createOneAuthProvider()`](/rpc) and binds the resolved session to the provider the
instant `connect()` resolves — so a transaction issued in the same tick routes correctly
without waiting for you to persist anything.
### Usage
```tsx
import { createOneAuthConnection } from '@rhinestone/1auth';
import { createWalletClient, custom } from 'viem';
import { base } from 'viem/chains';
// Omit eoaConnect (or set false) for passkey-only → 1auth smart accounts + intents.
// Set eoaConnect: true to also offer a traditional wallet (EOA, no intents).
const conn = createOneAuthConnection({ clientId: 'my-app', eoaConnect: true });
// Opens the 1auth dialog — the user picks passkey OR a traditional wallet.
const session = await conn.connect();
const walletClient = createWalletClient({
account: session.address,
chain: base,
transport: custom(session.provider),
});
// Same call for both signer types:
// - EOA (traditional wallet): sent via the wallet's native RPC, no intents
// - passkey: routed through 1auth intents
await walletClient.sendTransaction({ to: '0x…', value: 1n });
```
Branch on `signerType` when you need to:
```tsx
if (session.signerType === 'eoa') {
// Traditional wallet — single-chain, native RPC. No chain abstraction.
} else {
// 1auth passkey smart account — cross-chain intents available.
}
```
#### Reuse an existing client
```tsx
const client = new OneAuthClient({ clientId: 'my-app', sponsorship });
const conn = createOneAuthConnection({ client, defaultChainId: 8453 });
const { address, signerType, provider } = await conn.connect();
```
### Config
Accepts every [`OneAuthClient` config option](/sdk/client#config-options) plus:
| Option | Type | Required | Description |
| ----------------------------------------------------------- | --------------- | -------- | --------------------------------------------------------------------------------------------------------------------------------------------------------------------------------------------------------------- |
| `client` | `OneAuthClient` | No | Reuse a pre-built client instead of constructing one from the config. |
| `eoaConnect` | `boolean` | No | **Opt in** to offering a traditional wallet as the account signer (EOA, bypasses intents). **Defaults to `false`** — by default you get 1auth smart accounts + intents. Can be overridden per `connect()` call. |
| `defaultChainId` | `number` | No | Chain the provider reports via `eth_chainId` and uses as the default intent target. Defaults to `8453` (Base). |
| `storageKey` | `string` | No | localStorage key the session is persisted under. Defaults to `"1auth-user"`. |
| `closeOn`, `waitForHash`, `hashTimeoutMs`, `hashIntervalMs` | — | No | Forwarded to the provider for passkey intent sends. |
### Returns — `OneAuthConnection`
| Member | Type | Description |
| --------------------- | ------------------------- | ------------------------------------------------------------------------------------------- |
| `client` | `OneAuthClient` | The underlying client (escape hatch for `signMessage`, history, etc.). |
| `provider` | `OneAuthProvider` | Ready-to-use EIP-1193 provider. Stable across reconnects. |
| `connect(options?)` | `Promise` | Opens the dialog and resolves the session. Rejects (`{ code, message }`) on cancel/failure. |
| `getSession()` | `OneAuthSession \| null` | Current persisted session. Never opens a dialog. |
| `disconnect()` | `Promise` | Clears the session and emits `accountsChanged([])` / `disconnect`. |
| `subscribe(listener)` | `() => void` | Notified on connect/disconnect; returns an unsubscribe function. |
#### `OneAuthSession`
```ts
interface OneAuthSession {
signerType: 'passkey' | 'eoa';
address: `0x${string}`;
provider: OneAuthProvider;
chainId: number;
autoConnected: boolean;
}
```
### Gotcha: EOA sessions are single-chain
Cross-chain intents are **not available** for EOA (traditional-wallet) sessions — the
wallet's native RPC is single-chain by design, with no 1auth chain abstraction. Calling
`sendIntent` / `sendBatchIntent` on an EOA session fails with `E_SIGNER_UNSUPPORTED`. If
you need chain abstraction, use the passkey signer.
## API Reference
The 1auth SDK provides everything you need to add passkey authentication and transaction signing to your app.
* **React components** - Drop-in components that work standalone, no viem or wagmi required
* **Client API** - Full control over auth flows, signing, and intent execution
* **Viem/Wagmi integration** - Optional adapters for existing web3 apps
### Installation
:::code-group
```bash [npm]
npm install @rhinestone/1auth
```
```bash [yarn]
yarn add @rhinestone/1auth
```
```bash [pnpm]
pnpm add @rhinestone/1auth
```
:::
### Quick Links
#### Client
Core SDK classes for authentication and transaction signing.
* [**OneAuthClient**](/sdk/client) - Main SDK client for auth, signing, and intents
* [**Sign in with 1auth**](/sdk/sign-in) - Passkey authentication flow
* [**PayButton**](/sdk/pay-button) - One-click payment component
#### React
React components and hooks for building passkey-powered UIs.
* [**React Components & Hooks**](/sdk/react) - PayButton, BatchQueue, useBatchQueue
#### Utilities
Helper functions for signing and verification.
* [**signTypedData**](/sdk/sign-typed-data) - EIP-712 typed data signing
### Basic Example
```tsx
import { OneAuthClient } from '@rhinestone/1auth';
const client = new OneAuthClient({
providerUrl: 'https://passkey.1auth.app',
});
// Authenticate
const auth = await client.authWithModal();
if (auth.success) {
console.log('Logged in as:', auth.username);
}
// Send a transaction
const result = await client.sendIntent({
username: auth.username,
targetChain: 8453,
calls: [{ to: '0x...', value: parseEther('0.1') }],
});
```
import { PayButtonDemo } from '../../layout'
## PayButton
One-click payment button with built-in authentication. Users click, authenticate with their passkey, and the transaction executes.
### Usage
```tsx
import { PayButton } from '@rhinestone/1auth/react';
console.log('Paid:', result.transactionHash)}
onError={(error) => console.error(error)}
/>
```
### Props
| Prop | Type | Required | Description |
| ----------- | ------------------ | -------- | --------------------------------------- |
| `client` | `OneAuthClient` | Yes | SDK client instance |
| `intent` | `IntentParams` | Yes | Transaction parameters |
| `onSuccess` | `(result) => void` | No | Called on successful transaction |
| `onError` | `(error) => void` | No | Called on error |
| `children` | `ReactNode` | No | Button text (default: "Pay with 1auth") |
| `className` | `string` | No | Custom CSS class |
| `disabled` | `boolean` | No | Disabled state |
### IntentParams
```tsx
interface IntentParams {
targetChain: number; // Chain ID to execute on
calls: IntentCall[]; // Array of calls to execute
tokenRequests?: TokenRequest[]; // Optional: tokens to receive (output-first)
}
interface IntentCall {
to: `0x${string}`; // Target contract address
value?: bigint; // ETH value to send
data?: `0x${string}`; // Encoded calldata
}
interface TokenRequest {
token: string; // ERC-20 token contract address
amount: bigint; // Amount in base units
}
```
### Examples
#### Simple Payment
```tsx
Pay $10
```
#### Contract Interaction
```tsx
{
toast.success('NFT minted!');
router.push(`/nft/${tokenId}`);
}}
>
Mint NFT
```
#### Custom Styling
```tsx
Complete Purchase
```
#### ERC20 Payment with tokenRequests
For payments in ERC20 tokens (like USDC), use `tokenRequests` to tell the orchestrator what tokens are needed. This enables cross-chain funding - users can pay even if their funds are on a different chain.
```tsx
import { encodeFunctionData, parseUnits } from 'viem';
const USDC_BASE = '0x833589fCD6eDb6E08f4c7C32D4f71b54bdA02913';
const amount = parseUnits('10', 6); // 10 USDC
const transferData = encodeFunctionData({
abi: erc20Abi,
functionName: 'transfer',
args: [merchantAddress, amount],
});
toast.success('Payment complete!')}
>
Pay 10 USDC
```
:::tip
When `tokenRequests` is specified, the orchestrator automatically bridges or swaps from any chain where the user has funds. The user doesn't need to have USDC on Base - they can pay with ETH on Arbitrum and 1auth handles the conversion.
:::
### Chain Abstraction
The user can pay from any chain they have funds on. If their balance is on Arbitrum but `targetChain` is Base, 1auth automatically bridges the assets. Users see a unified balance and never worry about which chain they're on.
import { AuthDemo, PayButtonDemo, BatchQueueDemo } from '../../layout'
## React Components
Drop-in React components for passkey authentication and crypto payments. No viem, wagmi, or web3 knowledge required.
```tsx
import { PayButton, BatchQueueProvider, BatchQueueWidget, useBatchQueue } from '@rhinestone/1auth/react';
```
### Why Use React Components?
Building a crypto-enabled app shouldn't require deep web3 expertise. Our React components abstract away the complexity:
* **No web3 libraries required** - Works without viem, wagmi, ethers, or any other dependency
* **Built-in passkey flow** - Authentication, signing, and status updates handled for you
* **Chain abstraction included** - Users pay from any chain, bridging happens automatically
* **Production-ready UI** - Styled components that work out of the box
### Overview
These components work standalone - just pass a `OneAuthClient` instance and they handle everything: wallet connection, passkey prompts, transaction signing, and status updates.
**Zero web3 boilerplate.** No provider setup, no wallet connectors, no chain configuration. Your users click a button, authenticate with their passkey, and the transaction executes.
| Export | Type | Description |
| ------------------------------------------- | --------- | -------------------------------------------------- |
| [`PayButton`](#paybutton) | Component | One-click payment button with built-in auth flow |
| [`BatchQueueProvider`](#batchqueueprovider) | Component | Context provider for queuing multiple transactions |
| [`BatchQueueWidget`](#batchqueuewidget) | Component | Floating UI to review and sign queued transactions |
| [`useBatchQueue`](#usebatchqueue) | Hook | Access batch queue state and methods |
**When to use these components:**
* **PayButton** - E-commerce checkouts, donations, tips, or any single-action payment
* **BatchQueue** - Shopping carts, multi-step workflows, or batching gas-efficient operations
All components handle the complete passkey flow internally: authentication prompts, transaction signing, and status updates.
***
### AuthDemo
Interactive authentication component with message signing.
#### Authentication
```tsx
const client = new OneAuthClient({
providerUrl: 'https://passkey.1auth.app',
});
const result = await client.authWithModal();
if (result.success) {
console.log('Connected as:', result.user?.username);
}
```
#### Message Signing
```tsx
const result = await client.signMessage({
username: 'alice',
message: `Sign in to MyApp\nTimestamp: ${Date.now()}`,
description: 'Verify your identity',
});
if (result.success) {
console.log('Signature:', result.signature);
}
```
#### SignMessageOptions
| Property | Type | Required | Description |
| ------------- | ------------------------- | -------- | ------------------------------------------- |
| `username` | `string` | Yes | Username of the signer |
| `message` | `string` | Yes | Human-readable message to sign |
| `description` | `string` | No | Description shown in dialog |
| `metadata` | `Record` | No | Additional data to display |
| `challenge` | `string` | No | Custom challenge (defaults to message hash) |
| `theme` | `ThemeConfig` | No | Theme configuration for the dialog |
***
### PayButton
One-click payment button with built-in authentication.
#### Usage
```tsx
import { PayButton } from '@rhinestone/1auth/react';
console.log('Paid:', result.transactionHash)}
onError={(error) => console.error(error)}
/>
```
#### Props
| Prop | Type | Required | Description |
| ----------- | ------------------------------------ | -------- | -------------------------------------------------------------------------------------------------- |
| `client` | `OneAuthClient` | Yes | SDK client instance |
| `intent` | `SendIntentOptions` | Yes | Transaction parameters (calls, targetChain, tokenRequests) |
| `onSuccess` | `(result: SendIntentResult) => void` | No | Called on successful transaction |
| `onError` | `(error: Error) => void` | No | Called on error |
| `closeOn` | `CloseOnStatus` | No | When to close dialog: "claimed", "preconfirmed", "filled", or "completed". Default: "preconfirmed" |
| `children` | `ReactNode` | No | Button text (default: "Pay with 1auth") |
| `className` | `string` | No | Custom CSS class |
| `style` | `React.CSSProperties` | No | Custom inline styles (merged with defaults) |
| `disabled` | `boolean` | No | Disabled state |
| `hideIcon` | `boolean` | No | Hide the fingerprint icon |
See the full [PayButton reference](/sdk/pay-button) for more details.
***
### BatchQueueProvider
Context provider for managing batched transaction queues with localStorage persistence.
#### Usage
```tsx
import { BatchQueueProvider, BatchQueueWidget } from '@rhinestone/1auth/react';
function App() {
return (
);
}
```
#### Props
| Prop | Type | Required | Description |
| ---------------- | --------------- | -------- | ------------------------------------------------------ |
| `client` | `OneAuthClient` | Yes | SDK client instance |
| `accountAddress` | `string` | No | Smart account address for signing and localStorage key |
| `username` | `string` | No | Optional username hint for legacy accounts |
| `children` | `ReactNode` | Yes | Child components |
#### Chain Validation
All calls in a batch must target the same chain:
```tsx
const { addToBatch } = useBatchQueue();
addToBatch({ to: '0x...', label: 'Action 1' }, 8453); // Base
// This will fail - different chain
const result = addToBatch({ to: '0x...', label: 'Action 2' }, 1);
if (!result.success) {
console.log(result.error); // "Batch is set to Base..."
}
```
***
### BatchQueueWidget
Floating widget UI showing queued transactions.
#### Usage
```tsx
import { BatchQueueWidget, useBatchQueue } from '@rhinestone/1auth/react';
function SignAllHandler() {
const { signAll } = useBatchQueue();
const handleSignAll = async () => {
const result = await signAll({ accountAddress: '0x...' });
if (result.success) {
console.log('All signed!', result.transactionHash);
}
};
return ;
}
```
#### Props
| Prop | Type | Required | Description |
| ----------- | ------------ | -------- | ----------------------------------- |
| `onSignAll` | `() => void` | Yes | Callback when "Sign All" is clicked |
#### Features
* Collapsible header with call counter badge
* Chain indicator for current batch
* Remove individual calls on hover
* Clear all button
* Bounce animation on new calls
* Auto-hide when queue is empty
***
### useBatchQueue
Hook to access batch queue context.
#### Usage
```tsx
import { useBatchQueue } from '@rhinestone/1auth/react';
function AddToCartButton({ item }) {
const { addToBatch, queue } = useBatchQueue();
const handleClick = () => {
const result = addToBatch(
{
to: item.contractAddress,
data: item.calldata,
label: `Buy ${item.name}`,
},
8453
);
if (!result.success) alert(result.error);
};
return ;
}
```
#### Return Value
| Property | Type | Description |
| ----------------- | ---------------------------------------------------------------------------------------------------- | ----------------------------------------- |
| `queue` | `BatchedCall[]` | Array of queued calls |
| `batchChainId` | `number \| null` | Chain ID of the batch (set by first call) |
| `addToBatch` | `(call: IntentCall, chainId: number) => { success: boolean; error?: string }` | Add a call to queue |
| `removeFromBatch` | `(id: string) => void` | Remove a specific call |
| `clearBatch` | `() => void` | Clear all calls |
| `signAll` | `(identity?: { accountAddress?: string; username?: string } \| string) => Promise` | Sign and submit all calls |
| `isSigning` | `boolean` | Whether signing is in progress |
| `isExpanded` | `boolean` | Whether the widget is expanded |
| `setExpanded` | `(expanded: boolean) => void` | Set widget expanded state |
#### BatchedCall Type
```tsx
interface BatchedCall {
id: string;
call: IntentCall;
targetChain: number;
addedAt: number;
}
```
import { AuthDemo } from '../../layout'
## Sign in with 1auth
Add passkey authentication to your app with a single method call. Users authenticate with Face ID or Touch ID - no passwords, no seed phrases.
### Authentication
```tsx
import { OneAuthClient } from '@rhinestone/1auth';
const client = new OneAuthClient({
providerUrl: 'https://passkey.1auth.app',
});
// Open the authentication modal
const result = await client.authWithModal();
if (result.success) {
console.log('Connected as:', result.user?.username);
console.log('Address:', result.user?.address); // typed `0x${string}`
}
```
### How It Works
1. **User clicks sign in** - Your app calls `authWithModal()`
2. **1auth modal opens** - User enters their username or creates a new account
3. **Passkey prompt** - Device prompts for Face ID / Touch ID
4. **Success** - You receive user details and wallet address
The entire flow happens in a secure iframe. Your app never sees the passkey credentials.
### Message Signing
Request the user to sign a message for verification:
```tsx
const result = await client.signMessage({
username: 'alice',
message: `Sign in to MyApp\nTimestamp: ${Date.now()}`,
description: 'Verify your identity',
});
if (result.success) {
console.log('Signature:', result.signature);
// Verify signature on your backend
}
```
### SignMessageOptions
| Property | Type | Required | Description |
| ------------- | ------------------------- | -------- | --------------------------------------- |
| `username` | `string` | Yes | Username of the signer |
| `message` | `string` | Yes | Human-readable message to sign |
| `description` | `string` | No | Description shown in the signing dialog |
| `metadata` | `Record` | No | Additional data to display |
### AuthResult
`authWithModal()` returns an `AuthResult`:
```tsx
import type { AuthResult } from '@rhinestone/1auth';
interface AuthResult {
success: boolean;
/** Authenticated user (present when success is true) */
user?: {
id: string;
username?: string;
address: `0x${string}`;
};
/** Error details when success is false */
error?: {
code: string; // e.g. "USER_CANCELLED"
message: string;
};
}
```
### Challenge-Based Authentication
Use `authenticate()` for server-verified login. It returns an `AuthenticateResult` — the same shape as `AuthResult` plus a `challenge` object with the cryptographic signature.
```tsx
const result = await client.authenticate({
challenge: `Login to MyApp\nTimestamp: ${Date.now()}\nNonce: ${crypto.randomUUID()}`
});
if (result.success && result.challenge) {
// Send signature + signedHash to your backend for verification
await fetch('/api/verify', {
method: 'POST',
body: JSON.stringify({
username: result.user?.username,
address: result.user?.address,
signature: result.challenge.signature,
signedHash: result.challenge.signedHash,
}),
});
}
```
#### AuthenticateResult
`authenticate()` returns an `AuthenticateResult`, which extends `AuthResult` with a `challenge` field:
```tsx
import type { AuthenticateResult } from '@rhinestone/1auth';
interface AuthenticateResult extends AuthResult {
/** Present when a challenge was provided in the options */
challenge?: {
signature: WebAuthnSignature;
signedHash: `0x${string}`;
};
}
```
### Example: Protected Route
```tsx
import { useState, useEffect } from 'react';
import { OneAuthClient } from '@rhinestone/1auth';
const client = new OneAuthClient({
providerUrl: 'https://passkey.1auth.app',
});
function App() {
const [user, setUser] = useState(null);
const handleSignIn = async () => {
const result = await client.authWithModal();
if (result.success && result.user) {
setUser({ username: result.user.username, address: result.user.address });
}
};
if (!user) {
return (
);
}
return (
Welcome, {user.username}!
Address: {user.address}
);
}
```
import { SignTypedDataDemo } from "../../layout"
## signTypedData
Sign [EIP-712](https://eips.ethereum.org/EIPS/eip-712) structured data using passkeys. Used for gasless approvals, off-chain voting, order signing, and meta-transactions.
EIP-712 provides human-readable signing - users see exactly what they're signing instead of a raw hash.
### Live Demo
### Overview
Sign EIP-712 structured data with a human-readable preview. The dialog displays:
1. **Domain info** - Application name, version, chain, and contract
2. **Message fields** - Formatted values with type-aware display
3. **Signature** - WebAuthn signature with the EIP-712 hash
### Basic Usage
You need an active passkey session before calling `signTypedData`. Use `authWithModal()` once per session.
```tsx
import { OneAuthClient } from '@rhinestone/1auth';
const client = new OneAuthClient({
providerUrl: 'https://passkey.1auth.app',
});
await client.authWithModal();
const result = await client.signTypedData({
username: 'alice',
domain: {
name: 'My dApp',
version: '1',
chainId: 8453,
verifyingContract: '0x...',
},
types: {
Vote: [
{ name: 'proposalId', type: 'uint256' },
{ name: 'support', type: 'bool' },
{ name: 'voter', type: 'address' },
],
},
primaryType: 'Vote',
message: {
proposalId: '42',
support: true,
voter: '0xd8dA6BF26964aF9D7eEd9e03E53415D37aA96045',
},
description: 'Cast your vote',
});
if (result.success) {
console.log('Signature:', result.signature);
console.log('EIP-712 Hash:', result.signedHash);
}
```
### ERC-2612 Permit Example
Sign a token approval without an onchain transaction:
```tsx
const result = await client.signTypedData({
username: 'alice',
domain: {
name: 'Dai Stablecoin',
version: '1',
chainId: 1,
verifyingContract: '0x6B175474E89094C44Da98b954EecdeCB5BE3830F',
},
types: {
Permit: [
{ name: 'owner', type: 'address' },
{ name: 'spender', type: 'address' },
{ name: 'value', type: 'uint256' },
{ name: 'nonce', type: 'uint256' },
{ name: 'deadline', type: 'uint256' },
],
},
primaryType: 'Permit',
message: {
owner: '0xabc...',
spender: '0xdef...',
value: '1000000000000000000',
nonce: '0',
deadline: '1735689600',
},
description: 'Allow spending of DAI',
});
```
### SignTypedDataOptions
| Property | Type | Required | Description |
| ------------- | ------------------------- | -------- | --------------------------- |
| `username` | `string` | Yes | Username of the signer |
| `domain` | `EIP712Domain` | Yes | EIP-712 domain parameters |
| `types` | `EIP712Types` | Yes | Type definitions |
| `primaryType` | `string` | Yes | Primary type to sign |
| `message` | `Record` | Yes | Message values |
| `description` | `string` | No | Description shown in dialog |
| `theme` | `ThemeConfig` | No | Theme override |
### EIP712Domain
| Property | Type | Required | Description |
| ------------------- | ------------- | -------- | ------------------- |
| `name` | `string` | Yes | Application name |
| `version` | `string` | Yes | Application version |
| `chainId` | `number` | No | Chain ID |
| `verifyingContract` | `0x${string}` | No | Contract address |
| `salt` | `0x${string}` | No | Salt value |
### SignTypedDataResult
| Property | Type | Description |
| ------------- | -------------------- | -------------------------------------------------- |
| `success` | `boolean` | Whether signing succeeded |
| `signature?` | `WebAuthnSignature` | The WebAuthn signature (only on success) |
| `signedHash?` | `0x${string}` | The EIP-712 hash that was signed (only on success) |
| `passkey?` | `PasskeyCredentials` | Passkey used for signing (only on success) |
| `error?` | `{ code, message }` | Error details (only on failure) |
### Use Cases
* **ERC-2612 Permits** - Gasless token approvals
* **Governance** - Off-chain voting with typed signatures
* **Order signing** - DEX limit orders (EIP-712 format)
* **Meta-transactions** - Relay-compatible signatures
### How It Works
1. The SDK sends the typed data (domain, types, message) to the sign dialog
2. The sign dialog displays the data in human-readable format for user review
3. **The sign dialog computes the EIP-712 hash locally** using viem's `hashTypedData`
4. The user signs the locally-computed hash with their passkey
5. The signature and hash are returned to your app
### Security Model
The EIP-712 hash is computed **inside the sign dialog**, not by the calling application. This ensures users sign exactly what they see displayed:
```
┌─────────────────────────────────────┐
│ Your App (SDK Client) │
│ │
│ 1. Calls client.signTypedData() │
│ 2. SDK sends typed data to dialog │
└──────────────┬──────────────────────┘
│ postMessage (typed data only)
▼
┌─────────────────────────────────────┐
│ Sign Dialog (Trusted) │
│ │
│ 3. Displays data for user review │
│ 4. Computes EIP-712 hash locally │ ◄── Hash computed HERE
│ 5. Signs hash with passkey │
│ 6. Returns signature + hash │
└─────────────────────────────────────┘
```
This prevents a malicious app from displaying one thing while getting the user to sign something different. The sign dialog is the trusted component that ensures **what you see is what you sign**.
### Overview
`PasskeyWalletClient` is a viem-compatible wallet client that extends the standard `WalletClient` with passkey-authenticated transaction signing. It provides a familiar viem API while handling all WebAuthn operations internally.
Use this when you want:
* A standard viem `WalletClient` interface
* Batched transaction support via `sendCalls()`
* Output-first token requests (specify what tokens you want to receive)
### Creating a Wallet Client
```typescript
import { createPasskeyWalletClient } from '@rhinestone/1auth';
import { base } from 'viem/chains';
import { http } from 'viem';
const walletClient = createPasskeyWalletClient({
accountAddress: '0x...', // User's smart account address
clientId: 'my-dapp',
blind_signing: false, // opt into 1auth's visible review UI
chain: base,
transport: http(),
});
```
#### Config Options
| Option | Type | Required | Description |
| ---------------- | ----------- | -------- | ------------------------------------------------------------------------------------------------------------------------------- |
| `accountAddress` | `Address` | Yes | User's smart account address |
| `username` | `string` | No | Optional username hint for legacy accounts |
| `chain` | `Chain` | Yes | viem chain configuration |
| `transport` | `Transport` | Yes | viem transport (e.g., `http()`) |
| `providerUrl` | `string` | No | URL of the 1auth provider (defaults to `https://passkey.1auth.app`) |
| `dialogUrl` | `string` | No | URL for the dialog UI |
| `blind_signing` | `boolean` | No | Hide the 1auth signing review iframe. Defaults to `true`; set `false` to opt into the visible review UI for this wallet client. |
| `waitForHash` | `boolean` | No | Wait for transaction hash before resolving (default: `true`) |
| `hashTimeoutMs` | `number` | No | Maximum time to wait for hash in ms |
| `hashIntervalMs` | `number` | No | Poll interval for hash in ms |
### sendCalls
Send multiple calls as a single batched transaction. Opens the passkey modal for user approval.
```typescript
const hash = await walletClient.sendCalls({
calls: [
{
to: '0x...', // Contract address
data: '0x...', // Encoded calldata
value: parseEther('0.1'), // Optional ETH value
label: 'Swap ETH for USDC', // Optional: shown in signing UI
sublabel: '0.1 ETH → 250 USDC', // Optional: additional context
icon: 'https://your-app.example/icons/swap.svg', // Optional fallback icon
},
],
chainId: 8453, // Optional: override chain
});
```
#### Parameters
| Property | Type | Required | Description |
| --------------- | ------------------------------------- | -------- | ----------------------------- |
| `calls` | `TransactionCall[]` | Yes | Array of calls to execute |
| `chainId` | `number` | No | Override the default chain ID |
| `tokenRequests` | `{ token: string; amount: bigint }[]` | No | Output tokens to deliver |
#### TransactionCall
| Property | Type | Required | Description |
| ---------- | -------------------- | -------- | ------------------------------------------------------------------------------------------------------------------------------------------------------------------------------------------- |
| `to` | `Address` | Yes | Target contract address |
| `data` | `Hex` | No | Encoded calldata |
| `value` | `bigint` | No | ETH value in wei |
| `label` | `string` | No | Label shown in signing UI |
| `sublabel` | `string` | No | Additional context for UI |
| `icon` | `string` | No | Fallback icon URL (SVG / square PNG / `data:` URL) shown in the sign dialog when 1auth's built-in token registry can't resolve a logo for this call. See [Per-call icons](#per-call-icons). |
| `abi` | `readonly unknown[]` | No | Optional ABI used by the sign dialog to render an unverified decode of `data` (function name + args). See [Per-call ABIs](#per-call-abis). |
#### Returns
`Promise` - The transaction hash once confirmed.
### Per-call icons
The sign dialog shows a 48px icon next to every action card. By default 1auth
resolves the icon from the token's symbol / address (USDC, ETH, MATIC …) using
a built-in registry, and falls back to a neutral letter avatar for unknown
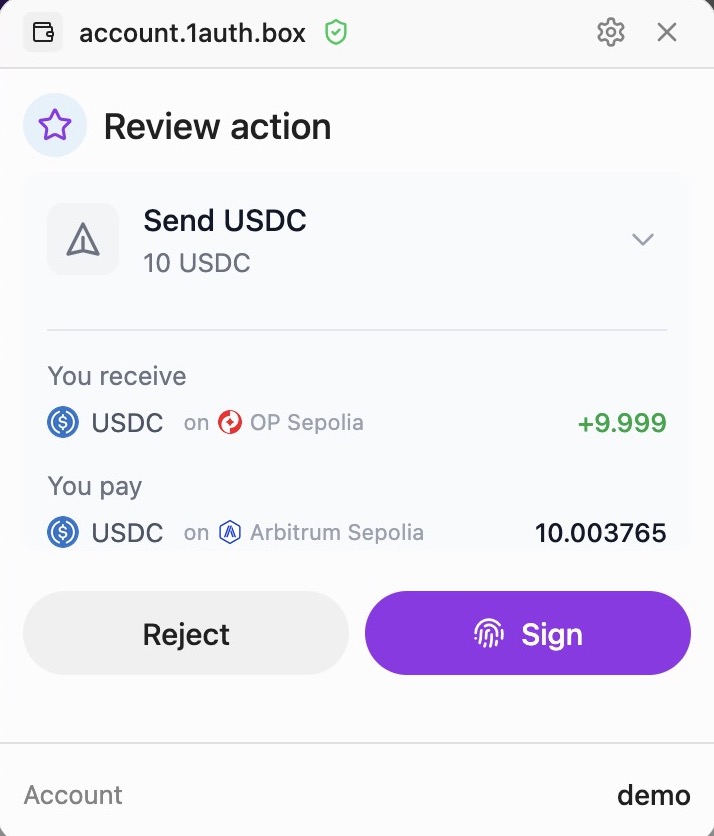
contracts.
For demos, custom NFT mints, or any contract 1auth doesn't recognise, pass
`icon` on the call so the dialog renders your glyph instead of the fallback:
```typescript
await walletClient.sendCalls({
calls: [
{
to: MOCK_NFT_ADDRESS,
data: encodeFunctionData({ abi: mockNftAbi, functionName: 'mint', args: [price] }),
label: 'Mint NFT',
sublabel: '0.10 USDC',
icon: 'https://your-app.example/nft-glyph.svg',
},
],
chainId: 421614,
});
```
#### Rules
* **Built-in icons always win.** If 1auth recognises the call's token (USDC,
ETH, …), it uses that icon and ignores `icon`. This keeps apps from
impersonating well-known assets with a custom SVG.
* **Allowed schemes**: `https://...` or `data:image/(svg+xml|png|webp|jpeg|gif);...`.
Other schemes (`http:`, `javascript:`, `file:`, …) are rejected by the
server with a 400. Maximum length 8 KB.
* **Same field on every call shape.** `IntentCall`, `TransactionCall`
(`walletClient.sendCalls`), and the EIP-1193 `wallet_sendCalls` params all
accept the same `icon?: string` field — mix and match as you would `label`
and `sublabel`.
#### Privacy note
HTTPS icon URLs are fetched directly by the user's browser when the sign
dialog renders. That leaks the user's IP, User-Agent, and Referer to
whatever host you point at — turning the icon URL into a real-time beacon
for "user is signing right now." If you don't want to make a third-party
request from inside the dialog, use a `data:image/svg+xml,…` URL instead
(the SVG is inlined into the call payload, never fetched).
### Per-call ABIs
By default the sign dialog can only decode calls whose contract+selector
is in 1auth's ERC-7730 clear-signing registry, or matches the built-in
ERC-20 fallback (`transfer` / `approve` / `transferFrom`). Calls to a
custom contract — your own marketplace, an NFT mint, a game state
update — render as `Unverified` with just the raw selector.
Pass `abi` on the call so the dialog can decode `data` into a
human-readable function signature with named arguments:
```typescript
import { encodeFunctionData } from 'viem';
const myAppAbi = [
{
name: 'mintWithReferral',
type: 'function',
inputs: [
{ name: 'tokenId', type: 'uint256' },
{ name: 'referrer', type: 'address' },
],
outputs: [{ type: 'bool' }],
},
] as const;
await walletClient.sendCalls({
calls: [
{
to: MY_NFT_ADDRESS,
data: encodeFunctionData({
abi: myAppAbi,
functionName: 'mintWithReferral',
args: [42n, referrerAddress],
}),
label: 'Mint NFT',
sublabel: '0.10 USDC',
icon: 'https://your-app.example/nft-glyph.svg',
abi: myAppAbi,
},
],
chainId: 421614,
});
```
The sign dialog's expanded action card now shows:
```
[Unverified]
mintWithReferral(uint256 tokenId, address referrer)
tokenId 42
referrer 0xabcd…1234
```
#### Trust model
`abi` is **app-supplied and unverified** — the same trust treatment as
`label`, `sublabel`, and `icon`. The dialog:
* Always renders the decoded preview behind an **amber "Unverified" badge**
so users can tell it didn't come from a verified clear-signing entry.
* Always shows the raw `to` address alongside the decode, so ground truth
is never hidden.
* **Silently drops the preview** if `decodeFunctionData` throws — e.g. when
the ABI doesn't include a function with a matching selector. The call
still goes through; it just falls back to the unverified-selector
display.
This is the same model used by `client.grantPermissions({ contracts })`'s
ABI metadata in the SmartSession review surface.
#### Rules
* **Verified entries always win.** If the call's contract+selector matches
a registry entry (ERC-7730 clear-signing data, ERC-20 fallback), that
decoded display is used and `abi` is ignored. An app cannot override
USDC's verified `transfer` row with its own ABI definition.
* **Same field on every call shape.** `IntentCall`, `TransactionCall`
(`walletClient.sendCalls`), and the EIP-1193 `wallet_sendCalls` params
all accept the same `abi?: readonly unknown[]` field.
* **Size cap.** The server rejects ABIs with more than 256 top-level items
to keep prepare-time JSON parsing bounded.
#### Pairing with viem
The natural pairing is to use the same ABI for both encoding and the
preview, so the bytes on the wire and the displayed function are
guaranteed to match by construction:
```typescript
const abi = myAppAbi;
await walletClient.sendCalls({
calls: [
{
to: MY_NFT_ADDRESS,
data: encodeFunctionData({ abi, functionName: 'mint', args: [42n] }),
abi, // same ABI used for both encoding and display
},
],
});
```
### Token Requests (Output-First Model)
The `tokenRequests` parameter lets you specify what tokens and amounts you want to receive as the output of your transaction. This is the **output-first model** - you declare the desired result, and the orchestrator figures out how to achieve it.
```typescript
import { encodeFunctionData, parseUnits } from 'viem';
const hash = await walletClient.sendCalls({
calls: [
{
to: '0xUSDC_ADDRESS',
data: encodeFunctionData({
abi: erc20Abi,
functionName: 'transfer',
args: [recipient, parseUnits('100', 6)],
}),
abi: erc20Abi,
label: 'Send USDC',
},
],
tokenRequests: [
{
token: '0xUSDC_ADDRESS', // Token contract address
amount: parseUnits('100', 6), // 100 USDC (6 decimals)
},
],
});
```
#### Type Signature
```typescript
tokenRequests?: {
token: string; // ERC-20 token contract address
amount: bigint; // Amount in base units (use parseUnits)
}[];
```
#### When to Use Token Requests
* **Swaps**: Specify the output token and amount, then include any real target calls that consume or settle that output
* **Cross-chain transfers**: Declare the destination token and amount
* **Multi-step operations**: Let the orchestrator optimize the path
The orchestrator will automatically:
1. Determine required input tokens from your portfolio
2. Find the optimal route across chains
3. Execute bridging and swaps as needed
### Example: Token Swap
```typescript
import { encodeFunctionData, parseUnits } from 'viem';
// Swap-funded payment: receive 100 USDC on Base, then transfer it
const hash = await walletClient.sendCalls({
calls: [
{
to: '0x833589fCD6eDb6E08f4c7C32D4f71b54bdA02913', // USDC on Base
data: encodeFunctionData({
abi: erc20Abi,
functionName: 'transfer',
args: [recipient, parseUnits('100', 6)],
}),
abi: erc20Abi,
label: 'Send USDC',
sublabel: '100 USDC',
},
],
tokenRequests: [
{
token: '0x833589fCD6eDb6E08f4c7C32D4f71b54bdA02913',
amount: parseUnits('100', 6),
},
],
chainId: 8453, // Base
});
console.log('Transaction hash:', hash);
```
### Notes
* The client extends viem's `WalletClient`, so standard methods like `getAddresses()` work as expected
* `sendCalls()` opens the passkey modal for user approval before executing
* Use `waitForHash: false` if you only need intent confirmation (faster, but no hash)
* Token amounts use `bigint` for viem compatibility - use `parseUnits()` for decimals
import { AccountsDemo } from "../../layout"
### eth\_accounts
Returns the list of accounts that the user has previously connected. This allows your dApp to check if a user is already connected on page load without prompting them to authenticate again. Unlike `eth_requestAccounts`, this method never shows a modal.
### Try it
### Parameters
None.
### Returns
`string[]` - Array of account addresses. Returns an empty array if not connected.
### Example
```typescript
const accounts = await provider.request({ method: 'eth_accounts' });
if (accounts.length > 0) {
console.log('Connected as:', accounts[0]);
} else {
console.log('Not connected');
}
```
### Notes
* Returns addresses from localStorage if the user has previously connected
* Does not prompt the user to connect - use `eth_requestAccounts` for that
* Always returns an array (empty if not connected)
import { ChainIdDemo } from "../../layout"
### eth\_chainId
Returns the chain ID of the currently selected network. This is useful for verifying which blockchain your dApp is connected to before initiating transactions, and for displaying network information to users.
### Try it
### Parameters
None.
### Returns
`string` - The current chain ID as a hexadecimal string (e.g., `"0x1"` for Ethereum mainnet).
### Example
```typescript
const chainId = await provider.request({ method: 'eth_chainId' });
console.log(chainId); // "0x1" (mainnet), "0x89" (polygon), etc.
```
### Notes
* The chain ID is returned as a hex-encoded string, not a number
* Use `parseInt(chainId, 16)` to convert to a number if needed
* This method does not require the user to be connected
import { ConnectionDemo } from "../../layout"
### eth\_requestAccounts
Prompts the user to connect their wallet to your dApp. If the user hasn't authenticated before, this opens the passkey registration/login flow. If already authenticated but not connected to your app, it shows a lightweight connect prompt. This is the standard method for initiating wallet connection.
### Try it
### Parameters
None.
### Returns
`string[]` - Array of account addresses that the user has authorized.
### Example
```typescript
try {
const accounts = await provider.request({ method: 'eth_requestAccounts' });
console.log('Connected as:', accounts[0]);
} catch (error) {
if (error.message.includes('cancelled')) {
console.log('User cancelled the connection');
}
}
```
### Behavior
1. If the user is already connected, returns the stored account immediately
2. If not connected, opens the lightweight connect modal
3. If the user has never authenticated, shows the full auth modal with passkey registration/login
4. The user can approve or cancel the connection request
### Notes
* This is the standard way to request wallet connection
* Equivalent to calling `wallet_connect`
* The returned address is the user's smart account address
import { SendTransactionDemo } from "../../layout"
### eth\_sendTransaction
Sends a single transaction through the 1auth intent system. The user reviews the transaction details and approves with their passkey. Gas is automatically sponsored, so users don't need ETH for fees. Returns an intent ID that you can poll with `wallet_getCallsStatus` to track execution.
### Try it
### Parameters
| Position | Type | Description |
| -------- | -------- | ---------------------- |
| 0 | `object` | The transaction object |
#### Transaction Object
| Field | Type | Description |
| --------------- | ------------------ | -------------------------------------------------------- |
| `to` | `string` | The recipient address or contract |
| `data` | `string` | The calldata (optional, defaults to `"0x"`) |
| `value` | `string \| number` | The value in wei (optional, defaults to `"0"`) |
| `chainId` | `number` | Target chain ID (optional, uses current chain) |
| `tokenRequests` | `array` | Tokens needed for this transaction (optional, see below) |
#### Token Requests
For direct same-chain ERC20 transfers, encode the ERC20 `transfer` call and omit
`tokenRequests`. Add `tokenRequests` only when you want 1auth to route or swap
the user's available assets so the target-chain call has the requested token
before execution.
| Field | Type | Description |
| -------- | -------- | ------------------------------------------------ |
| `token` | `string` | Token contract address on target chain |
| `amount` | `bigint` | Amount in base units (e.g., 6 decimals for USDC) |
### Returns
`string` - The intent ID (can be used with `wallet_getCallsStatus`).
### Example
```typescript
import { encodeFunctionData, parseUnits } from 'viem';
// Simple ETH transfer (no tokenRequests needed)
const intentId = await provider.request({
method: 'eth_sendTransaction',
params: [{
to: '0x...',
value: '1000000000000000000', // 1 ETH in wei
}],
});
// Swap-funded ERC20 payment with tokenRequests
const USDC = '0x833589fCD6eDb6E08f4c7C32D4f71b54bdA02913';
const amount = parseUnits('100', 6); // 100 USDC
const transferData = encodeFunctionData({
abi: erc20Abi,
functionName: 'transfer',
args: [recipientAddress, amount],
});
const intentId = await provider.request({
method: 'eth_sendTransaction',
params: [{
to: USDC,
data: transferData,
tokenRequests: [{ token: USDC, amount }],
}],
});
```
:::tip
When you include `tokenRequests`, the orchestrator automatically bridges or swaps
tokens from any chain where the user has funds. If you already want to spend the
selected token on the same chain, omit `tokenRequests` to keep the transaction as
a direct transfer.
:::
### Notes
* Returns an intent ID, not a transaction hash
* Use `wallet_getCallsStatus` to track the transaction status
* The transaction is executed via the 1auth intent system
* Gas is automatically sponsored - no ETH needed for fees
import { SignTypedDataDemo } from "../../layout"
### eth\_signTypedData\_v4
Signs structured data according to EIP-712. Unlike `personal_sign`, this method understands the structure of your data and displays it in a human-readable format. Use this for permit signatures, order signing, and any protocol that requires typed structured data signatures.
### Try it
### Parameters
| Position | Type | Description |
| -------- | ------------------ | -------------------------------------- |
| 0 | `string` | The account address |
| 1 | `string \| object` | The typed data object (or JSON string) |
### Typed Data Structure
```typescript
interface TypedData {
domain: {
name?: string;
version?: string;
chainId?: number;
verifyingContract?: string;
};
types: {
[typeName: string]: Array<{ name: string; type: string }>;
};
primaryType: string;
message: Record;
}
```
### Returns
`string` - The signature as a hex string.
### Example
```typescript
const typedData = {
domain: {
name: 'My App',
version: '1',
chainId: 1,
verifyingContract: '0x...',
},
types: {
Person: [
{ name: 'name', type: 'string' },
{ name: 'wallet', type: 'address' },
],
},
primaryType: 'Person',
message: {
name: 'Alice',
wallet: '0x...',
},
};
const signature = await provider.request({
method: 'eth_signTypedData_v4',
params: [accounts[0], typedData],
});
```
### Notes
* Shows a human-readable preview of the structured data
* Also available as `eth_signTypedData` (alias)
* The typed data is validated before signing
import { SignMessageDemo } from "../../layout"
### eth\_sign
Signs arbitrary hex-encoded data. This is a legacy method - prefer `personal_sign` for new implementations. The data is decoded and displayed to the user for review before signing. Internally, this method behaves identically to `personal_sign`.
### Try it
### Parameters
| Position | Type | Description |
| -------- | -------- | ------------------------------ |
| 0 | `string` | The account address |
| 1 | `string` | The data to sign (hex-encoded) |
### Returns
`string` - The signature as a hex string.
### Example
```typescript
const accounts = await provider.request({ method: 'eth_accounts' });
const data = '0x' + Buffer.from('Hello').toString('hex');
const signature = await provider.request({
method: 'eth_sign',
params: [accounts[0], data],
});
```
### Notes
* This method is deprecated in favor of `personal_sign`
* The data is displayed to the user after hex decoding
* Works the same as `personal_sign` internally
## RPC Reference
The 1auth provider implements the [EIP-1193](https://eips.ethereum.org/EIPS/eip-1193) interface, making it compatible with viem, wagmi, ethers, and other Ethereum libraries.
### Overview
All RPC methods can be called via the standard `request` interface:
```tsx
const result = await provider.request({
method: 'method_name',
params: [...],
})
```
### Supported Methods
#### Ethereum Standard
| Method | Description | EIP |
| -------------------------------------------------- | ---------------------------- | ---- |
| [`eth_chainId`](/rpc/eth-chainid) | Returns the current chain ID | 695 |
| [`eth_accounts`](/rpc/eth-accounts) | Returns connected accounts | - |
| [`eth_requestAccounts`](/rpc/eth-request-accounts) | Requests account access | 1102 |
| [`eth_sendTransaction`](/rpc/eth-send-transaction) | Sends a transaction | - |
#### Message Signing
| Method | Description | EIP |
| -------------------------------------------------- | ------------------------- | --- |
| [`personal_sign`](/rpc/personal-sign) | Signs a message (EIP-191) | 191 |
| [`eth_sign`](/rpc/eth-sign) | Signs raw message hash | - |
| [`eth_signTypedData_v4`](/rpc/eth-sign-typed-data) | Signs typed data | 712 |
#### Wallet Namespace
| Method | Description | EIP |
| ----------------------------------------------------------------- | ------------------------------------- | ---- |
| [`wallet_connect`](/rpc/wallet-connect) | Connects wallet and requests accounts | - |
| [`wallet_disconnect`](/rpc/wallet-disconnect) | Disconnects wallet session | - |
| [`wallet_switchEthereumChain`](/rpc/wallet-switch-ethereum-chain) | Switches to a different chain | 3326 |
| [`wallet_sendCalls`](/rpc/wallet-send-calls) | Sends batched calls atomically | 5792 |
| [`wallet_getCallsStatus`](/rpc/wallet-get-calls-status) | Gets batch execution status | 5792 |
| [`wallet_getCapabilities`](/rpc/wallet-get-capabilities) | Gets wallet capabilities | 5792 |
| [`wallet_getAssets`](/rpc/wallet-get-assets) | Gets user's token balances | - |
### Usage Example
```tsx
import { createOneAuthProvider, OneAuthClient } from '@rhinestone/1auth'
const client = new OneAuthClient({
providerUrl: 'https://passkey.1auth.app',
})
const provider = createOneAuthProvider({
client,
chainId: 8453, // Base
})
// Request accounts
const accounts = await provider.request({
method: 'eth_requestAccounts',
})
// Sign a message
const signature = await provider.request({
method: 'personal_sign',
params: ['Hello, 1auth!', accounts[0]],
})
```
### Cross-Chain with tokenRequests
For ERC20 transfers and contract calls that need tokens, include `tokenRequests` to enable automatic cross-chain funding. The user can pay from any chain - the orchestrator handles bridging and swaps automatically.
```tsx
import { encodeFunctionData, parseUnits } from 'viem';
const amount = parseUnits('100', 6); // 100 USDC
const transferData = encodeFunctionData({
abi: erc20Abi,
functionName: 'transfer',
args: [recipient, amount],
});
await provider.request({
method: 'eth_sendTransaction',
params: [{
to: USDC_ADDRESS,
data: transferData,
tokenRequests: [{ token: USDC_ADDRESS, amount }],
}],
});
```
See [Token Requests](/guides/token-requests) for detailed documentation.
import { SignMessageDemo } from "../../layout"
### personal\_sign
Signs a plaintext message using the user's passkey. This opens a signing modal where the user can review the message before approving. Use this for "Sign in with Ethereum" flows, proving account ownership, or any scenario where you need a cryptographic signature on arbitrary text.
### Try it
### Parameters
| Position | Type | Description |
| -------- | -------- | ------------------------------------------------------ |
| 0 | `string` | The message to sign (can be hex-encoded or plain text) |
| 1 | `string` | The account address (optional, uses connected account) |
### Returns
`string` - The signature as a hex string, encoded for smart account verification.
### Example
```typescript
const message = 'Hello, 1auth!';
const accounts = await provider.request({ method: 'eth_accounts' });
const signature = await provider.request({
method: 'personal_sign',
params: [message, accounts[0]],
});
console.log('Signature:', signature);
```
### Notes
* Opens the signing modal showing the message to the user
* The user must approve the signature with their passkey
* Returns a WebAuthn-encoded signature compatible with ERC-6492
* Hex-encoded messages are automatically decoded for display
import { ConnectionDemo } from "../../layout"
### wallet\_connect
An alias for `eth_requestAccounts`. Prompts the user to connect their wallet to your dApp if not already connected. Both methods behave identically - use whichever naming convention fits your codebase.
### Try it
### Parameters
None.
### Returns
`string[]` - Array of account addresses that the user has authorized.
### Example
```typescript
const accounts = await provider.request({ method: 'wallet_connect' });
console.log('Connected as:', accounts[0]);
```
### Notes
* This is an alias for `eth_requestAccounts`
* Opens the connection modal if not already connected
* Returns immediately if the user is already connected
import { DisconnectDemo } from "../../layout"
### wallet\_disconnect
Disconnects the user's wallet from your dApp and clears the stored session. After disconnecting, the user will need to reconnect to interact with your app again. This is a client-side disconnect only - it doesn't revoke any onchain permissions.
### Try it
### Parameters
None.
### Returns
`boolean` - Returns `true` on success.
### Example
```typescript
await provider.request({ method: 'wallet_disconnect' });
console.log('Disconnected');
```
### Events
After disconnecting, the provider emits:
* `accountsChanged` with an empty array `[]`
* `disconnect`
```typescript
provider.on('accountsChanged', (accounts) => {
if (accounts.length === 0) {
console.log('User disconnected');
}
});
provider.on('disconnect', () => {
console.log('Wallet disconnected');
});
```
### Notes
* Clears the stored session from localStorage
* The user will need to reconnect to use the wallet again
* Does not revoke any onchain permissions
import { GetAssetsDemo } from "../../layout"
### wallet\_getAssets
Fetches the user's token balances and portfolio across all supported chains. This provides a unified view of the user's holdings with USD values when available. Use this to display wallet balances or to check if the user has sufficient funds for a transaction.
Asset reads require the same app JWT setup as intent flows. Configure
`OneAuthClient` with `sponsorship` so the SDK can fetch your app access token
and forward it to the 1auth provider.
When you are already using `OneAuthClient`, prefer the native SDK helper:
```typescript
const assets = await client.getAssets({
accountAddress: "0x1111111111111111111111111111111111111111",
});
```
### Try it
### Parameters
Optional. Connected EIP-1193 apps can call with no params. Apps that already
have a verified account address can pass it explicitly:
```typescript
await provider.request({
method: "wallet_getAssets",
params: [{ accountAddress: "0x1111111111111111111111111111111111111111" }],
});
```
### Returns
Returns the user's portfolio data including token balances across all supported chains.
```typescript
interface AssetsResponse {
balances: Array<{
chainId: number;
token: string;
symbol: string;
decimals: number;
balance: string;
usdValue?: number;
isTestnet?: boolean;
}>;
mainnets: { balances: AssetsResponse["balances"] };
testnets: { balances: AssetsResponse["balances"] };
}
```
### Example
```typescript
const assets = await provider.request({
method: 'wallet_getAssets',
});
console.log('Portfolio:', assets);
// Display balances
for (const balance of assets.balances) {
const amount = Number(balance.balance) / 10 ** balance.decimals;
console.log(`${balance.symbol}: ${amount} ($${balance.usdValue})`);
}
console.log("Mainnet balances:", assets.mainnets.balances);
console.log("Testnet balances:", assets.testnets.balances);
```
### Notes
* Requires the user to be connected
* Requires `OneAuthClient.sponsorship` so the SDK can send an app JWT
* Fetches data from the 1auth portfolio API
* Returns balances across all supported chains
* Also returns `mainnets.balances` and `testnets.balances` so apps can render
network-specific views without changing SDK configuration
* USD values are fetched from price feeds when available
import { SendCallsDemo } from "../../layout"
### wallet\_getCallsStatus
Checks the execution status of a previously submitted transaction or batch. After calling `eth_sendTransaction` or `wallet_sendCalls`, use this method to poll for confirmation. Returns the current status (pending or confirmed) along with transaction receipts when complete.
### Try it
### Parameters
| Position | Type | Description |
| -------- | -------- | --------------------------------------------- |
| 0 | `string` | The calls ID returned from `wallet_sendCalls` |
### Returns
```typescript
interface CallsStatus {
status: 'PENDING' | 'CONFIRMED';
receipts: Array<{
logs: any[];
status: '0x1' | '0x0'; // success or failure
blockHash?: string;
blockNumber?: string;
transactionHash?: string;
}>;
}
```
### Example
```typescript
const callsId = await provider.request({
method: 'wallet_sendCalls',
params: [{ calls: [...] }],
});
// Poll for status
const checkStatus = async () => {
const result = await provider.request({
method: 'wallet_getCallsStatus',
params: [callsId],
});
if (result.status === 'CONFIRMED') {
const receipt = result.receipts[0];
if (receipt.status === '0x1') {
console.log('Transaction succeeded:', receipt.transactionHash);
} else {
console.log('Transaction failed');
}
} else {
console.log('Still pending...');
setTimeout(checkStatus, 2000);
}
};
checkStatus();
```
### Status Values
| Status | Description |
| ----------- | ------------------------------------------------------------------------------- |
| `PENDING` | Transaction is being processed |
| `CONFIRMED` | Transaction has been confirmed (check `receipts[0].status` for success/failure) |
### Notes
* The intent system handles cross-chain execution
* `PENDING` includes both preconfirmed and in-flight states
* Transaction hash is available once confirmed
import { CapabilitiesDemo } from "../../layout"
### wallet\_getCapabilities
Returns the wallet's supported features for each chain. Use this to discover capabilities like atomic batching, gas sponsorship, and cross-chain fund sourcing. This helps your dApp adapt its UX based on what the wallet supports.
### Try it
### Parameters
| Position | Type | Description |
| -------- | ---------- | -------------------------------------------------------------- |
| 0 | `string` | The wallet address (optional, ignored) |
| 1 | `string[]` | Array of chain IDs to query (optional, returns all if omitted) |
### Returns
```typescript
type Capabilities = {
[chainId: `0x${string}`]: {
atomic: { status: 'supported' };
paymasterService: { supported: boolean };
auxiliaryFunds: { supported: boolean };
};
};
```
### Example
```typescript
const capabilities = await provider.request({
method: 'wallet_getCapabilities',
params: [],
});
console.log(capabilities);
// {
// "0x1": {
// atomic: { status: "supported" },
// paymasterService: { supported: true },
// auxiliaryFunds: { supported: true }
// },
// "0x89": { ... },
// ...
// }
```
### Capabilities
| Capability | Description |
| ------------------ | ---------------------------------------------------- |
| `atomic` | Batch calls are executed atomically (all-or-nothing) |
| `paymasterService` | Gas fees are sponsored - users don't need ETH |
| `auxiliaryFunds` | Cross-chain funds can be used for transactions |
***
#### atomic
Multiple calls sent via `wallet_sendCalls` execute atomically. If any call fails, all calls are reverted.
```typescript
// All calls execute together or none execute
const callsId = await provider.request({
method: 'wallet_sendCalls',
params: [{
chainId: 8453,
calls: [
{ to: tokenAddress, data: approveData },
{ to: dexAddress, data: swapData },
],
}],
});
```
***
#### paymasterService
Gas fees are sponsored. Users don't need to hold ETH to pay for transactions.
**How it works:**
1. User submits a transaction via `eth_sendTransaction` or `wallet_sendCalls`
2. The 1auth intent system handles gas payment automatically
3. User signs with their passkey - no ETH required
***
#### auxiliaryFunds
Funds from other supported chains can be used to fulfill transactions. The 1auth intent system automatically sources funds cross-chain when needed.
**How it works:**
1. User initiates a transaction on Chain A
2. If insufficient funds on Chain A, the system checks other chains
3. Funds are automatically bridged to complete the transaction
4. User only signs once - cross-chain complexity is abstracted away
### Notes
* Returns capabilities for all supported chains by default
* All 1auth accounts have the same capabilities
* Use this to check if features like gas sponsorship are available
import { SendCallsDemo } from "../../layout"
### wallet\_sendCalls
Sends multiple contract calls as a single atomic batch. All calls execute together or none execute, preventing partial failures. This is ideal for multi-step operations like "approve + swap" that must succeed together. Gas is sponsored and the user signs once for the entire batch.
### Try it
### Parameters
| Position | Type | Description |
| -------- | -------- | ----------------------- |
| 0 | `object` | The batch calls payload |
#### Payload Object
| Field | Type | Description |
| --------------- | ---------------- | ------------------------------------------------ |
| `chainId` | `number` | **Required**: Target chain ID for execution |
| `calls` | `Call[]` | Array of calls to execute |
| `tokenRequests` | `TokenRequest[]` | Optional: tokens to receive (output-first model) |
#### Call Object
| Field | Type | Description |
| ---------- | ------------------ | ----------------------------------------------------------------------------------------------------------------------------------------------------------------------------------------------------------------------------------------------------------------------------------------------------------------------------------------------------------------------------- |
| `to` | `string` | The recipient address |
| `data` | `string` | The calldata (optional) |
| `value` | `string \| number` | The value in wei (optional) |
| `label` | `string` | Optional human-readable label shown in the sign dialog (e.g. `"Mint NFT"`) |
| `sublabel` | `string` | Optional secondary line shown under the label (e.g. `"0.10 USDC"`) |
| `icon` | `string` | Optional fallback icon URL (SVG / square PNG / `data:` URL, max 8 KB). Rendered in the sign dialog when 1auth's built-in token registry can't resolve a logo for the call. Built-in icons always win — apps cannot override USDC / ETH / MATIC etc. |
| `abi` | `unknown[]` | Optional ABI used by the sign dialog to render an unverified human-readable decode of `data` (function name + named args). Same trust model as `label` / `sublabel` / `icon` — rendered behind an "Unverified" badge with the raw `to` + selector always shown alongside. Max 256 items. See [Per-call ABIs](/sdk/wallet-client#per-call-abis) for the trust model and usage. |
#### TokenRequest Object
| Field | Type | Description |
| -------- | -------- | ------------------------------------------------- |
| `token` | `string` | ERC-20 token contract address |
| `amount` | `string` | Amount in base units (e.g., "1000000" for 1 USDC) |
### Returns
`string` - The calls ID (intent ID) for tracking status.
### Example
The `chainId` parameter specifies which chain the calls execute on. This enables crosschain transactions - the user's funds can be on any chain and the orchestrator handles bridging automatically.
```typescript
// Batch multiple contract calls
const callsId = await provider.request({
method: 'wallet_sendCalls',
params: [{
chainId: 8453, // Target chain is required! // [!code ++]
calls: [
{
to: '0x...', // Token contract
data: '0x...', // approve()
},
{
to: '0x...', // DEX contract
data: '0x...', // swap()
},
],
}],
});
// Track the status
const status = await provider.request({
method: 'wallet_getCallsStatus',
params: [callsId],
});
```
### Crosschain execution
The `chainId` parameter is the key to crosschain transactions. Set it to the chain where you want the calls to execute:
```typescript
// Execute on Base (chainId: 8453)
const callsId = await provider.request({
method: 'wallet_sendCalls',
params: [{
chainId: 8453, // Calls execute on Base // [!code ++]
calls: [{
to: '0x...', // Contract on Base
data: '0x...',
}],
}],
});
```
The orchestrator finds the cheapest route to fund the transaction, regardless of where the user's assets are. User signs once with their passkey.
### Token requests (output-first)
Use `tokenRequests` to specify what tokens the target-chain calls need before
they execute. The orchestrator automatically determines the best path to deliver
those tokens from the user's available assets across chains.
```typescript
import { encodeFunctionData } from 'viem';
const USDC_BASE = '0x833589fCD6eDb6E08f4c7C32D4f71b54bdA02913';
const amount = 100000000n; // 100 USDC
const transferData = encodeFunctionData({
abi: erc20Abi,
functionName: 'transfer',
args: ['0xRecipient...', amount],
});
const callsId = await provider.request({
method: 'wallet_sendCalls',
params: [{
chainId: 8453, // Base // [!code ++]
calls: [{ to: USDC_BASE, data: transferData }], // [!code ++]
tokenRequests: [ // [!code ++]
{ // [!code ++]
token: USDC_BASE, // USDC on Base // [!code ++]
amount: '100000000', // 100 USDC (6 decimals) // [!code ++]
}, // [!code ++]
], // [!code ++]
}],
});
```
This is useful for transfers, deposits, purchases, or any operation where real
calldata consumes the requested output token. Do not add a dummy `{ data: '0x' }`
call or a self-transfer to model a plain swap; plain swaps should use
`sendIntent({ calls: [], tokenRequests })`.
### Notes
* All calls are executed atomically - if one fails, all fail
* User sees a summary of all calls before signing
* Gas is sponsored - no ETH needed for fees
* Use `wallet_getCallsStatus` to track execution status
* `tokenRequests.amount` is a string at the RPC level; the SDK accepts `bigint` and converts automatically
import { SwitchChainDemo } from "../../layout"
### wallet\_switchEthereumChain
Changes the active network to a different supported chain. The switch is instant and doesn't require user approval. After switching, subsequent transactions will target the new chain. Use this when your dApp needs to operate on a specific network.
### Try it
### Parameters
| Position | Type | Description |
| -------- | -------- | --------------------------- |
| 0 | `object` | Object containing `chainId` |
#### Parameter Object
| Field | Type | Description |
| --------- | ------------------ | ----------------------------------- |
| `chainId` | `string \| number` | The chain ID (hex string or number) |
### Returns
`null` - Returns `null` on success.
### Example
```typescript
// Switch to Polygon (chainId: 137)
await provider.request({
method: 'wallet_switchEthereumChain',
params: [{ chainId: '0x89' }], // 137 in hex
});
// Or using a number
await provider.request({
method: 'wallet_switchEthereumChain',
params: [{ chainId: 137 }],
});
```
### Events
After switching, the provider emits:
```typescript
provider.on('chainChanged', (chainId) => {
console.log('Switched to chain:', chainId);
});
```
### Supported Chains
The provider supports all chains configured in the 1auth registry. Common chains include:
* Ethereum Mainnet (`0x1`)
* Polygon (`0x89`)
* Arbitrum (`0xa4b1`)
* Optimism (`0xa`)
* Base (`0x2105`)
### Notes
* Chain switching is instant - no user approval required
* Unsupported chain IDs will throw an error
import { AccountRecoveryDemo } from '../../layout'
## Set Up Recovery
This guide is about **setting up a recovery backup** ahead of time — not the act
of recovering an account. You decide when to offer it; the SDK handles the rest.
1auth accounts are secured by a passkey stored on the user's device or password
manager. If that passkey is ever lost, the account is unreachable unless the user
prepared a backup first. So your app prompts the user to create one: a short
**recovery passphrase** and an **encrypted backup file**. Together they can
restore the account even if every passkey is gone.
Whether and when to offer this is **your app's call** — 1auth never prompts on
its own. When you're ready, trigger the flow with a single call:
```ts
const { completed } = await client.setupRecovery()
```
### When to prompt
The backup is optional, and it's entirely up to your app to decide when to
surface it — a natural moment is right after sign-up, or the first time a user
holds a meaningful balance. `setupRecovery()` resolves with `{ completed }` so
you can record that the user finished (and avoid nagging them again):
```ts
const { completed } = await client.setupRecovery()
if (completed) {
// mark the onboarding step done for this user
await markRecoveryBackedUp()
}
```
`completed` is `false` if the user closes the dialog without finishing — you can
re-prompt later.
### What the user sees
After you call `setupRecovery()`, the dialog walks the user through the backup
inside the secure 1auth iframe:
1. **Backup your account** — an intro nudge (with an "Are you sure?" step if
they decline).
2. **Verify with their passkey** — a Face ID / Touch ID prompt derives the
recovery key from the passkey (the key never leaves the device).
3. **Recovery passphrase** — a short passphrase to copy and store somewhere
safe (e.g. a password manager).
4. **Backup file** — an encrypted file to download and store separately.
5. **Done** — both pieces are required to recover, so they're stored apart.
```text
Backup your account → Verify (passkey) → Setup account recovery
├─ 1. Recovery passphrase (copy)
└─ 2. Backup file (download)
→ Account recovery completed
```
### How it works
* The recovery key is an ECDSA key **derived from the user's passkey** via the
WebAuthn PRF extension — 1auth's servers never store recovery material.
* The downloaded file is the recovery key **encrypted with AES-256-GCM**; the
recovery passphrase is the key that decrypts it.
* Because the passphrase and the file are stored separately, neither one alone
is enough — an attacker would need both to recover the account.
:::tip
Requires an authenticated user. Call [`authWithModal()`](/guides/signup-login)
(or your wagmi connector) first; `setupRecovery()` opens the backup for the
currently signed-in account.
:::
### Next steps
* [Signup & Login](/guides/signup-login) — authenticate users before backup
## Authentication
After users sign in, you can request them to sign messages for verification. This enables secure off-chain authentication without exposing passkey credentials.
### Using wagmi
Wagmi provides hooks to sign messages with the user's passkey.
::::steps
#### Install the SDK
```bash
npm install @rhinestone/1auth
```
#### Create config.ts
Create a wagmi config file with the 1auth connector:
```ts [config.ts]
import { createConfig, http } from 'wagmi'
import { base } from 'wagmi/chains'
import { OneAuthClient } from '@rhinestone/1auth' // [!code ++]
import { oneAuth } from '@rhinestone/1auth/wagmi' // [!code ++]
// Create the 1auth client
const client = new OneAuthClient({ // [!code ++]
providerUrl: 'https://passkey.1auth.app', // [!code ++]
}) // [!code ++]
// Create the wagmi config with 1auth connector
export const config = createConfig({
chains: [base],
connectors: [oneAuth({ client })], // [!code ++]
transports: {
[base.id]: http(),
},
})
```
#### Sign a message
Use the `useSignMessage` hook to request a signature:
:::code-group
```tsx [Example.tsx]
import { useSignMessage, useAccount } from 'wagmi'
export function SignMessage() {
const { address } = useAccount()
const { signMessage, data: signature } = useSignMessage()
const handleSign = () => {
signMessage({
message: `Sign in to MyApp\nTimestamp: ${Date.now()}`,
})
}
if (!address) return
Connect wallet first
return (
{signature &&
Signature: {(signature.length - 2) / 2} bytes
}
)
}
```
:::
#### Verify on your backend
Send the signature to your backend for verification:
:::code-group
```tsx [Example.tsx]
import { useSignMessage, useAccount } from 'wagmi'
export function AuthenticatedAction() {
const { address } = useAccount()
const { signMessageAsync } = useSignMessage()
const handleAuth = async () => {
const message = `Sign in to MyApp\nTimestamp: ${Date.now()}`
const signature = await signMessageAsync({ message })
// Send to your backend for verification
const response = await fetch('/api/verify', {
method: 'POST',
body: JSON.stringify({ message, signature, address }),
})
if (response.ok) {
console.log('Authenticated!')
}
}
return
}
```
```ts [api/verify.ts]
import { createPublicClient, http } from 'viem'
import { base } from 'viem/chains'
const publicClient = createPublicClient({
chain: base,
transport: http(),
})
export async function POST(req: Request) {
const { message, signature, address } = await req.json()
// verifyMessage supports ERC-1271 for smart accounts
const isValid = await publicClient.verifyMessage({ // [!code ++]
address, // [!code ++]
message, // [!code ++]
signature, // [!code ++]
}) // [!code ++]
if (!isValid) {
return new Response('Invalid signature', { status: 401 })
}
// Create session, return token, etc.
return new Response('OK')
}
```
:::
#### Done
You have successfully implemented message signing for authentication!
::::
### Using the SDK directly
If you prefer not to use wagmi, use the SDK's `signMessage` method:
```tsx
const result = await client.signMessage({
username: 'alice',
message: `Sign in to MyApp\nTimestamp: ${Date.now()}`,
description: 'Verify your identity',
})
if (result.success) {
console.log('Signature:', result.signature)
// Send to backend for verification
}
```
### SignMessageOptions
| Property | Type | Required | Description |
| ------------- | ------------------------- | -------- | ------------------------------------------- |
| `username` | `string` | Yes | Username of the signer |
| `message` | `string` | Yes | Human-readable message to sign |
| `challenge` | `string` | No | Custom challenge (defaults to message hash) |
| `description` | `string` | No | Description shown in the signing dialog |
| `metadata` | `Record` | No | Additional data to display |
| `theme` | `ThemeConfig` | No | Theme configuration for the dialog |
### Security considerations
* **Include timestamps** to prevent replay attacks
* **Include domain** to prevent cross-site signature reuse
* **Verify on backend** - never trust client-side verification alone
* **Use HTTPS** for all API calls
### Next steps
* [Checkout](/guides/checkout) - Add payments with PayButton
* [Crosschain](/guides/crosschain) - Execute transactions on any chain
import { BatchQueueDemo } from '../../layout'
## Batch Transactions
Queue multiple transactions and sign them all with a single passkey confirmation. Perfect for shopping carts, multi-step workflows, or gas-efficient operations.
### Using BatchQueue
The BatchQueue components let users add items to a queue and sign everything at once.
::::steps
#### Install the SDK
```bash
npm install @rhinestone/1auth
```
#### Configure BatchQueueProvider
Create a client and wrap your app with `BatchQueueProvider`:
```tsx [App.tsx]
import { OneAuthClient } from '@rhinestone/1auth' // [!code ++]
import { BatchQueueProvider } from '@rhinestone/1auth/react' // [!code ++]
const client = new OneAuthClient({ // [!code ++]
providerUrl: 'https://passkey.1auth.app', // [!code ++]
}) // [!code ++]
export function App({ username }: { username?: string }) {
return (
// [!code ++]
// [!code ++]
)
}
```
#### Add items to the queue
Use the `useBatchQueue` hook to add transactions:
:::code-group
```tsx [AddToCart.tsx]
import { useBatchQueue } from '@rhinestone/1auth/react' // [!code ++]
export function AddToCartButton({ item }) {
const { addToBatch, queue } = useBatchQueue() // [!code ++]
const handleClick = () => { // [!code ++]
const result = addToBatch( // [!code ++]
{ // [!code ++]
to: item.contractAddress, // [!code ++]
data: item.calldata, // [!code ++]
label: `Buy ${item.name}`, // [!code ++]
}, // [!code ++]
8453 // Base chain ID // [!code ++]
) // [!code ++]
// [!code ++]
if (!result.success) { // [!code ++]
alert(result.error) // [!code ++]
} // [!code ++]
} // [!code ++]
return (
)
}
```
:::
#### Display the queue widget
Add the `BatchQueueWidget` to show queued items:
:::code-group
```tsx [App.tsx]
import { BatchQueueProvider, BatchQueueWidget, useBatchQueue } from '@rhinestone/1auth/react'
function SignAllHandler({ username }: { username: string }) {
const { signAll } = useBatchQueue() // [!code ++]
const handleSignAll = async () => {
const result = await signAll(username) // [!code ++]
if (result.success) {
console.log('All signed!', result.transactionHash)
}
}
return // [!code ++]
}
export function App() {
return (
)
}
```
:::
#### Done
You have successfully set up batch transactions!
::::
### Chain validation
All calls in a batch must target the same chain:
```tsx
const { addToBatch } = useBatchQueue()
// First call sets the batch chain
addToBatch({ to: '0x...', label: 'Action 1' }, 8453) // Base
// This will fail - different chain
const result = addToBatch({ to: '0x...', label: 'Action 2' }, 1) // Ethereum
if (!result.success) {
console.log(result.error) // "Batch is set to Base..."
}
```
### BatchQueueProvider props
| Prop | Type | Required | Description |
| ---------- | --------------- | -------- | ----------------------------------------------------------------------------- |
| `client` | `OneAuthClient` | Yes | SDK client instance |
| `username` | `string` | No | Username for localStorage persistence (enables queue to survive page refresh) |
| `children` | `ReactNode` | Yes | Child components |
### useBatchQueue reference
| Property | Type | Description |
| ----------------- | ----------------------------------------------------------------------------- | ----------------------------------------- |
| `queue` | `BatchedCall[]` | Array of queued calls |
| `batchChainId` | `number \| null` | Chain ID of the batch (set by first call) |
| `addToBatch` | `(call: IntentCall, chainId: number) => { success: boolean; error?: string }` | Add a call to queue |
| `removeFromBatch` | `(id: string) => void` | Remove a specific call |
| `clearBatch` | `() => void` | Clear all calls |
| `signAll` | `(username: string) => Promise` | Sign and submit all calls |
| `isSigning` | `boolean` | Whether signing is in progress |
| `isExpanded` | `boolean` | Whether the widget is expanded |
| `setExpanded` | `(expanded: boolean) => void` | Set widget expanded state |
### Widget features
The `BatchQueueWidget` includes:
* Collapsible header with call counter badge
* Chain indicator for current batch
* Remove individual calls on hover
* Clear all button
* Bounce animation on new additions
* Auto-hide when queue is empty
See the full [React Components reference](/sdk/react) for more details.
### Next steps
* [Crosschain](/guides/crosschain) - Execute transactions on any chain
* [Deposit](/guides/deposit) - Fund user accounts
import { PayButtonDemo } from '../../layout'
## Checkout
Add one-click payments to your app with the PayButton component. Users click, authenticate with their passkey, and the transaction executes.
### Using PayButton
The PayButton component handles the entire payment flow: authentication, signing, and transaction execution.
::::steps
#### Install the SDK
```bash
npm install @rhinestone/1auth
```
#### Create client.ts
Create a client instance for the PayButton component:
```ts [client.ts]
import { OneAuthClient } from '@rhinestone/1auth' // [!code ++]
// Create the 1auth client // [!code ++]
export const client = new OneAuthClient({ // [!code ++]
providerUrl: 'https://passkey.1auth.app', // [!code ++]
}) // [!code ++]
```
For checkout flows where your page already displays the payment details
before the user clicks, the SDK defaults to blind signing. If you want
1auth to show its visible review UI instead, opt into
[Clear Signing](/guides/clear-signing) on the shared client:
```ts [client.ts]
export const client = new OneAuthClient({
providerUrl: 'https://passkey.1auth.app',
blind_signing: false,
})
```
#### Add PayButton
Import and use the PayButton component:
:::code-group
```tsx [Checkout.tsx]
import { PayButton } from '@rhinestone/1auth/react' // [!code ++]
import { parseEther } from 'viem'
export function Checkout() {
return (
{ // [!code ++]
console.log('Paid:', result.transactionHash) // [!code ++]
}} // [!code ++]
onError={(error) => console.error(error)} // [!code ++]
> // [!code ++]
Pay $10 // [!code ++]
// [!code ++]
)
}
```
:::
#### Handle success
Use the `onSuccess` callback to update your UI or backend:
:::code-group
```tsx [Checkout.tsx]
import { PayButton, SendIntentResult } from '@rhinestone/1auth/react'
import { parseEther } from 'viem'
import { useRouter } from 'next/navigation'
export function Checkout({ orderId }: { orderId: string }) {
const router = useRouter()
const handleSuccess = async (result: SendIntentResult) => { // [!code ++]
// Update your backend // [!code ++]
await fetch('/api/orders/complete', { // [!code ++]
method: 'POST', // [!code ++]
body: JSON.stringify({ // [!code ++]
orderId, // [!code ++]
txHash: result.transactionHash, // [!code ++]
}), // [!code ++]
}) // [!code ++]
// [!code ++]
// Redirect to confirmation // [!code ++]
router.push(`/order/${orderId}/confirmation`) // [!code ++]
} // [!code ++]
return (
Complete Purchase
)
}
```
:::
#### Done
You have successfully added one-click payments to your app!
::::
### Contract interactions
PayButton supports any contract call, not just simple transfers:
```tsx
import { encodeFunctionData } from 'viem'
toast.success('NFT minted!')}
>
Mint NFT
```
### Custom styling
Apply your own styles with `className`:
```tsx
Complete Purchase
```
### Props reference
| Prop | Type | Required | Description |
| ----------- | ------------------------------------ | -------- | -------------------------------------------------------------------------------------------------- |
| `client` | `OneAuthClient` | Yes | SDK client instance |
| `intent` | `SendIntentOptions` | Yes | Transaction parameters (calls, targetChain, tokenRequests) |
| `onSuccess` | `(result: SendIntentResult) => void` | No | Called on successful transaction |
| `onError` | `(error: Error) => void` | No | Called on error |
| `closeOn` | `CloseOnStatus` | No | When to close dialog: "claimed", "preconfirmed", "filled", or "completed". Default: "preconfirmed" |
| `children` | `ReactNode` | No | Button text (default: "Pay with 1auth") |
| `className` | `string` | No | Custom CSS class |
| `style` | `React.CSSProperties` | No | Custom inline styles (merged with defaults) |
| `disabled` | `boolean` | No | Disabled state |
| `hideIcon` | `boolean` | No | Hide the fingerprint icon |
See the full [PayButton API reference](/sdk/pay-button) for more details.
### Next steps
* [Crosschain](/guides/crosschain) - Execute transactions on any chain
* [Batch Transactions](/guides/batch-transactions) - Queue multiple operations
## Clear Signing
Clear signing shows the 1auth transaction, message, or EIP-712 review
iframe before the user approves the browser or platform passkey prompt.
Use it when the user should inspect the action in 1auth instead of relying
only on your app's own UI.
Clear signing is useful for wallet dashboards, account tools, high-risk
transfers, EIP-712 approvals, and any flow where independent review is
more important than the fastest possible signing ceremony.
### Default behavior
Blind signing is the SDK default. That means supported signing calls hide
the 1auth review iframe unless you opt into clear signing.
Set `blind_signing: false` on the client or wallet-client factory to show
the 1auth review UI by default.
Authentication, signup, recovery, and permission-grant dialogs are always
visible when required. The `blind_signing` option only controls signing
review UI.
### Configure OneAuthClient
Opt into clear signing when you initialize `OneAuthClient`.
```ts
import { OneAuthClient } from "@rhinestone/1auth";
export const client = new OneAuthClient({
providerUrl: "https://passkey.1auth.app",
clientId: "wallet-dashboard",
blind_signing: false,
sponsorship: {
accessTokenUrl: "/api/sponsorship/access-token",
extensionTokenUrl: "/api/sponsorship/extension-token",
},
});
```
Supported signing calls from this client now show the 1auth review iframe
before WebAuthn starts.
### Supported methods
Clear signing applies to SDK signing flows that can render a 1auth review
iframe:
* `sendIntent()`
* `sendBatchIntent()`
* `signMessage()`
* `signTypedData()`
* `signWithModal()`
* `createPasskeyWalletClient()` signing and `sendCalls()` flows
It does not change `authWithModal()`, signup, login, recovery, or
permission-grant dialogs.
### Per-call overrides
You can override the client default for a single request.
```ts
await client.signMessage({
username: "alice@example.com",
message: "Approve checkout order #123",
blind_signing: false,
});
```
This is useful when most of your app uses blind signing, but selected
high-risk actions should still show the review UI.
For viem wallet-client integrations, set `blind_signing: false` on the
factory because it creates its own internal `OneAuthClient`:
```ts
const walletClient = createPasskeyWalletClient({
accountAddress,
clientId: "wallet-dashboard",
chain,
transport,
blind_signing: false,
});
```
### What users see
The 1auth review iframe renders the signable action before WebAuthn:
* verified actions from 1auth's clear-signing registry,
* decoded ERC-20 transfers and approvals when possible,
* app-supplied ABI labels marked as app supplied,
* raw contract calls when no safe decode exists,
* chain, amount, recipient, and policy details when available.
Verified badges only come from 1auth's registry. App-supplied ABI metadata
can make a custom contract readable, but it is not marked verified.
### Blind-sign selected calls
If a clear-signing client has a low-risk flow where your app already shows
the full payload, you can hide the 1auth review UI for that one request:
```ts
await client.sendIntent({
accountAddress,
targetChain: 8453,
calls: [
{
to: merchantAddress,
data: transferCalldata,
value: "0",
},
],
blind_signing: true,
});
```
Use this sparingly. When `blind_signing: true`, your app is responsible
for presenting the payload, amount, recipient, chain, and risk context
before calling the SDK.
### Dashboard example
Configure clear signing on the shared client for account or wallet UI.
```ts [oneauth-client.ts]
export const oneAuth = new OneAuthClient({
providerUrl: "https://passkey.1auth.app",
clientId: "wallet-dashboard",
blind_signing: false,
});
```
```ts [send-payment.ts]
await oneAuth.sendIntent({
accountAddress,
targetChain: 8453,
calls: [paymentCall],
tokenRequests: [usdcRequest],
});
```
The user reviews the action in 1auth, approves the browser passkey prompt,
and the SDK continues with intent execution.
### Failure behavior
Clear signing still requires a valid passkey signing context.
Common cases:
* no active passkey session: ask the user to sign in with
`authWithModal()`, then retry the signing call,
* untrusted or unregistered app origin: complete the visible trust flow
before signing,
* WebAuthn cancellation or platform failure: surface the SDK error and
let the user retry from your app UI.
### Clear signing vs Headless Mode
Clear signing still uses 1auth's passkey signer. The iframe is visible,
and the user's passkey produces the signature after review.
[Headless Mode](/guides/headless-mode) is different: your app provides
signatures from another validator or signer, and 1auth does not run the
passkey signing dialog at all.
## Crosschain
1auth provides complete chain abstraction through intents. Users can execute transactions on any chain using funds from any other chain - no bridging, no chain switching, no gas token management.
### How it works
1. User has funds on Chain A (e.g., USDC on Ethereum)
2. User wants to execute a transaction on Chain B (e.g., mint NFT on Base)
3. 1auth's orchestrator handles the bridging and execution automatically
4. User signs once with their passkey - done
The user's balance is aggregated and abstracted across all chains. They see one unified balance, not separate balances per chain.
### Using wagmi
Wagmi provides hooks to integrate crosschain transactions into your React app.
::::steps
#### Install the SDK
```bash
npm install @rhinestone/1auth
```
#### Create config.ts
Create a wagmi config file with the 1auth connector. For crosschain transactions, add all the chains you want to support:
```ts [config.ts]
import { createConfig, http } from 'wagmi'
import { base, mainnet, optimism, arbitrum } from 'wagmi/chains'
import { OneAuthClient } from '@rhinestone/1auth' // [!code ++]
import { oneAuth } from '@rhinestone/1auth/wagmi' // [!code ++]
// Create the 1auth client
const client = new OneAuthClient({ // [!code ++]
providerUrl: 'https://passkey.1auth.app', // [!code ++]
}) // [!code ++]
// Create the wagmi config with 1auth connector
export const config = createConfig({
chains: [mainnet, base, optimism, arbitrum], // [!code ++]
connectors: [oneAuth({ client })], // [!code ++]
transports: {
[mainnet.id]: http(),
[base.id]: http(),
[optimism.id]: http(),
[arbitrum.id]: http(),
},
})
```
#### Build your calls
The `calls` array defines what contract interactions to execute. Each call has a `to` address, optional `data` (calldata), and optional `value` (ETH amount). Multiple calls execute atomically - all succeed or all fail together.
```ts
import { encodeFunctionData, parseUnits } from 'viem'
// Example: Approve + Swap in a single atomic batch
const calls = [
{
to: '0x833589fCD6eDb6E08f4c7C32D4f71b54bdA02913', // USDC contract
data: encodeFunctionData({
abi: erc20Abi,
functionName: 'approve',
args: [DEX_ADDRESS, parseUnits('100', 6)],
}),
},
{
to: DEX_ADDRESS, // DEX contract
data: encodeFunctionData({
abi: dexAbi,
functionName: 'swap',
args: [USDC, WETH, parseUnits('100', 6)],
}),
},
]
```
#### Send to any chain
Use `useSendCalls` with your calls array. The key crosschain parameters are:
* **`chainId`** - specifies which chain the calls execute on (required)
* **`tokenRequests`** - specifies what tokens the user needs for the transaction (optional)
```ts
sendCalls({
calls,
chainId: 8453, // Execute on Base // [!code ++]
tokenRequests: [{ // [!code ++]
token: USDC_ADDRESS, // [!code ++]
amount: parseUnits('100', 6), // [!code ++]
}], // [!code ++]
})
```
The `tokenRequests` parameter enables the output-first model: instead of specifying which tokens to spend, you specify what tokens you need. The orchestrator automatically finds the cheapest route to deliver those tokens from the user's assets across all chains.
:::code-group
```tsx [SwapOnBase.tsx]
import { useSendCalls } from 'wagmi'
import { encodeFunctionData, parseUnits } from 'viem'
export function SwapOnBase() {
const { sendCalls, isPending } = useSendCalls()
const calls = [
{
to: USDC_ADDRESS,
data: encodeFunctionData({
abi: erc20Abi,
functionName: 'approve',
args: [DEX_ADDRESS, parseUnits('100', 6)],
}),
},
{
to: DEX_ADDRESS,
data: encodeFunctionData({
abi: dexAbi,
functionName: 'swap',
args: [USDC, WETH, parseUnits('100', 6)],
}),
},
]
const handleSwap = () => {
sendCalls({
calls,
chainId: 8453, // Execute on Base // [!code ++]
tokenRequests: [{ // [!code ++]
token: USDC_ADDRESS, // USDC needed for swap // [!code ++]
amount: parseUnits('100', 6), // [!code ++]
}], // [!code ++]
})
}
return (
)
}
```
:::
The orchestrator finds the cheapest route to fund the transaction, regardless of where the user's assets currently are. See [Token Requests](/guides/crosschain/token-requests) for more details on the output-first model.
#### Done
You're now sending crosschain transactions with 1auth! Users sign once with their passkey and the orchestrator handles everything else.
::::
### Using the SDK directly
If you prefer not to use wagmi, you can use the SDK's `sendIntent` method:
```tsx
import { OneAuthClient } from '@rhinestone/1auth'
import { parseEther } from 'viem'
const client = new OneAuthClient({
providerUrl: 'https://passkey.1auth.app',
})
const result = await client.sendIntent({
username: 'alice',
targetChain: 8453, // Base // [!code ++]
calls: [
{
to: '0x...', // Contract on Base
data: '0x...', // Calldata
value: parseEther('0.1'),
},
],
closeOn: 'completed',
})
if (result.success) {
console.log('TX Hash:', result.transactionHash)
}
```
### Next steps
* [Token Requests](/guides/crosschain/token-requests) - Deep dive into the output-first model
* [Batch Transactions](/guides/batch-transactions) - Queue multiple transactions with a shopping cart UI
* [Fee Sponsorship](/guides/fee-sponsorship) - Sponsor gas fees for your users
## Custom ENS
:::info
Contact Rhinestone if you require this feature.
:::
1auth supports custom ENS resolution for account addresses via an offchain ENS resolver (CCIP-Read / EIP-3668). This allows developers to provide human-readable addresses for their users.
### How It Works
Instead of sharing a `0x...` address, your users can have readable names like:
```
alice.yourapp.eth
bob.yourapp.eth
```
The offchain resolver maps these names to the user's 1auth smart account address without requiring onchain transactions for each registration.
### Setup
1. Deploy an `OffchainResolver` contract pointing to the 1auth gateway
2. Set your ENS subdomain's resolver to your deployed contract
**Gateway URL:**
```
https://passkey.1auth.app/api/ens
```
### Benefits
* **User-friendly** - Easy to share and remember addresses
* **Branded** - Use your own `.eth` subdomain
* **Gasless** - Offchain resolution means no gas costs for name registration
* **Universal** - Works with any ENS-compatible wallet or dApp
## Deposit
:::warning
This feature is coming soon.
:::
The deposit service allows users to easily fund their 1auth accounts. It can be integrated via:
* **React component** - Drop-in component for your app
* **Iframe embed** - Embed the deposit flow in any website
* **Signing dialog** - Users can fund directly within the 1auth signing dialog
This enables seamless onboarding where users can deposit funds without leaving your app.
import { UserPaidIntentDemo } from '../../components/demos/UserPaidIntentDemo';
## Fee Sponsorship
Every user-initiated intent authenticates with the calling app's JWT. The
app independently chooses, per intent, whether to **sponsor** (pay the
gas/bridge fees) or to let the user pay from their source assets.
### Sponsored vs. user-paid
| Mode | SDK call | App JWT | Extension token | Who pays |
| ------------------- | ------------------------------------- | -------- | --------------- | -------- |
| Sponsored (default) | `sendIntent({ ... })` | required | required | app |
| User-paid | `sendIntent({ ..., sponsor: false })` | required | not fetched | user |
The `sponsor` flag is an explicit per-call decision — setting it to
`false` skips the extension-token fetch entirely, saving one HTTP round
trip when the user is paying.
### Set up sponsorship on the server
The SDK client signs every intent with short-lived JWTs minted by your
backend. You expose two endpoints; the SDK calls them same-origin with
the user's session cookie attached:
* **Access token** — identifies your app to the orchestrator. Minted once
and reused; expires after **1 hour**.
* **Extension token** — scoped to a single intent's digest, authorizing
that exact operation. Minted per intent; expires after **5 minutes**.
Short expiries mean a leaked token has a small blast radius — but it's no
substitute for guarding the endpoints (see the warning below).
#### Environment variables
Create a Rhinestone app in the [Rhinestone dashboard](https://dashboard.rhinestone.dev)
to generate a JWT signing key, then copy these values into your server
environment:
| Variable | Description |
| ---------------------------- | ------------------------------------------------------------- |
| `RHINESTONE_JWT_PRIVATE_KEY` | JSON-encoded JWK (EC P-256 / ES256 recommended, RSA accepted) |
| `RHINESTONE_INTEGRATOR_ID` | Your integrator handle |
| `RHINESTONE_PROJECT_ID` | Project ID the app belongs to |
| `RHINESTONE_APP_ID` | App ID used as the JWT `app_id` claim |
| `RHINESTONE_KEY_ID` | Key ID registered with the orchestrator (`kid` header) |
#### Next.js App Router
```ts
// app/api/sponsorship/access-token/route.ts
import { NextResponse } from "next/server";
import { createSponsorshipSigner } from "@rhinestone/1auth/server";
import { getSession } from "@/lib/session"; // your auth
const signer = createSponsorshipSigner();
export async function GET() {
const session = await getSession();
if (!session.userId) return NextResponse.json({ error: "unauthorized" }, { status: 401 });
return NextResponse.json({ token: await signer.accessToken() });
}
```
```ts
// app/api/sponsorship/extension-token/route.ts
import { NextRequest, NextResponse } from "next/server";
import { createSponsorshipSigner } from "@rhinestone/1auth/server";
import { getSession } from "@/lib/session";
// `shouldSponsor` runs server-side *before* the grant is signed, so it
// protects you against every caller — including scripted requests that
// ignore CORS. Scope it as tightly as your product allows.
const signer = createSponsorshipSigner({
shouldSponsor: {
// Only chains you actually operate on.
chain: ({ id }) => SUPPORTED_CHAIN_IDS.has(id),
// Only your own contracts — stops an attacker from billing you for
// gas on arbitrary (e.g. gas-heavy) contracts.
calls: (calls) => calls.every((c) => ALLOWED_CONTRACTS.has(c.to.toLowerCase())),
},
});
export async function POST(req: NextRequest) {
const session = await getSession();
if (!session.userId) return NextResponse.json({ error: "unauthorized" }, { status: 401 });
const { intentOp } = await req.json();
try {
return NextResponse.json({ token: await signer.extensionToken(intentOp) });
} catch (err) {
// `shouldSponsor` rejected this intent — expected, not a server fault.
if (err instanceof Error && err.name === "SponsorshipDeniedError") {
return NextResponse.json({ error: "not sponsorable" }, { status: 403 });
}
throw err;
}
}
```
`createSponsorshipSigner()` reads all five env vars automatically. Pass
`{ credentials: { ... } }` to override them, or `{ shouldSponsor }` to
filter which intents you'll sponsor.
### Securing the sponsorship endpoints
These endpoints **mint tokens billed against your Rhinestone project** — treat
a sponsorship grant as money, not as an identity. The extension token is the
grant that actually says "the app pays this intent's gas" (the access token
only identifies your app). Because the SDK calls these endpoints from the
browser, anyone who can reach them can request a grant unless you stop them.
No single control is enough — defend in layers, because each covers a different
class of caller:
| Layer | What it stops | Covers scripted (non-browser) callers? |
| ------------------------------------------------------------- | ----------------------------------------------------- | ------------------------------------------------------ |
| **1. `shouldSponsor` policy** (chain / contract / value caps) | Billing you for intents you never meant to sponsor | ✅ Yes — enforced before signing, regardless of caller |
| **2. Session auth** (httpOnly + Secure + `SameSite` cookie) | Anonymous & cross-site browser abuse | ❌ No — cookies/CORS only constrain browsers |
| **3. Intent binding** (built in) | Replaying a leaked grant against a *different* intent | ✅ Yes — the 5-min token is pinned to the intent digest |
| **4. Budget cap + rate limits** (Rhinestone dashboard) | Bounding total damage if anything else leaks | ✅ Yes |
The key takeaway: **a session cookie is necessary but not sufficient.** It stops
opportunistic browser abuse, but a `curl` attacker ignores cookies and CORS
entirely — so the `shouldSponsor` policy is your only protection against them.
#### Bind the grant to the logged-in user
`shouldSponsor.account` receives the smart-account address the intent will
execute from. Combined with your session, this stops one authenticated user
from minting grants for *other* accounts:
```ts
export async function POST(req: NextRequest) {
const session = await getSession();
if (!session.userId) return NextResponse.json({ error: "unauthorized" }, { status: 401 });
// Resolve the account this user is allowed to spend for, then bind the
// grant to it so a logged-in user can't sponsor someone else's intents.
const usersAccount = await getOneAuthAddressForUser(session.userId);
const signer = createSponsorshipSigner({
shouldSponsor: {
chain: ({ id }) => SUPPORTED_CHAIN_IDS.has(id),
account: (address) => address.toLowerCase() === usersAccount.toLowerCase(),
},
});
const { intentOp } = await req.json();
return NextResponse.json({ token: await signer.extensionToken(intentOp) });
}
```
`verifyOneAuthAccount()` (also exported from `@rhinestone/1auth/server`) lets
you confirm server-side that an address really belongs to a known 1auth
account before you bind to it.
:::warning
**Never put `Access-Control-Allow-Origin: *` on a token-minting endpoint.**
Keep it same-origin so `SameSite` and your session cookie actually gate it.
And always set a **project-level budget cap** in the Rhinestone dashboard as a
final backstop — assume a key or token can leak, and bound the blast radius.
:::
#### Other frameworks
The factory returns plain async functions, so it works with any HTTP
framework. Express example:
```ts
import express from "express";
import { createSponsorshipSigner } from "@rhinestone/1auth/server";
const signer = createSponsorshipSigner();
const app = express();
app.get("/api/sponsorship/access-token", requireSession, async (_req, res) => {
res.json({ token: await signer.accessToken() });
});
app.post("/api/sponsorship/extension-token", requireSession, async (req, res) => {
res.json({ token: await signer.extensionToken(req.body.intentOp) });
});
```
#### Advanced: custom claims
If you need a custom audience or additional claims, drop down to the raw
`createJwtSigner` from `@rhinestone/sdk/jwt-server`, also re-exported
from `@rhinestone/1auth/server`.
### Configure sponsorship on the client
Point the SDK at the two endpoints you just created:
```ts
import { OneAuthClient } from "@rhinestone/1auth";
const client = new OneAuthClient({
providerUrl: "https://passkey.1auth.app",
sponsorship: {
accessTokenUrl: "/api/sponsorship/access-token",
extensionTokenUrl: "/api/sponsorship/extension-token",
},
});
```
`sponsorship` is required whenever the client submits user intents —
there is no anonymous fallback. A client without `sponsorship` configured
will reject `sendIntent` calls with `MISSING_APP_CREDENTIALS`.
### Demo
## Headless Mode
Headless mode lets an app submit a 1auth intent with signatures produced
outside the 1auth passkey dialog. Use it when the user's ERC-7579 account
already has another validator installed and your app can produce the
signatures that validator expects.
The important boundary is simple: 1auth prepares the intent and forwards
opaque signature bytes, but it does not decide whether those bytes are
valid. The installed on-chain validator is the signature gate.
For example, the non-passkey signer might be:
* an app-managed ECDSA signer,
* a backend or AWS KMS signing service,
* another ERC-7579 validator your app has installed out of band.
If you want 1auth to show the user a passkey approval dialog for every
intent, use `OneAuthClient.sendIntent` instead.
### What 1auth does
In headless mode, 1auth still provides the intent infrastructure:
* `/api/intent/prepare?signingMode=headless` quotes the intent, performs
balance checks, and returns the message hashes your validator signer
must sign.
* Sponsorship helpers mint access and extension JWTs for apps that
sponsor intents.
* `/api/intent/headless-execute` forwards your pre-encoded validator
signatures to the orchestrator.
* Status and wait endpoints work the same way as the passkey flow.
1auth treats the submitted signatures as opaque bytes. It does not open
clear signing UI and does not verify the validator signature locally.
### Requirements
Before using headless mode:
* the account must already have a validator installed that can authorize
the intent,
* your app must know how to sign the prepared hashes for that validator,
* your app must encode the signatures in the validator-prefixed format
expected by the orchestrator,
* submitted calls must stay inside whatever policy or authorization the
installed validator enforces.
This guide only covers the prepare-sign-submit execution path. If the
validator is a SmartSession validator, put the setup, policy review, and
session-key details in the [Permissions](/guides/permissions) flow.
The permissions flow stores public grant metadata per browser origin, so
a registered app origin can later recover its `sessionKeyHandle` without
asking the user to grant the same SmartSession permission again.
### Prepare
```ts
import { OneAuthHeadlessClient } from "@rhinestone/1auth/headless";
const headless = new OneAuthHeadlessClient({
providerUrl: "https://passkey.1auth.app",
sponsorship: {
accessTokenUrl: "/api/sponsorship/access-token",
extensionTokenUrl: "/api/sponsorship/extension-token",
},
});
const prepared = await headless.prepareIntent({
accountAddress,
targetChain: 84532,
calls: [
{
to: vault,
data: depositCalldata,
value: "0",
},
],
});
```
`prepareIntent()` returns:
* `intentOp` and `digestResult`, which are passed back unchanged at
submit time,
* per-origin message hashes,
* destination and target-execution message hashes when required,
* the echoed account, calls, target chain, and expiry.
### Sign
Sign the prepared hashes with the non-passkey validator your app
controls. 1auth does not prescribe the signer or encoding here; use the
encoder for your validator.
```ts
const {
originSignatures,
destinationSignature,
targetExecutionSignature,
} = await signWithInstalledValidator({
prepared,
validatorContext,
});
```
The contents of `validatorContext` depend on the installed validator.
### Submit
```ts
const result = await headless.submitIntent({
intentOp: prepared.intentOp,
digestResult: prepared.digestResult,
accountAddress: prepared.accountAddress,
targetChain: prepared.targetChain,
calls: prepared.calls,
expiresAt: prepared.expiresAt,
originSignatures,
destinationSignature,
targetExecutionSignature,
});
```
For sponsored intents, `submitIntent()` fetches an extension token and
binds it to the prepared `intentOp`. Pass `sponsor: false` for
self-paying intents.
### Wait
```ts
const final = await headless.waitForIntent(
result.intentId,
result.transactionResult,
);
```
`waitForIntent()` polls 1auth's wait endpoint and returns the latest
orchestrator status. If the orchestrator exposes a transaction hash, the
headless client returns it in the submit or wait response.
### Trust Model
Headless mode removes the per-intent passkey dialog, so your app becomes
responsible for deciding what to sign. 1auth still protects sponsored
intents by binding the extension token to the prepared `intentOp`, but a
malicious or buggy app-side signer can still sign the wrong thing.
The safety boundary is the installed validator:
* if the validator approves the submitted signature, the intent can
execute,
* if the calls drift outside that validator's policy, the validator
should reject on-chain.
## Onramp
:::warning
This feature is coming soon.
:::
The onramp feature will allow users to purchase crypto directly within your app using fiat payment methods. Users will be able to fund their 1auth accounts without leaving your application.
### Planned features
* **Credit/debit card support** - Purchase crypto with standard payment cards
* **Bank transfers** - Direct bank-to-crypto funding
* **Regional support** - Multiple currencies and payment methods
* **Embedded flow** - Seamless integration without redirects
### Next steps
* [Deposit](/guides/deposit) - Allow users to fund accounts with existing crypto
* [Checkout](/guides/checkout) - Add payments with PayButton
import { GrantPermissionDemo } from '../../layout'
## Permissions
Permissions let a user add a scoped session key to their account. The
app owns the session key; 1auth owns the approval UI, passkey
authorization, and install/enable transaction.
Use this when your app needs to execute a narrow set of actions later
without opening a passkey dialog for every intent.
This guide covers the one-time grant. After the user approves the
permission, continue with [Headless Mode](/guides/headless-mode) to
prepare, sign outside 1auth, and submit intents under that permission.
1auth never receives the session private key.
Permissions are multi-chain by default. Pass chains where selector
permissions execute in `targetChains`. For cross-chain funding, pass
chains that only need settlement authorization in `sourceChains`. 1auth
asks the user for one SmartSession owner signature that commits to all
session chains, then submits the required install/enable intents per
chain.
For cross-chain routes, put the destination execution chain in
`targetChains` and every funding chain in `sourceChains`. For example,
an Arbitrum Sepolia swap funded by mUSD on Base Sepolia needs selector
permissions on Arbitrum Sepolia for the swap calls and source-chain
coverage on Base Sepolia for the Permit2 claim.
### Grant scoped access
:::steps
#### Create or load a signer
Create or load the ECDSA signer your app will use later for headless
execution. The signer can live in the browser, on your backend, in AWS
KMS, another HSM/KMS, or any signing system that can produce the
SmartSession ECDSA signatures later.
Only the public `sessionKeyAddress` is sent to 1auth.
#### Define permissions
Use `definePermissions()` so app code does not hardcode selectors or
calldata offsets. Start with a narrow permission: this session key may
mint exactly 0.1 mUSD, and only to the user's own account.
```ts
import { definePermissions } from "@rhinestone/1auth";
import { parseUnits } from "viem";
const mockUsdMintAbi = [
{
type: "function",
name: "mint",
stateMutability: "nonpayable",
inputs: [
{ name: "to", type: "address" },
{ name: "amount", type: "uint256" },
],
outputs: [],
},
] as const;
const mintAmount = parseUnits("0.1", 6);
const validAfter = Math.floor(Date.now() / 1000);
const validUntil = validAfter + 24 * 60 * 60;
const permissions = definePermissions({
address: mUSD,
name: "mUSD",
abi: mockUsdMintAbi,
functions: {
mint: {
params: {
to: {
condition: "equal",
value: accountAddress,
},
amount: {
condition: "equal",
value: mintAmount,
},
},
},
},
});
```
`definePermissions()` returns the `permissions` and `contracts` that
`grantPermissions()` expects.
#### Grant permissions
Create or load the session key in your app, then pass only its public
address to 1auth. The key can live wherever your app's signer lives:
browser storage, your backend, AWS KMS, another HSM/KMS, or any signer
that can produce the SmartSession ECDSA signatures later.
```ts
import { OneAuthClient } from "@rhinestone/1auth";
const oneAuth = new OneAuthClient({
providerUrl: "https://passkey.1auth.app",
clientId: "webshop",
sponsorship: {
accessTokenUrl: "/api/sponsorship/access-token",
extensionTokenUrl: "/api/sponsorship/extension-token",
},
});
const sessionKeyAddress = await appSigner.getAddress();
const result = await oneAuth.grantPermissions({
accountAddress,
targetChains: [8453, 84532],
sessionKeyAddress,
validAfter,
validUntil,
maxUses: 25,
...permissions,
});
if (!result.success) {
throw new Error(result.error.message);
}
```
`appSigner` is whatever signer your application controls. In a browser
demo it might wrap a locally generated private key; in production it can
be a backend service, AWS KMS key, HSM, or another signing system. The
only value sent into `grantPermissions()` is the signer's public
`sessionKeyAddress`.
After this one-time grant, the app can use that session key to submit a
matching `mint(accountAddress, parseUnits("0.1", 6))` intent without
opening another user-signature dialog. The SmartSession validator
enforces the `to` and `amount` constraints the user approved.
#### Add a bridge claim permission
Selector permissions cover calls on the destination chain. If the
headless intent is funded by a source-chain asset through Permit2 and a
settlement layer such as Across, add a `crossChainPermits` entry as
well. This tells the SmartSession what source token may be claimed,
which destination token may be delivered, who may receive it, and which
settlement layer is allowed.
```ts
import {
createCrossChainPermission,
definePermissions,
resolveTokenAddress,
} from "@rhinestone/1auth";
import { parseUnits } from "viem";
import { arbitrumSepolia, baseSepolia } from "viem/chains";
const ARB_SEPOLIA_CHAIN_ID = 421614;
const BASE_SEPOLIA_CHAIN_ID = 84532;
const usdcOnArb = resolveTokenAddress("USDC", ARB_SEPOLIA_CHAIN_ID);
const maxBridgeSpend = parseUnits("0.1", 6);
const now = Math.floor(Date.now() / 1000);
const validUntil = now + 24 * 60 * 60;
const swap = definePermissions({
address: rwaSwap,
name: "RWASwap",
abi: rwaSwapAbi,
functions: {
swap: {
params: {
usdcIn: { condition: "equal", value: maxBridgeSpend },
recipient: { condition: "equal", value: accountAddress },
},
},
},
});
const bridge = createCrossChainPermission({
from: {
chain: baseSepolia,
token: mUSDOnBase,
maxAmount: maxBridgeSpend,
},
to: {
chain: arbitrumSepolia,
token: usdcOnArb,
recipient: accountAddress,
},
validAfter: BigInt(now),
validUntil: BigInt(validUntil),
settlementLayers: ["ACROSS"],
});
const result = await oneAuth.grantPermissions({
accountAddress,
// Arbitrum verifies the swap call. Base only verifies the Permit2 claim.
targetChains: [ARB_SEPOLIA_CHAIN_ID],
sourceChains: [BASE_SEPOLIA_CHAIN_ID],
sessionKeyAddress,
validAfter: now,
validUntil,
maxUses: 25,
permissions: swap.permissions,
crossChainPermits: [bridge],
contracts: swap.contracts,
});
```
`crossChainPermits` is part of the safety boundary in the grant dialog:
the user sees the source token, source chain, destination token,
recipient, cap, validity window, and settlement layer before approving.
App-supplied labels and ABIs can improve readability, but the signable
permission is the structured bridge permit plus the selector policies.
Do not omit the source chain from `sourceChains`. Permit2 calls
`isValidSignature` on the source-chain account during the claim. If the
SmartSession is only enabled on the destination chain, the later
headless route cannot use the permission even though the destination
swap permission exists.
`grantPermissions()` returns:
```ts
{
success: true,
grantId,
sessionKeyHandle: {
sessionKeyAddress,
permissionId,
permissionIdsByChain,
accountAddress,
permissions,
chainId,
chainIds,
expiresAt,
},
permissionId,
permissionIdsByChain,
intentId,
intentIds,
status,
chainResults,
transactionHash,
transactionHashesByChain,
statusUrl,
waitUrl,
}
```
Persist whatever your app needs to sign later: the session private key,
a KMS key identifier, or another signer reference. 1auth never stores
the private key or signing capability.
1auth does store public grant metadata for the requesting origin after a
successful grant. The stored record includes the recoverable
`sessionKeyHandle`, permission IDs, chain status, transaction hashes,
and the origin that requested the grant. Grants are keyed by the exact
browser origin, not by `clientId`, so `https://checkout.example.com`
cannot recover grants created by `https://app.example.com`.
Your app can recover existing grants from the same registered origin:
```ts
const grants = await oneAuth.listSessionGrants({
accountAddress,
});
const activeGrant = grants.success
? grants.grants.find((grant) => !grant.revokedAt)
: undefined;
```
The registry is a UX and recovery index. The SmartSession validator is
still the source of truth for execution, and the app-controlled signer
must still produce the headless signatures. The handle includes
`chainIds` and `permissionIdsByChain` so your headless signer can choose
the right permission for the chain it is executing on.
Users can inspect and revoke stored grants from the 1auth account
dialog. Revocation submits a SmartSession `removeConfig` transaction for
the selected grant; 1auth marks the registry entry revoked only after
that transaction is submitted.
#### Review in 1auth
The grant iframe renders a permission-specific review. It answers:
> What can this signer do later?
This is different from transaction clear signing, which answers:
> What will happen now?
The review groups permissions by contract and function. For each action,
1auth shows:
* every chain the permission applies to,
* contract and function name,
* verified, app-supplied ABI, or raw selector badge,
* policy chips such as `100 uses`, `Valid until ...`, and
`Universal action: 2 parameter rules`,
* constrained parameters like `to = 0x...account` and
`amount = 100000`,
* unconstrained parameters as `any value`,
* warnings for app-supplied ABIs, raw selectors, no expiry, or broad
permissions.
For the mUSD mint example above, the review would show one
permission group:
```txt
mUSD
mint(address to, uint256 amount)
App supplied ABI
25 uses | Valid until 24h from now | Universal action: 2 parameter rules
to = 0x...account
amount = 100000
```
Verified badges only come from 1auth's clear-signing registry. ABI
metadata supplied by the app is useful for readability, but it is never
marked verified.
#### Execute headlessly
After the permission is granted, use the returned handle with the
headless client. This step does not open another 1auth approval dialog:
your app signs with its session-key signer, and the on-chain
SmartSession validator enforces the scope the user approved in the grant
iframe.
```ts
import { OneAuthHeadlessClient } from "@rhinestone/1auth/headless";
const headless = new OneAuthHeadlessClient({
providerUrl: "https://passkey.1auth.app",
sponsorship: {
accessTokenUrl: "/api/sponsorship/access-token",
extensionTokenUrl: "/api/sponsorship/extension-token",
},
});
const prepared = await headless.prepareIntent({
accountAddress,
targetChain: 84532,
calls,
sessionKeyHandle: stored.handle,
});
// Sign prepared SmartSession hashes with your app-managed signer,
// encode the validator-prefixed signatures, then submit.
const submitted = await headless.submitIntent({
intentOp: prepared.intentOp,
digestResult: prepared.digestResult,
accountAddress: prepared.accountAddress,
targetChain: prepared.targetChain,
calls: prepared.calls,
expiresAt: prepared.expiresAt,
originSignatures,
destinationSignature,
targetExecutionSignature,
});
```
See the [Headless Mode guide](/guides/headless-mode) for the signing
and submit details, including validator-prefixed signature encoding and
intent status polling.
:::
### Advanced example: approve and deposit
The same pattern can grant a small workflow instead of one function. For
an ERC-4626 vault deposit, the session key needs permission to approve
USDC for the vault and then call `deposit` on the vault. Keep both
actions scoped to the same spender, receiver, and maximum amount.
```ts
import { definePermissions } from "@rhinestone/1auth";
import { parseUnits } from "viem";
const erc20ApproveAbi = [
{
type: "function",
name: "approve",
stateMutability: "nonpayable",
inputs: [
{ name: "spender", type: "address" },
{ name: "amount", type: "uint256" },
],
outputs: [{ name: "", type: "bool" }],
},
] as const;
const erc4626DepositAbi = [
{
type: "function",
name: "deposit",
stateMutability: "nonpayable",
inputs: [
{ name: "assets", type: "uint256" },
{ name: "receiver", type: "address" },
],
outputs: [{ name: "shares", type: "uint256" }],
},
] as const;
const maxDeposit = parseUnits("500", 6);
const validAfter = Math.floor(Date.now() / 1000);
const validUntil = validAfter + 24 * 60 * 60;
const usdcApproval = definePermissions({
address: USDC,
name: "USDC",
abi: erc20ApproveAbi,
functions: {
approve: {
params: {
spender: {
condition: "equal",
value: vault,
},
amount: {
condition: "lessThanOrEqual",
value: maxDeposit,
},
},
},
},
});
const vaultDeposit = definePermissions({
address: vault,
name: "USDC Vault",
abi: erc4626DepositAbi,
functions: {
deposit: {
params: {
assets: {
condition: "lessThanOrEqual",
value: maxDeposit,
},
receiver: {
condition: "equal",
value: accountAddress,
},
},
},
},
});
const permissions = {
permissions: [...usdcApproval.permissions, ...vaultDeposit.permissions],
contracts: [...usdcApproval.contracts, ...vaultDeposit.contracts],
validAfter,
validUntil,
maxUses: 25,
};
```
In the 1auth review UI, this appears as two grouped permissions: one
for `USDC.approve(spender, amount)` and one for
`USDC Vault.deposit(assets, receiver)`. Both groups show the same usage
and time limits, plus the parameter constraints that make the permission
safe for that specific vault flow. If you pass multiple `targetChains`,
the same approval review and SmartSession owner signature cover every
requested chain, while 1auth still submits the install/enable intent on
each chain that needs it.
### Session limits
#### Usage limit
Limits how many times the session may use its granted actions.
```ts
await oneAuth.grantPermissions({
// ...
maxUses: 100,
});
```
#### Time frame
Limits when the action may be used.
```ts
await oneAuth.grantPermissions({
// ...
validAfter: 0,
validUntil: Math.floor(Date.now() / 1000) + 24 * 60 * 60,
});
```
`validAfter` and `validUntil` are Unix timestamps in seconds in the
1auth SDK and docs. 1auth normalizes these values before calling the
experimental SmartSession encoder, which currently expects millisecond
timestamps internally. Use seconds at the app boundary; do not multiply
by `1000` yourself.
#### Value limit
Limits the native value for a use. Add it as a function config field
inside `definePermissions()`.
```ts
functions: {
deposit: {
valueLimitPerUse: parseEther("0.1"),
params: { /* ... */ },
},
}
```
#### Universal action
Constrains calldata parameters. Prefer writing this through
`definePermissions()`:
```ts
params: {
asset: { condition: "equal", value: USDC },
amount: { condition: "lessThanOrEqual", value: parseUnits("50000", 6) },
onBehalfOf: { condition: "equal", value: treasury },
}
```
That expands to a SmartSession `universal-action` policy with the correct
calldata offsets for `asset`, `amount`, and `onBehalfOf`.
### Security notes
* Do not send private session keys to 1auth.
* Prefer exact parameter constraints over broad selector access.
* Treat app-supplied ABI labels as unverified readability hints.
* Show short expiries and usage limits for automated sessions.
* Rotate or revoke session keys when users disconnect or change devices.
import { AuthDemo } from '../../layout'
## Signup & Login
Add passkey authentication to your app with a single method call. Users authenticate with Face ID or Touch ID - no passwords, no seed phrases.
### Using wagmi
Wagmi provides hooks to integrate 1auth authentication into your React app.
::::steps
#### Install the SDK
```bash
npm install @rhinestone/1auth
```
#### Create config.ts
Create a wagmi config file with the 1auth connector:
```ts [config.ts]
import { createConfig, http } from 'wagmi'
import { base } from 'wagmi/chains'
import { OneAuthClient } from '@rhinestone/1auth' // [!code ++]
import { oneAuth } from '@rhinestone/1auth/wagmi' // [!code ++]
// Create the 1auth client
const client = new OneAuthClient({ // [!code ++]
providerUrl: 'https://passkey.1auth.app', // [!code ++]
}) // [!code ++]
// Create the wagmi config with 1auth connector
export const config = createConfig({
chains: [base],
connectors: [oneAuth({ client, chainId: base.id })], // [!code ++]
transports: {
[base.id]: http(),
},
})
```
#### Display sign in button
Create a component that connects users with their passkey. The `connectors` array contains the 1auth connector from your config:
```tsx [SignInButton.tsx]
import { useConnect } from 'wagmi'
export function SignInButton() {
const { connectors, connect } = useConnect()
const connector = connectors.find((c) => c.id === '1auth') // [!code ++]
return (
)
}
```
#### Display account & sign out
After the user signs in, display their account and provide a sign out button:
:::code-group
```tsx [Example.tsx]
import { useAccount, useConnect, useDisconnect } from 'wagmi'
export function Account() {
const { address } = useAccount() // [!code ++]
const { disconnect } = useDisconnect() // [!code ++]
const { connectors, connect } = useConnect()
const connector = connectors.find((c) => c.id === '1auth')
if (address) { // [!code ++]
return ( // [!code ++]
// [!code ++]
{address.slice(0, 6)}...{address.slice(-4)}
// [!code ++]
// [!code ++]
// [!code ++]
) // [!code ++]
} // [!code ++]
return (
)
}
```
:::
#### Done
You have successfully set up passkey authentication with 1auth!
::::
### Using the SDK directly
If you prefer not to use wagmi, you can use the SDK's `authWithModal()` method directly:
```tsx
import { OneAuthClient } from '@rhinestone/1auth'
const client = new OneAuthClient({
providerUrl: 'https://passkey.1auth.app',
})
// Open the authentication modal
const result = await client.authWithModal()
if (result.success) {
console.log('Connected as:', result.user?.username)
console.log('Address:', result.user?.address)
}
```
### How it works
1. **User clicks sign in** - Your app calls `authWithModal()` or uses the wagmi connector
2. **1auth modal opens** - User enters their username or creates a new account
3. **Passkey prompt** - Device prompts for Face ID / Touch ID
4. **Success** - You receive the username and wallet address
The entire flow happens in a secure iframe. Your app never sees the passkey credentials.
### Next steps
* [Authentication](/guides/authentication) - Learn about message signing and verification
* [Checkout](/guides/checkout) - Add payments with PayButton
## Theming
Customize the appearance of 1auth dialogs to match your brand. Set color mode and accent colors when initializing the client or update them at runtime.
### ThemeConfig
Pass a `theme` option when creating your client:
```ts
import { OneAuthClient } from '@rhinestone/1auth'
const client = new OneAuthClient({
providerUrl: 'https://passkey.1auth.app',
theme: { // [!code ++]
mode: 'dark', // 'light' | 'dark' | 'system' // [!code ++]
accent: '#4F41EF', // Hex color for buttons and interactive elements // [!code ++]
}, // [!code ++]
})
```
### Theme options
| Property | Type | Description |
| ---------- | ------------------------------- | ------------------------------------------------------------------------------------- |
| `mode` | `'light' \| 'dark' \| 'system'` | Color mode. "system" follows the user's OS preference |
| `accent` | `string` | Hex color for buttons and interactive elements (e.g., "#4F41EF") |
| `backdrop` | `object` | Tint and blur of the full-viewport scrim behind the dialog. See [Backdrop](#backdrop) |
### Backdrop
The dialog floats over a full-viewport scrim that tints and blurs your page behind it. By default the scrim is a near-black wash (`rgba(0,0,0,0.4)`). On a **dark** app this can make it hard to tell where your page ends and the dialog begins — set a lighter `color` (e.g. a mid-gray) so the dialog reads as a distinct surface lifted off the background.
```ts
const client = new OneAuthClient({
providerUrl: 'https://passkey.1auth.app',
theme: {
mode: 'dark',
backdrop: { // [!code ++]
color: '#52525c', // 6-digit hex tint, default "#000000" // [!code ++]
opacity: 0.5, // 0–1, default 0.4 // [!code ++]
blur: 12, // gaussian blur in px (0–40), default 8 // [!code ++]
}, // [!code ++]
},
})
```
| Property | Type | Description |
| --------- | -------- | ------------------------------------------------------------------------------------------ |
| `color` | `string` | Scrim tint as a 6-digit hex (e.g. "#52525c"). Defaults to "#000000" |
| `opacity` | `number` | Scrim opacity, `0`–`1`. Defaults to `0.4` |
| `blur` | `number` | Gaussian blur radius of your page behind the dialog, in pixels (`0`–`40`). Defaults to `8` |
Every field is optional and falls back to its default independently, so passing only `color` keeps the default opacity and blur. The backdrop config also applies to the loading screen shown while the dialog initializes, so the transition is seamless.
### Update theme at runtime
Change the theme dynamically using `setTheme()`:
```ts
// Switch to dark mode
client.setTheme({ mode: 'dark' })
// Change accent color
client.setTheme({ accent: '#ec4899' })
// Update both
client.setTheme({
mode: 'light',
accent: '#3b82f6',
})
```
### Per-method theming
You can also pass theme options to individual methods:
```ts
const result = await client.signMessage({
username: 'alice',
message: 'Hello World',
theme: {
mode: 'dark',
accent: '#10b981',
},
})
```
### Planned features
:::warning
These features are coming soon.
:::
* **Typography** - Custom fonts and text styles
* **Border radius** - Rounded corners configuration
* **CSS variables** - Full control via CSS custom properties
### Next steps
* [Signup & Login](/guides/signup-login) - Add passkey authentication
* [Checkout](/guides/checkout) - Add payments with PayButton
## Token Requests
The `tokenRequests` parameter tells the orchestrator what tokens are needed to execute your transaction. This enables automatic cross-chain funding - users can pay from any chain with any token.
### Rhinestone Warp
1auth is powered by [Rhinestone Warp](https://docs.rhinestone.dev/intents/use-cases/chain-abstracted-swaps) - a cross-chain intent protocol that handles asset movement automatically. When you submit an intent:
1. Warp's solver network finds the optimal route across chains
2. Solvers compete to fulfill your intent at the best price
3. Assets are bridged, swapped, and delivered atomically
4. You get execution guarantees - it either completes fully or reverts
This means users don't need to think about which chain their funds are on. They just sign once, and Warp handles bridging, swapping, and gas across all chains.
### User Experience
When `tokenRequests` is specified, users see exactly what tokens will be used in the signing dialog. This provides full transparency about the transaction before they approve it.
The dialog shows:
* The token being transferred (e.g., USDC)
* The amount in human-readable format
* The destination chain
* Where the funds are coming from (if cross-chain)
### When to Use tokenRequests
Use `tokenRequests` when your intent requires specific tokens to be delivered
on the target chain. `tokenRequests` are not calldata. They describe the token
output the orchestrator must provide before any app call executes.
| Scenario | tokenRequests |
| ------------------------------- | -------------------------------------------------------------------------------------------------- |
| Plain swap via `sendIntent` | **Required** - specify the output token and amount, and set `calls: []` |
| ERC20 transfer via `sendIntent` | **Required** - specify the token and amount being sent, and include the real `ERC20.transfer` call |
| Contract call needing tokens | **Required** - specify tokens the contract will consume |
| Native ETH transfer | Not needed - use `value` field instead |
:::info
Plain swaps are `sendIntent` calls with `tokenRequests` and an empty `calls`
array. If the output token must be consumed by an app action, include the real
target-chain calldata in `calls`.
:::
:::tip
Think of `tokenRequests` and `calls` as separate layers:
`tokenRequests` say "deliver 100 USDC on Base"; `calls` say "now call this
contract." A plain swap uses only the first layer. App workflows such as
payments, deposits, approvals, and marketplace swaps need both layers, and the
calls must be real calldata rather than placeholders.
:::
### How It Works
1. You specify what tokens are needed via `tokenRequests`
2. Orchestrator checks user's balances across all chains
3. Orchestrator finds the optimal route (bridges, swaps) to acquire those tokens
4. User signs once - orchestrator handles everything else
5. Tokens are delivered and your calls execute atomically
### Interface
```tsx
interface TokenRequest {
token: string; // Token contract address on target chain
amount: bigint; // Amount in base units (use parseUnits)
}
```
### Example: ERC20 Transfer
When sending USDC, tell the orchestrator you need USDC:
```tsx
import { encodeFunctionData, parseUnits } from 'viem';
const USDC_BASE = '0x833589fCD6eDb6E08f4c7C32D4f71b54bdA02913';
const amount = parseUnits('100', 6); // 100 USDC
const transferData = encodeFunctionData({
abi: erc20Abi,
functionName: 'transfer',
args: [recipientAddress, amount],
});
const result = await client.sendIntent({
username: 'alice',
targetChain: 8453, // Base
calls: [{
to: USDC_BASE,
data: transferData,
label: 'Send USDC',
sublabel: '100 USDC',
}],
tokenRequests: [{
token: USDC_BASE,
amount: amount,
}],
});
```
Even if Alice has no USDC on Base, the orchestrator will:
* Find her assets on other chains (e.g., USDC on Ethereum, ETH on Arbitrum)
* Bridge/swap to get 100 USDC on Base
* Execute the transfer
### Using with EIP-1193 Provider
The `tokenRequests` parameter also works with [`eth_sendTransaction`](/rpc/eth-send-transaction) and [`wallet_sendCalls`](/rpc/wallet-send-calls):
```tsx
import { createOneAuthProvider } from '@rhinestone/1auth';
const provider = createOneAuthProvider({ client, chainId: 84532 });
// Single transaction with tokenRequests
await provider.request({
method: 'eth_sendTransaction',
params: [{
to: USDC_ADDRESS,
data: transferData,
tokenRequests: [{ token: USDC_ADDRESS, amount }],
}],
});
// Batch calls with tokenRequests
await provider.request({
method: 'wallet_sendCalls',
params: [{
chainId: 84532,
calls: [
{ to: USDC_ADDRESS, data: transfer1Data },
{ to: USDC_ADDRESS, data: transfer2Data },
],
tokenRequests: [{ token: USDC_ADDRESS, amount: totalAmount }],
}],
});
```
### Constraining Source Assets
Use `sourceAssets` to limit which tokens the orchestrator can use as input:
```tsx
const result = await client.sendIntent({
username: 'alice',
targetChain: 8453,
calls: [{ to: USDC_BASE, data: transferData }],
tokenRequests: [{ token: USDC_BASE, amount }],
sourceAssets: ['USDC'], // Only use USDC from any chain
});
```
Without `sourceAssets`, the orchestrator picks the cheapest route from all available balances.
### Usage in Components
#### PayButton
```tsx
Pay 100 USDC
```
See [PayButton](/sdk/pay-button) for more details.
## Integrate into viem / wagmi
Already have an app built with viem or wagmi? You can add 1auth as a wallet provider in minutes. 1auth provides a standard EIP-1193 compatible provider that works seamlessly with any web3 library.
### Why Integrate?
* **Keep your existing code** - No need to rewrite your dApp, just add 1auth as another connector
* **Passkey authentication** - Give your users the option to authenticate with Face ID / Touch ID
* **Chain abstraction** - Your users get unified balances and automatic bridging
* **Works alongside other wallets** - Offer 1auth alongside MetaMask, WalletConnect, and others
This approach is ideal for:
* **Existing dApps** that already use viem/wagmi and want to add passkey support
* **Multi-wallet apps** that want 1auth as one connector option alongside MetaMask, WalletConnect, etc.
* **Developers familiar with the Ethereum stack** who want standard wallet APIs
### Setup
:::code-group
```bash [npm]
npm install @rhinestone/1auth
```
```bash [yarn]
yarn add @rhinestone/1auth
```
```bash [pnpm]
pnpm add @rhinestone/1auth
```
:::
```typescript
import { OneAuthClient, createOneAuthProvider } from '@rhinestone/1auth';
const client = new OneAuthClient({
providerUrl: 'https://passkey.1auth.app',
});
const provider = createOneAuthProvider({ client, chainId: 8453 });
```
### With viem
```typescript
import { createWalletClient, custom } from 'viem';
import { base } from 'viem/chains';
const walletClient = createWalletClient({
chain: base,
transport: custom(provider),
});
// Connect
const [address] = await walletClient.requestAddresses();
// Send transaction
const hash = await walletClient.sendTransaction({
to: '0x...',
value: parseEther('0.01'),
});
```
### With wagmi
```typescript
import { createConfig, http } from 'wagmi';
import { base } from 'wagmi/chains';
import { oneAuth } from '@rhinestone/1auth/wagmi';
const config = createConfig({
chains: [base],
connectors: [oneAuth({ client, chainId: base.id })],
transports: { [base.id]: http() },
});
```
Then use standard wagmi hooks:
```tsx
import { useConnect, useAccount } from 'wagmi';
function App() {
const { connect, connectors } = useConnect();
const { address, isConnected } = useAccount();
if (!isConnected) {
return ;
}
return
Connected: {address}
;
}
```
### Supported Methods
| Method | Description |
| ------------------------ | ----------------------------- |
| `eth_requestAccounts` | Connect and get address |
| `eth_accounts` | Get connected address |
| `personal_sign` | Sign message (EIP-191) |
| `eth_signTypedData_v4` | Sign typed data (EIP-712) |
| `eth_sendTransaction` | Send transaction |
| `wallet_sendCalls` | Batch transactions (EIP-5792) |
| `wallet_getCallsStatus` | Check batch status |
| `wallet_getCapabilities` | Query wallet capabilities |
### Events
```typescript
provider.on('accountsChanged', (accounts) => console.log('Account:', accounts[0]));
provider.on('chainChanged', (chainId) => console.log('Chain:', chainId));
provider.on('disconnect', () => console.log('Disconnected'));
```
See [SDK Reference](/sdk) for more details.
## Swap
Swaps are modeled as intents with `tokenRequests`. A token request describes
the output token and amount the orchestrator must deliver on the target chain.
For a plain swap where the user only receives the output token, send no
calldata:
```ts
calls: []
```
Do not add a dummy token transfer, `{ data: '0x' }`, or a self-transfer to make
the intent look like a transaction. Placeholder calldata changes the review UI
and can cause the quoter to reject the route as unsupported destination
calldata.
:::steps
#### Install the SDK
```bash
npm install @rhinestone/1auth viem
```
#### Create client
```ts [client.ts]
import { OneAuthClient } from '@rhinestone/1auth'
export const client = new OneAuthClient({
providerUrl: 'https://passkey.1auth.app',
})
```
#### Send a swap intent
```ts
import { resolveTokenAddress } from '@rhinestone/1auth'
import { parseUnits } from 'viem'
const usdcOnBase = resolveTokenAddress('USDC', 8453)
const result = await client.sendIntent({
accountAddress: '0x...',
targetChain: 8453,
calls: [],
tokenRequests: [{
token: usdcOnBase,
amount: parseUnits('0.1', 6),
}],
sourceAssets: ['ETH'],
})
if (result.success) {
console.log('Swap intent:', result.intentId)
}
```
#### Done
The orchestrator routes the input asset into the requested output token.
:::
### Cross-chain swap
Use the same shape for cross-chain routes. Constrain the source chain when your
source asset address only exists on one chain:
```ts
import { resolveTokenAddress } from '@rhinestone/1auth'
import { parseUnits } from 'viem'
const BASE_SEPOLIA = 84532
const ARB_SEPOLIA = 421614
const mUSDOnBaseSepolia = '0x2f6fdE5E2AeAB6335d8f978B4d8B2a9c1129AcFb'
const usdcOnArbitrumSepolia = resolveTokenAddress('USDC', ARB_SEPOLIA)
await client.sendIntent({
accountAddress,
targetChain: ARB_SEPOLIA,
calls: [],
tokenRequests: [{
token: usdcOnArbitrumSepolia,
amount: parseUnits('0.1', 6),
}],
sourceAssets: [mUSDOnBaseSepolia],
sourceChainId: BASE_SEPOLIA,
})
```
The orchestrator finds the route, bridges if needed, and delivers the requested
USDC on the target chain.
### Token requests vs calls
Use this distinction when deciding what to send:
| Intent shape | Use it for | What to send |
| -------------------------------- | ----------------------------------------- | ----------------------------------------------------------------- |
| Plain swap | User receives an output token | `sendIntent({ calls: [], tokenRequests })` |
| ERC20 payment | User sends tokens to a recipient | Real `ERC20.transfer(...)` calldata plus matching `tokenRequests` |
| Contract action requiring tokens | Contract consumes tokens during execution | Real app calldata plus matching `tokenRequests` |
`tokenRequests` answer "what token output must exist on the target chain?"
`calls` answer "what contract action should execute with that output?" Plain
swaps only need the first layer. Payments, deposits, approvals, and marketplace
actions need both layers.
### Funding target-chain execution
When the delivered token must be consumed by a contract call, include the real
call and the token request together:
```ts
import { encodeFunctionData, parseUnits } from 'viem'
import { resolveTokenAddress } from '@rhinestone/1auth'
const USDC_BASE = resolveTokenAddress('USDC', 8453)
const amount = parseUnits('100', 6)
const transferData = encodeFunctionData({
abi: erc20Abi,
functionName: 'transfer',
args: [recipientAddress, amount],
})
await client.sendIntent({
accountAddress,
targetChain: 8453,
calls: [{
to: USDC_BASE,
data: transferData,
label: 'Send USDC',
sublabel: '100 USDC',
}],
tokenRequests: [{
token: USDC_BASE,
amount,
}],
})
```
### Constraining source assets
If you omit `sourceAssets`, the orchestrator can choose from available balances.
Pass `sourceAssets` and optionally `sourceChainId` to restrict the input side:
```ts
await client.sendIntent({
accountAddress,
targetChain: 8453,
calls: [],
tokenRequests: [{
token: resolveTokenAddress('USDC', 8453),
amount: parseUnits('100', 6),
}],
sourceAssets: ['ETH', 'WETH'],
})
```
Use token addresses when constraining to a specific source chain. Use symbols
only when the token symbol is supported by the registry for the route you want.
### Tracking status
`sendIntent` returns an intent id. Pass `waitForHash: true` when you need the
transaction hash before the promise resolves:
```ts
const result = await client.sendIntent({
accountAddress,
targetChain: 8453,
calls: [],
tokenRequests: [{
token: resolveTokenAddress('USDC', 8453),
amount: parseUnits('0.1', 6),
}],
waitForHash: true,
closeOn: 'completed',
})
if (result.success) {
console.log(result.intentId)
console.log(result.transactionHash)
}
```
You can also poll later with `getIntentStatus(result.intentId)`.
### Next steps
* [Token Requests](/guides/crosschain/token-requests) - Request specific token outputs
* [Batch Transactions](/guides/batch-transactions) - Queue multiple operations
## Token Requests
Token requests enable the **output-first model** for crosschain transactions. Instead of specifying which tokens to spend (input), you specify what tokens you need to receive (output). The orchestrator automatically finds the optimal route to deliver those tokens.
### Why output-first?
Traditional blockchain transactions require you to:
1. Know exactly which token to spend
2. Calculate swap rates and slippage
3. Handle bridging between chains
4. Manage gas tokens on each chain
With token requests, you simply say "I need 100 USDC on Base" and the orchestrator handles everything else.
#### Benefits
* **Simpler UX** - Users don't need to think about routing or bridging
* **Optimal routing** - Orchestrator finds the cheapest path across all chains
* **Flexible funding** - Uses whatever assets the user has available
* **Single signature** - User signs once with their passkey
### Using token requests
Add `tokenRequests` to your `sendCalls` to specify what tokens you need:
:::code-group
```tsx [Example.tsx]
import { useSendCalls } from 'wagmi'
import { parseUnits } from 'viem'
const USDC_BASE = '0x833589fCD6eDb6E08f4c7C32D4f71b54bdA02913'
export function BuyWithUSDC() {
const { sendCalls, isPending } = useSendCalls()
const handlePurchase = () => {
sendCalls({
calls: [{
to: '0x...', // Your contract
data: '0x...', // Purchase calldata
}],
chainId: 8453, // Execute on Base
tokenRequests: [ // [!code ++]
{ // [!code ++]
token: USDC_BASE, // [!code ++]
amount: parseUnits('50', 6), // 50 USDC // [!code ++]
}, // [!code ++]
], // [!code ++]
})
}
return (
)
}
```
:::
### How it works
When you include `tokenRequests`:
1. **Orchestrator analyzes** the user's balances across all supported chains
2. **Finds optimal route** - cheapest combination of bridges and swaps
3. **Executes atomically** - bridging, swapping, and your calls all succeed or fail together
4. **Delivers tokens** - the requested tokens arrive on the target chain before your calls execute
### TokenRequest object
| Field | Type | Description |
| -------- | -------- | ---------------------------------------------------------------- |
| `token` | `string` | ERC-20 token contract address on the target chain |
| `amount` | `bigint` | Amount in base units (e.g., `parseUnits('100', 6)` for 100 USDC) |
### Multiple token requests
You can request multiple tokens in a single transaction:
```tsx
sendCalls({
calls: [{ to: '0x...', data: '0x...' }],
chainId: 8453,
tokenRequests: [
{
token: '0x833589fCD6eDb6E08f4c7C32D4f71b54bdA02913', // USDC
amount: parseUnits('100', 6),
},
{
token: '0x4200000000000000000000000000000000000006', // WETH
amount: parseUnits('0.05', 18),
},
],
})
```
### Common use cases
#### E-commerce checkout
User wants to buy an item priced in USDC, but only has ETH on mainnet:
```tsx
sendCalls({
calls: [{
to: SHOP_CONTRACT,
data: encodeFunctionData({
abi: shopAbi,
functionName: 'purchase',
args: [itemId],
}),
}],
chainId: 8453, // Shop is on Base
tokenRequests: [{
token: USDC_BASE,
amount: parseUnits('29.99', 6), // Item price
}],
})
```
#### DeFi interactions
Provide liquidity with tokens from any chain:
```tsx
sendCalls({
calls: [{
to: LP_CONTRACT,
data: encodeFunctionData({
abi: lpAbi,
functionName: 'addLiquidity',
args: [amount0, amount1],
}),
}],
chainId: 42161, // Arbitrum
tokenRequests: [
{ token: USDC_ARB, amount: parseUnits('1000', 6) },
{ token: WETH_ARB, amount: parseUnits('0.5', 18) },
],
})
```
#### NFT minting
Mint an NFT with payment in any token:
```tsx
sendCalls({
calls: [{
to: NFT_CONTRACT,
data: encodeFunctionData({
abi: nftAbi,
functionName: 'mint',
args: [tokenId],
}),
}],
chainId: 8453,
tokenRequests: [{
token: USDC_BASE,
amount: parseUnits('0.5', 6), // Mint price
}],
})
```
### Next steps
* [Crosschain](/guides/crosschain) - Back to crosschain overview
* [Batch Transactions](/guides/batch-transactions) - Combine multiple operations
## Lost Passkey Recovery
If a user loses their phone, gets a new laptop, or their passkey simply stops working, they can recover their account through **guardians** — trusted backup signers that can authorize adding a new passkey.
### Guardians
A guardian is someone (or something) that can vouch for the account owner during recovery. 1auth supports two types:
* **Google account** — The user links their Google account during setup. During recovery, they sign in with Google to prove their identity. This is the recommended default.
* **Personal backup** — The user creates a passphrase-based backup key. The passphrase never leaves the browser — it's used locally to derive a signing key. This works fully offline, but the user must remember or securely store the passphrase.
Both guardians can be set up together with a threshold: require **one** (either guardian can authorize recovery) or **both** (both must approve). Most users should use a threshold of one for simplicity.
### Setting Up Recovery
Users set up recovery directly in the 1auth dialog — the same popup they use to sign in and approve transactions. The setup flow walks them through three steps:
1. **Link a Google account** — Sign in with Google to register it as an external guardian. This binds the user's Google identity to the account on-chain.
2. **Optional personal backup** — Create a passphrase-based backup key, or connect an external wallet as a second guardian
3. **Confirm with biometrics** — Approve the guardian configuration with Face ID, Touch ID, or another authenticator. The setup is deployed on-chain across all supported chains.
Once configured, the user's account can be recovered even if their original passkey device is completely lost.
### Recovering an Account
When a user needs to recover, they open the recovery flow from any app that integrates 1auth:
1. **Identify their account** — Enter their account address or username. The system looks up the guardian configuration on-chain.
2. **Register a new passkey** — Create a new passkey on their current device using Face ID, Touch ID, or another authenticator
3. **Prove their identity** — Sign in with Google (or enter their passphrase) to authenticate with the guardian. The guardian verifies this against the identity linked during setup.
4. **Automatic execution** — The recovery transaction is submitted across all chains where the account is deployed. Once confirmed, the user can sign in with their new passkey immediately.
The entire process takes a few minutes. No funds are at risk during recovery — the account remains secure and unchanged until the recovery transaction completes.
### For Developers
To let users set up recovery from your app, open the account management dialog:
```typescript
await client.openAccountDialog();
```
This opens the 1auth dialog where users can configure their guardians, link their Google account, and set a recovery threshold. The dialog handles the full setup flow including on-chain deployment.
If a user has lost their passkey and needs to recover, the recovery flow is accessible from the 1auth login dialog — users click "Recover" to start the process. No additional SDK integration is needed.
Users can also manage their recovery settings at [account.1auth.app](https://account.1auth.app).
## Recovery
With traditional authentication, losing access usually means losing your account. Password resets depend on email providers. Seed phrases, once lost, are gone forever. 1auth takes a different approach.
Every 1auth account is a smart contract on the blockchain. The account's rules — who can sign, who can authorize recovery — are stored on-chain, not in any single company's database. This means recovery can work through multiple independent paths, and no single point of failure can permanently lock a user out.
### Two Recovery Scenarios
Recovery in 1auth is designed around two fundamentally different situations:
#### The user loses their passkey
A phone breaks, a laptop is stolen, or a passkey simply stops working. The user is fine — they just need a way to prove who they are and register a new passkey on a new device. This is handled by **guardians**: trusted signers that the user sets up in advance (like a linked Google account) that can vouch for their identity and authorize adding a new passkey.
[Learn how lost passkey recovery works](/architecture/lost-passkey)
#### The service goes offline
The 1auth service itself becomes unavailable — temporarily or permanently. In this case, the user still has their passkey, but the infrastructure they normally interact with is gone. Because the account and its recovery configuration live entirely on-chain, **independent signers** that operate outside of 1auth can step in. The user proves their identity directly to these signers, who authorize recovery by reading verification data straight from the blockchain.
[Learn how trustless recovery works](/architecture/trustless-recovery)
### The Underlying Principle
Both scenarios share the same design principle: the user's account is defined by on-chain state, not by any service's availability. Guardians, identity commitments, and signer configurations are all stored in the smart contract. Any authorized party — whether it's the 1auth backend, an independent signer, or a decentralized network — can read that state and help the user recover, as long as the user can prove they are who they say they are.
## Trustless Recovery
1auth accounts are self-custodial smart contracts deployed on-chain. If the 1auth service goes offline — whether temporarily or permanently — users never lose access to their funds or their account. This page explains the safeguards that make this possible.
### Your Account Lives On-Chain
When a user creates a 1auth account, a smart contract is deployed to the blockchain. This contract holds the user's assets and enforces who can authorize transactions. The 1auth service helps manage this account, but it does not control it — only the user's passkey (or their recovery guardians) can authorize changes.
If 1auth becomes unavailable:
* **Funds remain safe** — Assets are in the on-chain smart contract, not in any 1auth database
* **Account state is unchanged** — The account's signers, guardians, and configuration are all stored on-chain
* **No one can lock you out** — 1auth has no admin key or backdoor into user accounts
### Independent Recovery Signers
To ensure recovery works without the 1auth backend, the guardian system uses **independent recovery signers** — services that run separately from 1auth and can authorize recovery on their own.
When a user sets up recovery with their Google account, the linked guardian is an independent signing service. This service:
* Runs on its own infrastructure, separate from 1auth
* Reads the user's guardian configuration directly from the blockchain
* Verifies the user's identity through Google sign-in
* Authorizes recovery without contacting the 1auth backend at any point
Because the signer reads all verification data from the blockchain and the identity provider directly, it has no dependency on 1auth being online.
### Lit Protocol: Decentralized Recovery
:::note[Coming Soon]
Lit Protocol integration is currently in development. Once live, it will provide a fully decentralized recovery path with no single point of failure.
:::
For even stronger guarantees, 1auth will use [Lit Protocol](https://litprotocol.com) as a decentralized recovery signer. Instead of relying on a single signing service, the recovery key is split across a distributed network of nodes.
How it works:
* **No single point of failure** — The signing key is distributed across the Lit network. No single node holds the complete key.
* **Threshold signing** — A minimum number of nodes must agree before a recovery signature is produced. Compromising a few nodes is not enough to forge a signature.
* **Programmable conditions** — Recovery is only authorized when the user proves their identity (e.g., Google sign-in), enforced by the network itself
* **Fully independent** — The Lit network operates independently of 1auth, its infrastructure, and its team
This means that even in the worst case — 1auth shuts down entirely, its servers go offline, and its team is unreachable — users will be able to recover their accounts through the Lit network by proving their identity.
### The Self-Custody Guarantee
Traditional wallets and auth providers create a dependency: if the service disappears, users may lose access. 1auth is built differently:
| Scenario | What happens |
| ----------------------------------- | ------------------------------------------------------------------------------ |
| 1auth service goes down temporarily | Users can still transact via recovery signers or wait for service to return |
| 1auth shuts down permanently | Users recover via independent signers and Lit Protocol |
| A recovery signer goes offline | Other guardians (personal backup, Lit Protocol) can still authorize recovery |
| User loses their passkey | Guardians authorize adding a new passkey — no dependency on any single service |
The account is always the user's. The infrastructure around it is designed so that no single failure — technical or organizational — can lock them out.
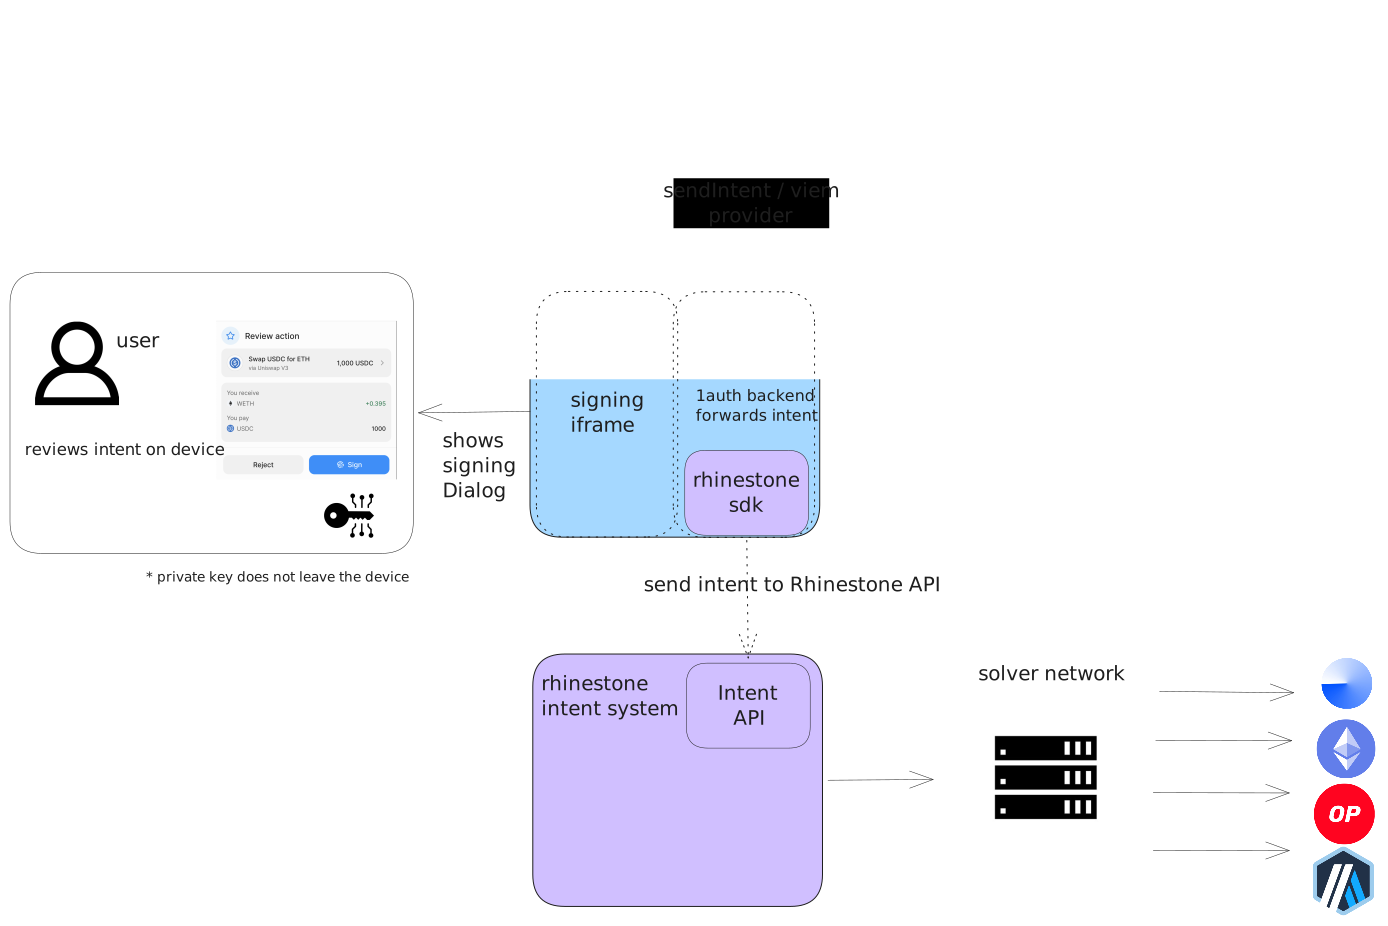 ### 1auth Service
The 1auth service runs at `passkey.1auth.app` and consists of two main parts:
#### Passkey Provider (iframe)
The passkey provider runs in a secure iframe embedded in your application and handles all WebAuthn operations:
* Passkey registration and authentication
* EIP-712 typed data signing
* Intent preparation and user approval
* Session persistence across origins
The iframe architecture ensures that passkey credentials are never exposed to the parent application, providing an additional layer of security.
:::note[White-Labeling]
The `passkey.1auth.app` domain can be whitelabeled to your own domain, so the wallet experience is fully branded and siloed to your application. Contact us for whitelabel setup.
:::
##### Cross-App Session Persistence
Because the passkey provider runs on a dedicated domain (`passkey.1auth.app`), users stay logged in across all apps that integrate 1auth. Session state is stored in the provider's localStorage and cookies, separate from each app's origin.
This means:
* **One login, many apps** - Users authenticate once and are recognized across all 1auth-powered apps
* **No unnecessary repeated passkey prompts** - Returning users get a seamless experience
* **App isolation** - Individual apps never access session data directly; they communicate through the secure iframe
#### 1auth Backend
The backend integrates the [Rhinestone Orchestrator SDK](https://docs.rhinestone.dev) to handle onchain execution:
* Receives signed intents from the passkey provider
* Uses Rhinestone SDK to convert intents into executable transactions
* Submits transactions across multiple chains
* Handles gas sponsorship and transaction monitoring
### Chain Abstraction
1auth accounts are fully chain abstracted, powered by the Rhinestone SDK. Users interact with a single account that works seamlessly across all supported chains:
| Feature | Description |
| ------------------------- | ------------------------------------------------------------------- |
| **Cross-chain execution** | Execute transactions on any supported chain from a single signature |
| **Unified balances** | Users see aggregated balances across chains |
| **Automatic bridging** | Assets are bridged as needed to fulfill transactions |
| **Gas sponsorship** | Users never need native tokens for gas |
| **MEV protection** | Transactions are protected from front-running and sandwich attacks |
### Crosschain Keystore
The 1auth keystore maps a user's passkey-secured identity to their smart account ownership across supported chains. Instead of asking users to register and recover accounts chain-by-chain, 1auth keeps ownership changes coordinated so the same passkey and recovery configuration can apply wherever the account is used.
This is what lets a recovered account regain access across chains with one authorization. The passkey remains the user's signing root, while the onchain account configuration gives every supported chain the same view of who can sign and who can authorize recovery.
### Smart Account
Each user gets a fully [self-custodial](/self-custody) smart contract account that supports modular functionality via [ERC-7579](https://erc7579.com). The account is controlled by a passkey validator module that verifies WebAuthn signatures onchain—only the user can authorize transactions.
Key features:
* Counterfactual deployment (account exists before first transaction)
* Modular architecture for extensibility
* Same address on EVM chains
### Request Flow
1. **User Action** - User clicks PayButton or initiates transaction in your app
2. **SDK Request** - 1auth SDK sends the transaction request to the passkey provider iframe
3. **Passkey Signing** - User reviews and authenticates with Face ID/Touch ID
4. **Backend Processing** - Signed intent is sent to 1auth backend
5. **Rhinestone Execution** - Backend uses Rhinestone SDK to execute onchain
6. **Confirmation** - SDK receives confirmation, updates UI
### Learn More
* [Rhinestone Documentation](https://docs.rhinestone.dev/home/introduction/welcome-to-rhinestone) - Deep dive into the underlying infrastructure
* [Passkeys](/passkey) - How passkeys provide secure, non-custodial authentication
## FAQ
### General
#### What is 1auth?
1auth is a passkey-based authentication and transaction signing SDK for smart accounts. It lets users authenticate and sign transactions using biometrics (Face ID, Touch ID, Windows Hello) instead of seed phrases or browser extensions.
#### Do users need a wallet extension?
No. 1auth uses passkeys which are built into modern browsers and operating systems. No extensions or apps required.
#### Which chains are supported?
1auth supports any EVM-compatible chain. Transactions are executed via cross-chain intents, so users can pay from any chain.
### Accounts
#### What type of account do users get?
Each user gets a smart contract account (ERC-7579 modular account) controlled by their passkey. The account is fully self-custodial—only the user can authorize transactions.
#### Is my account address the same on every chain?
Yes. Your 1auth account has the same address on all EVM chains. You can receive funds on any chain to the same address.
#### What is chain abstraction?
Chain abstraction means users don't need to think about which chain they're on. Powered by [Rhinestone](https://rhinestone.wtf), 1auth handles bridging assets and executing transactions across chains automatically. Users see a unified balance and can pay from any chain.
#### Do I need to bridge tokens manually?
No. When you make a transaction, 1auth automatically bridges assets as needed. You never need to manually bridge or worry about having the right tokens on the right chain.
#### Can I use the same account across different apps?
Yes. Your 1auth account works across all apps that integrate 1auth. Because authentication happens on a shared provider domain (`passkey.1auth.app`), you stay logged in across apps—no need to re-authenticate for each one.
### Compatibility
#### Which browsers are supported?
Passkeys work in all modern browsers:
| Browser | Support |
| ------- | -------------------- |
| Chrome | Full support (v109+) |
| Safari | Full support (v16+) |
| Firefox | Full support (v122+) |
| Edge | Full support (v109+) |
#### Which devices support passkeys?
| Platform | Passkey Storage |
| ----------- | -------------------------------------------- |
| macOS / iOS | iCloud Keychain (syncs across Apple devices) |
| Windows | Windows Hello |
#### Do password managers work with passkeys?
Yes. These password managers support passkey storage and sync:
| Password Manager | Passkey Support |
| ---------------- | ---------------------- |
| 1Password | Full support |
| Bitwarden | Full support |
| iCloud Keychain | Native (Apple devices) |
Using a password manager lets you sync passkeys across all your devices and browsers.
### Integration
#### Do I need viem or wagmi?
No. The React components work standalone without any web3 libraries. If you already use viem/wagmi, we provide adapters for those too.
#### Can I test against 1auth from localhost?
No. Passkeys (WebAuthn) require a [secure context](https://developer.mozilla.org/en-US/docs/Web/Security/Secure_Contexts), and browsers block passkey operations on plain `http://` origins other than `localhost` itself. Because 1auth authenticates on a separate provider domain (`passkey.1auth.app`), the cross-origin iframe and credential scoping make `http://localhost` unreliable or non-functional for the full authentication flow.
To develop locally, use one of these approaches:
* **Self-signed certificate + `/etc/hosts`** — Generate a self-signed TLS cert, add an entry like `127.0.0.1 local.myapp.dev` to `/etc/hosts`, and serve your app over HTTPS on that hostname.
* **[Tailscale](https://tailscale.com/kb/1153/enabling-https/)** — Tailscale can provision valid HTTPS certificates for your machine via `tailscale cert`, giving you a `*.ts.net` domain that works out of the box.
* **[Caddy](https://caddyserver.com/)** — Use Caddy as a local reverse proxy; it automatically provisions locally-trusted TLS certificates.
#### Is there a testnet?
Yes. Pass `testnets: true` when creating your client to operate on testnet chains only:
```tsx
const client = new OneAuthClient({ testnets: true });
```
### Security
#### How are passkeys secured?
Passkeys use public key cryptography. The private key never leaves the user's device and is protected by the device's secure enclave (TPM, Secure Enclave, etc.).
#### What happens if a user loses their device?
Passkeys sync across devices via iCloud Keychain, Google Password Manager, or Windows Hello. Users can also register multiple passkeys as backup.
## Introduction
Passkey-based authentication and transaction signing for smart accounts. Build secure, gasless, cross-chain applications without the complexity.
### What is 1auth?
1auth provides a complete authentication and transaction signing solution built on top of WebAuthn passkeys and smart contract accounts. It enables your users to interact with blockchain applications using just their device's biometrics - no seed phrases, no browser extensions, no gas fees.
### Motivation
Traditional wallet experiences create friction at every step. Users must manage seed phrases, install browser extensions, manage gas tokens, and understand complex blockchain concepts before they can interact with applications. The goal of 1auth is to abstract all this with a simple, but powerful, embedded wallet solution that leverages passkeys.
Passkeys are an open source tool that any developer can leverage. So why use 1auth? Building a produciton-ready passkey wallet from scratch is hard:
* **Key recovery** - If a user loses their device, how do they regain access? Passkeys sync across devices via platform providers (such as iCloud and Google), but coordinating this with onchain accounts in a self-custodial manner requires careful architecture.
* **Crosschain key management (i.e., keystore)** - Passkey credentials must be mapped to smart account ownership across multiple chains, with proper validation methods deployed and maintained onchain.
* **Crosschain complexity** - A single user action might require bridging assets, managing random gas tekens to execute on a different chain, and monitoring multiple transactions.
* **Gas abstraction** - Users shouldn't need native tokens on every chain. Sponsoring gas requires paymaster integration and infrastructure across all supported chains.
1auth handles all of this so you can focus on your application.
### The advantages of 1auth
* **Full self-custody** - Users hold their own keys in device secure hardware. 1auth never has access to private key material.
* **Transact on any chain** - One account works across all supported chains with automatic bridging and unified balances.
* **No seed phrases, no extensions** - Users authenticate with Face ID or Touch ID, in any modern browser.
* **Gasless by default** - Transactions are sponsored. Users never need native tokens.
### 1auth Use Cases
#### Fintechs
Build applications with crypto functionality while maintaining a non-custodial architecture. Because 1auth never holds keys, your application can align with unhosted wallet classifications under MiCA, SEC, and FinCEN frameworks. See [Self-Custody & Compliance](/self-custody).
#### Crypto Consumer Apps
Create a clean new user onboarding experience using familiar web2 flows (Oauth, SSO, etc) that is fully self-custodial, highly performant (with transaction signing local to the user), and with great economics (passkeys leverage existing device hardware at zero infrastructure cost).
#### DeFi Onboarding
Bring new users into DeFi without the traditional wallet setup barrier. 1auth's EIP-1193 provider works with viem, wagmi, and ethers, so you can integrate with existing DeFi tooling while offering a Web2-like sign-up experience.
#### Multi-Chain Applications
Build applications that work across chains without users managing multiple wallets or bridging assets manually. 1auth accounts have unified balances and execute transactions on any supported chain from a single signature.
#### Agents
Generate wallets for AI agents or enable co-piloted self-custodial wallets between your users and agents using session keys for scoped agent spending authorisations.
### Self-Custody
1auth is built on a fully self-custodial architecture. Private keys are generated and stored exclusively in the user's device secure hardware (Secure Enclave, TPM). 1auth cannot access, reconstruct, or use private keys—and cannot sign transactions or censor users on their behalf.
This means users have true ownership of their assets with no third-party risk, while developers benefit from reduced compliance burden.
[Learn more about Self-Custody & Compliance →](/self-custody)
## Why Passkeys
Passkeys are the foundation of 1auth's security model. They provide a user-friendly alternative to passwords and seed phrases, while ensuring your users maintain full custody of their private keys.
### What are Passkeys?
Passkeys are a modern authentication standard based on [WebAuthn (FIDO2)](https://www.w3.org/TR/webauthn-2/). Instead of remembering passwords or securing seed phrases, users authenticate with their device's built-in biometrics:
* **Face ID** or **Touch ID** on Apple devices
* **Windows Hello** on Windows devices
* **Fingerprint sensors** on Android devices
Each passkey is bound to a specific domain and protected by the device's secure hardware. They cannot be reused on a different site, which makes credential theft through fake websites ineffective.
### How Passkeys Work
Passkeys use public key cryptography:
1. **Registration**: When a user creates an account, their device generates a key pair. The private key is stored in secure hardware (Secure Enclave, TPM), while the public key is sent to the server.
2. **Authentication**: When signing in or signing a transaction, the server sends a challenge. The device signs this challenge with the private key after biometric verification.
3. **Verification**: The server verifies the signature using the stored public key.
The critical point: **the private key never leaves the device**. The server only ever sees the public key and signed challenges.
```
┌─────────────────────────────────────────────────────────┐
│ User's Device │
│ │
│ ┌──────────────────┐ ┌─────────────────────────┐ │
│ │ Biometric │ │ Secure Hardware │ │
│ │ Verification │─────▶│ (Secure Enclave) │ │
│ │ │ │ │ │
│ │ Face ID │ │ Private Key Stored │ │
│ │ Touch ID │ │ Signing Operations │ │
│ └──────────────────┘ └───────────┬─────────────┘ │
│ │ │
└────────────────────────────────────────┼────────────────┘
│ Signed Intent
▼
┌─────────────────────┐
│ 1auth Server │
│ │
│ Public Key Only │
│ No Key Material │
└─────────────────────┘
```
### Benefits
#### For Users
* **Full self-custody** - Private keys live in your device's secure hardware. No third party—including 1auth—can access or move your assets. Secure enough for anyone to use.
* **No passwords or seed phrases** - Just use Face ID or Touch ID. Nothing to remember, write down, or lose.
* **Cross-platform sync** - Passkeys sync across your devices via iCloud Keychain, Google Password Manager, or Windows Hello, so you're never locked to a single device.
* **Simple and familiar** - The same biometric experience as unlocking your phone or making an Apple Pay purchase.
#### For Developers
* **Self-custody = regulatory hedge** - Because users hold their own keys, your application can align with non-custodial wallet classifications. No custody license required.
* **Clean user onboarding** - No wallet downloads, no seed phrase UX, no browser extension requirements. Users sign up with a single biometric prompt.
* **Fast conversion** - Users are more likely to complete sign-up without password friction or extension install steps.
* **Cost-effective** - No MPC infrastructure, no key management servers, no HSMs. Passkeys leverage existing device hardware at zero infrastructure cost.
* **Standard browser APIs** - WebAuthn is supported in all modern browsers with no dependencies.
### Passkey Support
Passkey support is effectively universal on modern hardware.
| Platform | Passkey Support | Source |
| --------------- | --------------- | ---------------------------------------------------- |
| **iOS / macOS** | 95%+ | [passkeys.dev](https://passkeys.dev/device-support/) |
| **Android** | 95%+ | [passkeys.dev](https://passkeys.dev/device-support/) |
| **Windows** | \~75% | [passkeys.dev](https://passkeys.dev/device-support/) |
:::note[Windows Support]
TPM 2.0—which enables Windows Hello and passkey support—has been built into essentially all CPUs since 2015 (Intel PTT, AMD fTPM). Microsoft **mandated** it for all new Windows device certifications **starting 2016**.
:::
#### Password Manager Support
Major password managers also support passkey storage and sync, extending coverage beyond platform-native implementations:
| Password Manager | Passkey Support |
| ---------------- | ------------------------------- |
| **1Password** | Full support (all platforms) |
| **Dashlane** | Full support (all platforms) |
| **Bitwarden** | Full support (all platforms) |
| **Enpass** | Full support (desktop + mobile) |
| **NordPass** | Full support (all platforms) |
This means users can store and sync passkeys through their preferred password manager, independent of their device platform.
### How 1auth Uses Passkeys
1auth leverages passkeys throughout the authentication and transaction flow:
1. **Account Creation** - User registers a passkey, creating a smart account controlled by that passkey
2. **Authentication** - Users authenticate with biometrics via WebAuthn
3. **Transaction Signing** - EIP-712 typed data is signed using the passkey's private key
4. **Cross-Origin Security** - The passkey provider runs in a secure iframe, isolating credentials from your application
This architecture ensures that even if your application is compromised, the user's private keys remain protected in their device's secure hardware.
## Quick Start
::::steps
#### Install the SDK
:::code-group
```bash [npm]
npm install @rhinestone/1auth
```
```bash [yarn]
yarn add @rhinestone/1auth
```
```bash [pnpm]
pnpm add @rhinestone/1auth
```
:::
#### Get a JWT signing key
Every user intent is authenticated with your app's JWT — there is no
anonymous fallback. Create an app in the
[Rhinestone dashboard](https://dashboard.rhinestone.dev) to generate a
signing key, then expose two same-origin endpoints that mint the JWTs the
SDK attaches to each intent. See [Fee Sponsorship](/guides/fee-sponsorship)
for the full server setup.
#### Initialize Client
```tsx
import { OneAuthClient } from '@rhinestone/1auth';
const client = new OneAuthClient({
providerUrl: 'https://passkey.1auth.app',
// Required for intents — points at the endpoints you created above.
sponsorship: {
accessTokenUrl: '/api/sponsorship/access-token',
extensionTokenUrl: '/api/sponsorship/extension-token',
},
});
```
:::tip
A client without `sponsorship` configured rejects every `sendIntent` call
with `MISSING_APP_CREDENTIALS`. See [Fee Sponsorship](/guides/fee-sponsorship)
to wire up the token endpoints.
:::
::::
### Next Steps
### 1auth Service
The 1auth service runs at `passkey.1auth.app` and consists of two main parts:
#### Passkey Provider (iframe)
The passkey provider runs in a secure iframe embedded in your application and handles all WebAuthn operations:
* Passkey registration and authentication
* EIP-712 typed data signing
* Intent preparation and user approval
* Session persistence across origins
The iframe architecture ensures that passkey credentials are never exposed to the parent application, providing an additional layer of security.
:::note[White-Labeling]
The `passkey.1auth.app` domain can be whitelabeled to your own domain, so the wallet experience is fully branded and siloed to your application. Contact us for whitelabel setup.
:::
##### Cross-App Session Persistence
Because the passkey provider runs on a dedicated domain (`passkey.1auth.app`), users stay logged in across all apps that integrate 1auth. Session state is stored in the provider's localStorage and cookies, separate from each app's origin.
This means:
* **One login, many apps** - Users authenticate once and are recognized across all 1auth-powered apps
* **No unnecessary repeated passkey prompts** - Returning users get a seamless experience
* **App isolation** - Individual apps never access session data directly; they communicate through the secure iframe
#### 1auth Backend
The backend integrates the [Rhinestone Orchestrator SDK](https://docs.rhinestone.dev) to handle onchain execution:
* Receives signed intents from the passkey provider
* Uses Rhinestone SDK to convert intents into executable transactions
* Submits transactions across multiple chains
* Handles gas sponsorship and transaction monitoring
### Chain Abstraction
1auth accounts are fully chain abstracted, powered by the Rhinestone SDK. Users interact with a single account that works seamlessly across all supported chains:
| Feature | Description |
| ------------------------- | ------------------------------------------------------------------- |
| **Cross-chain execution** | Execute transactions on any supported chain from a single signature |
| **Unified balances** | Users see aggregated balances across chains |
| **Automatic bridging** | Assets are bridged as needed to fulfill transactions |
| **Gas sponsorship** | Users never need native tokens for gas |
| **MEV protection** | Transactions are protected from front-running and sandwich attacks |
### Crosschain Keystore
The 1auth keystore maps a user's passkey-secured identity to their smart account ownership across supported chains. Instead of asking users to register and recover accounts chain-by-chain, 1auth keeps ownership changes coordinated so the same passkey and recovery configuration can apply wherever the account is used.
This is what lets a recovered account regain access across chains with one authorization. The passkey remains the user's signing root, while the onchain account configuration gives every supported chain the same view of who can sign and who can authorize recovery.
### Smart Account
Each user gets a fully [self-custodial](/self-custody) smart contract account that supports modular functionality via [ERC-7579](https://erc7579.com). The account is controlled by a passkey validator module that verifies WebAuthn signatures onchain—only the user can authorize transactions.
Key features:
* Counterfactual deployment (account exists before first transaction)
* Modular architecture for extensibility
* Same address on EVM chains
### Request Flow
1. **User Action** - User clicks PayButton or initiates transaction in your app
2. **SDK Request** - 1auth SDK sends the transaction request to the passkey provider iframe
3. **Passkey Signing** - User reviews and authenticates with Face ID/Touch ID
4. **Backend Processing** - Signed intent is sent to 1auth backend
5. **Rhinestone Execution** - Backend uses Rhinestone SDK to execute onchain
6. **Confirmation** - SDK receives confirmation, updates UI
### Learn More
* [Rhinestone Documentation](https://docs.rhinestone.dev/home/introduction/welcome-to-rhinestone) - Deep dive into the underlying infrastructure
* [Passkeys](/passkey) - How passkeys provide secure, non-custodial authentication
## FAQ
### General
#### What is 1auth?
1auth is a passkey-based authentication and transaction signing SDK for smart accounts. It lets users authenticate and sign transactions using biometrics (Face ID, Touch ID, Windows Hello) instead of seed phrases or browser extensions.
#### Do users need a wallet extension?
No. 1auth uses passkeys which are built into modern browsers and operating systems. No extensions or apps required.
#### Which chains are supported?
1auth supports any EVM-compatible chain. Transactions are executed via cross-chain intents, so users can pay from any chain.
### Accounts
#### What type of account do users get?
Each user gets a smart contract account (ERC-7579 modular account) controlled by their passkey. The account is fully self-custodial—only the user can authorize transactions.
#### Is my account address the same on every chain?
Yes. Your 1auth account has the same address on all EVM chains. You can receive funds on any chain to the same address.
#### What is chain abstraction?
Chain abstraction means users don't need to think about which chain they're on. Powered by [Rhinestone](https://rhinestone.wtf), 1auth handles bridging assets and executing transactions across chains automatically. Users see a unified balance and can pay from any chain.
#### Do I need to bridge tokens manually?
No. When you make a transaction, 1auth automatically bridges assets as needed. You never need to manually bridge or worry about having the right tokens on the right chain.
#### Can I use the same account across different apps?
Yes. Your 1auth account works across all apps that integrate 1auth. Because authentication happens on a shared provider domain (`passkey.1auth.app`), you stay logged in across apps—no need to re-authenticate for each one.
### Compatibility
#### Which browsers are supported?
Passkeys work in all modern browsers:
| Browser | Support |
| ------- | -------------------- |
| Chrome | Full support (v109+) |
| Safari | Full support (v16+) |
| Firefox | Full support (v122+) |
| Edge | Full support (v109+) |
#### Which devices support passkeys?
| Platform | Passkey Storage |
| ----------- | -------------------------------------------- |
| macOS / iOS | iCloud Keychain (syncs across Apple devices) |
| Windows | Windows Hello |
#### Do password managers work with passkeys?
Yes. These password managers support passkey storage and sync:
| Password Manager | Passkey Support |
| ---------------- | ---------------------- |
| 1Password | Full support |
| Bitwarden | Full support |
| iCloud Keychain | Native (Apple devices) |
Using a password manager lets you sync passkeys across all your devices and browsers.
### Integration
#### Do I need viem or wagmi?
No. The React components work standalone without any web3 libraries. If you already use viem/wagmi, we provide adapters for those too.
#### Can I test against 1auth from localhost?
No. Passkeys (WebAuthn) require a [secure context](https://developer.mozilla.org/en-US/docs/Web/Security/Secure_Contexts), and browsers block passkey operations on plain `http://` origins other than `localhost` itself. Because 1auth authenticates on a separate provider domain (`passkey.1auth.app`), the cross-origin iframe and credential scoping make `http://localhost` unreliable or non-functional for the full authentication flow.
To develop locally, use one of these approaches:
* **Self-signed certificate + `/etc/hosts`** — Generate a self-signed TLS cert, add an entry like `127.0.0.1 local.myapp.dev` to `/etc/hosts`, and serve your app over HTTPS on that hostname.
* **[Tailscale](https://tailscale.com/kb/1153/enabling-https/)** — Tailscale can provision valid HTTPS certificates for your machine via `tailscale cert`, giving you a `*.ts.net` domain that works out of the box.
* **[Caddy](https://caddyserver.com/)** — Use Caddy as a local reverse proxy; it automatically provisions locally-trusted TLS certificates.
#### Is there a testnet?
Yes. Pass `testnets: true` when creating your client to operate on testnet chains only:
```tsx
const client = new OneAuthClient({ testnets: true });
```
### Security
#### How are passkeys secured?
Passkeys use public key cryptography. The private key never leaves the user's device and is protected by the device's secure enclave (TPM, Secure Enclave, etc.).
#### What happens if a user loses their device?
Passkeys sync across devices via iCloud Keychain, Google Password Manager, or Windows Hello. Users can also register multiple passkeys as backup.
## Introduction
Passkey-based authentication and transaction signing for smart accounts. Build secure, gasless, cross-chain applications without the complexity.
### What is 1auth?
1auth provides a complete authentication and transaction signing solution built on top of WebAuthn passkeys and smart contract accounts. It enables your users to interact with blockchain applications using just their device's biometrics - no seed phrases, no browser extensions, no gas fees.
### Motivation
Traditional wallet experiences create friction at every step. Users must manage seed phrases, install browser extensions, manage gas tokens, and understand complex blockchain concepts before they can interact with applications. The goal of 1auth is to abstract all this with a simple, but powerful, embedded wallet solution that leverages passkeys.
Passkeys are an open source tool that any developer can leverage. So why use 1auth? Building a produciton-ready passkey wallet from scratch is hard:
* **Key recovery** - If a user loses their device, how do they regain access? Passkeys sync across devices via platform providers (such as iCloud and Google), but coordinating this with onchain accounts in a self-custodial manner requires careful architecture.
* **Crosschain key management (i.e., keystore)** - Passkey credentials must be mapped to smart account ownership across multiple chains, with proper validation methods deployed and maintained onchain.
* **Crosschain complexity** - A single user action might require bridging assets, managing random gas tekens to execute on a different chain, and monitoring multiple transactions.
* **Gas abstraction** - Users shouldn't need native tokens on every chain. Sponsoring gas requires paymaster integration and infrastructure across all supported chains.
1auth handles all of this so you can focus on your application.
### The advantages of 1auth
* **Full self-custody** - Users hold their own keys in device secure hardware. 1auth never has access to private key material.
* **Transact on any chain** - One account works across all supported chains with automatic bridging and unified balances.
* **No seed phrases, no extensions** - Users authenticate with Face ID or Touch ID, in any modern browser.
* **Gasless by default** - Transactions are sponsored. Users never need native tokens.
### 1auth Use Cases
#### Fintechs
Build applications with crypto functionality while maintaining a non-custodial architecture. Because 1auth never holds keys, your application can align with unhosted wallet classifications under MiCA, SEC, and FinCEN frameworks. See [Self-Custody & Compliance](/self-custody).
#### Crypto Consumer Apps
Create a clean new user onboarding experience using familiar web2 flows (Oauth, SSO, etc) that is fully self-custodial, highly performant (with transaction signing local to the user), and with great economics (passkeys leverage existing device hardware at zero infrastructure cost).
#### DeFi Onboarding
Bring new users into DeFi without the traditional wallet setup barrier. 1auth's EIP-1193 provider works with viem, wagmi, and ethers, so you can integrate with existing DeFi tooling while offering a Web2-like sign-up experience.
#### Multi-Chain Applications
Build applications that work across chains without users managing multiple wallets or bridging assets manually. 1auth accounts have unified balances and execute transactions on any supported chain from a single signature.
#### Agents
Generate wallets for AI agents or enable co-piloted self-custodial wallets between your users and agents using session keys for scoped agent spending authorisations.
### Self-Custody
1auth is built on a fully self-custodial architecture. Private keys are generated and stored exclusively in the user's device secure hardware (Secure Enclave, TPM). 1auth cannot access, reconstruct, or use private keys—and cannot sign transactions or censor users on their behalf.
This means users have true ownership of their assets with no third-party risk, while developers benefit from reduced compliance burden.
[Learn more about Self-Custody & Compliance →](/self-custody)
## Why Passkeys
Passkeys are the foundation of 1auth's security model. They provide a user-friendly alternative to passwords and seed phrases, while ensuring your users maintain full custody of their private keys.
### What are Passkeys?
Passkeys are a modern authentication standard based on [WebAuthn (FIDO2)](https://www.w3.org/TR/webauthn-2/). Instead of remembering passwords or securing seed phrases, users authenticate with their device's built-in biometrics:
* **Face ID** or **Touch ID** on Apple devices
* **Windows Hello** on Windows devices
* **Fingerprint sensors** on Android devices
Each passkey is bound to a specific domain and protected by the device's secure hardware. They cannot be reused on a different site, which makes credential theft through fake websites ineffective.
### How Passkeys Work
Passkeys use public key cryptography:
1. **Registration**: When a user creates an account, their device generates a key pair. The private key is stored in secure hardware (Secure Enclave, TPM), while the public key is sent to the server.
2. **Authentication**: When signing in or signing a transaction, the server sends a challenge. The device signs this challenge with the private key after biometric verification.
3. **Verification**: The server verifies the signature using the stored public key.
The critical point: **the private key never leaves the device**. The server only ever sees the public key and signed challenges.
```
┌─────────────────────────────────────────────────────────┐
│ User's Device │
│ │
│ ┌──────────────────┐ ┌─────────────────────────┐ │
│ │ Biometric │ │ Secure Hardware │ │
│ │ Verification │─────▶│ (Secure Enclave) │ │
│ │ │ │ │ │
│ │ Face ID │ │ Private Key Stored │ │
│ │ Touch ID │ │ Signing Operations │ │
│ └──────────────────┘ └───────────┬─────────────┘ │
│ │ │
└────────────────────────────────────────┼────────────────┘
│ Signed Intent
▼
┌─────────────────────┐
│ 1auth Server │
│ │
│ Public Key Only │
│ No Key Material │
└─────────────────────┘
```
### Benefits
#### For Users
* **Full self-custody** - Private keys live in your device's secure hardware. No third party—including 1auth—can access or move your assets. Secure enough for anyone to use.
* **No passwords or seed phrases** - Just use Face ID or Touch ID. Nothing to remember, write down, or lose.
* **Cross-platform sync** - Passkeys sync across your devices via iCloud Keychain, Google Password Manager, or Windows Hello, so you're never locked to a single device.
* **Simple and familiar** - The same biometric experience as unlocking your phone or making an Apple Pay purchase.
#### For Developers
* **Self-custody = regulatory hedge** - Because users hold their own keys, your application can align with non-custodial wallet classifications. No custody license required.
* **Clean user onboarding** - No wallet downloads, no seed phrase UX, no browser extension requirements. Users sign up with a single biometric prompt.
* **Fast conversion** - Users are more likely to complete sign-up without password friction or extension install steps.
* **Cost-effective** - No MPC infrastructure, no key management servers, no HSMs. Passkeys leverage existing device hardware at zero infrastructure cost.
* **Standard browser APIs** - WebAuthn is supported in all modern browsers with no dependencies.
### Passkey Support
Passkey support is effectively universal on modern hardware.
| Platform | Passkey Support | Source |
| --------------- | --------------- | ---------------------------------------------------- |
| **iOS / macOS** | 95%+ | [passkeys.dev](https://passkeys.dev/device-support/) |
| **Android** | 95%+ | [passkeys.dev](https://passkeys.dev/device-support/) |
| **Windows** | \~75% | [passkeys.dev](https://passkeys.dev/device-support/) |
:::note[Windows Support]
TPM 2.0—which enables Windows Hello and passkey support—has been built into essentially all CPUs since 2015 (Intel PTT, AMD fTPM). Microsoft **mandated** it for all new Windows device certifications **starting 2016**.
:::
#### Password Manager Support
Major password managers also support passkey storage and sync, extending coverage beyond platform-native implementations:
| Password Manager | Passkey Support |
| ---------------- | ------------------------------- |
| **1Password** | Full support (all platforms) |
| **Dashlane** | Full support (all platforms) |
| **Bitwarden** | Full support (all platforms) |
| **Enpass** | Full support (desktop + mobile) |
| **NordPass** | Full support (all platforms) |
This means users can store and sync passkeys through their preferred password manager, independent of their device platform.
### How 1auth Uses Passkeys
1auth leverages passkeys throughout the authentication and transaction flow:
1. **Account Creation** - User registers a passkey, creating a smart account controlled by that passkey
2. **Authentication** - Users authenticate with biometrics via WebAuthn
3. **Transaction Signing** - EIP-712 typed data is signed using the passkey's private key
4. **Cross-Origin Security** - The passkey provider runs in a secure iframe, isolating credentials from your application
This architecture ensures that even if your application is compromised, the user's private keys remain protected in their device's secure hardware.
## Quick Start
::::steps
#### Install the SDK
:::code-group
```bash [npm]
npm install @rhinestone/1auth
```
```bash [yarn]
yarn add @rhinestone/1auth
```
```bash [pnpm]
pnpm add @rhinestone/1auth
```
:::
#### Get a JWT signing key
Every user intent is authenticated with your app's JWT — there is no
anonymous fallback. Create an app in the
[Rhinestone dashboard](https://dashboard.rhinestone.dev) to generate a
signing key, then expose two same-origin endpoints that mint the JWTs the
SDK attaches to each intent. See [Fee Sponsorship](/guides/fee-sponsorship)
for the full server setup.
#### Initialize Client
```tsx
import { OneAuthClient } from '@rhinestone/1auth';
const client = new OneAuthClient({
providerUrl: 'https://passkey.1auth.app',
// Required for intents — points at the endpoints you created above.
sponsorship: {
accessTokenUrl: '/api/sponsorship/access-token',
extensionTokenUrl: '/api/sponsorship/extension-token',
},
});
```
:::tip
A client without `sponsorship` configured rejects every `sendIntent` call
with `MISSING_APP_CREDENTIALS`. See [Fee Sponsorship](/guides/fee-sponsorship)
to wire up the token endpoints.
:::
::::
### Next Steps